
Can I sharpen a hand saw? Absolutely! If you’ve ever wondered about reviving your dull hand saw, you’re in the right place. Sharpening a hand saw may sound challenging, but with a little know-how, it can be a rewarding and practical skill to have. So, grab your tool belt and get ready to learn how to breathe new life into your trusty hand saw.
Now, you might be thinking, “Why should I bother sharpening my hand saw?” Well, a sharp hand saw cuts through wood like a hot knife through butter! When you sharpen a hand saw, you improve its cutting efficiency, making your woodworking projects smoother and more enjoyable. Plus, you’ll save money by extending the lifespan of your saw rather than buying a new one. So, let’s dive into the fascinating world of hand saw sharpening!
In this guide, we’ll walk you through the step-by-step process, complete with handy tips and tricks, for sharpening your hand saw. You’ll learn about the essential tools you’ll need, the proper technique for filing the teeth, and how to maintain a consistent tooth geometry. So, if you’re ready to unleash the full potential of your hand saw, let’s get started on this sharpening adventure!
Sharpening a hand saw is definitely possible! By following these steps, you can bring new life to your dull saw blade:
- Clean the saw blade using a wire brush to remove dirt and debris.
- Secure the saw blade in a vise.
- Use a file to sharpen the teeth of the saw, maintaining a consistent angle.
- File in one direction, away from your body, for optimal results.
- Test the sharpness by making a few cuts on scrap wood.
With a little practice, you’ll be able to sharpen your hand saw like a pro!

Can I Sharpen a Hand Saw?
Hand saws are essential tools for any DIY enthusiast or professional carpenter. Over time, the teeth on a hand saw can become dull, making it difficult to achieve precise and clean cuts. Many people wonder if they can sharpen a hand saw themselves, or if it’s better to leave the task to professionals. In this article, we will explore the process of sharpening a hand saw, the tools and techniques involved, and whether it’s feasible for an amateur to undertake this task.
Understanding Hand Saw Teeth
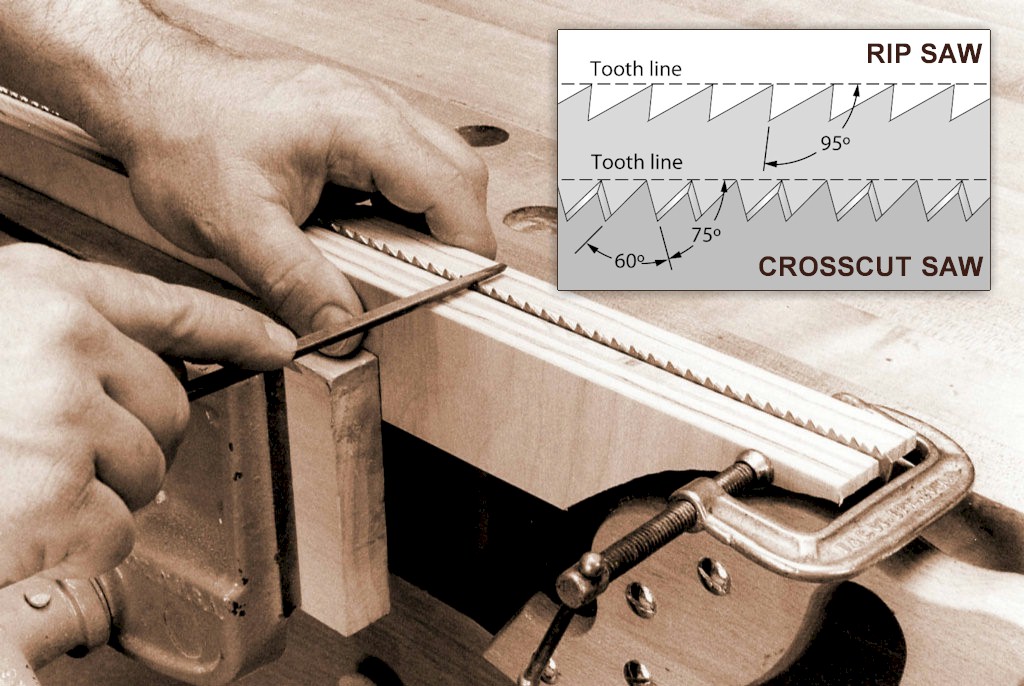
To comprehend how to sharpen a hand saw, it’s crucial to have a basic understanding of the different types of hand saw teeth. Hand saws usually feature two types of teeth: rip teeth and crosscut teeth. Rip teeth are designed to cut along the grain of the wood, while crosscut teeth are meant for cutting across the grain. Each tooth has a specific shape and angle that contributes to its cutting efficiency.
Step 1: Gathering the Necessary Tools
Before embarking on the sharpening process, gather the necessary tools and materials. You will need a saw file or a triangular file that matches the size of the saw teeth, a saw set to adjust the tooth set, a saw vice to hold the saw securely, and a lubricant such as oil or beeswax to minimize friction.
Make sure to choose a file that matches the number of teeth per inch (TPI) of your saw. For instance, a saw with 10 TPI requires a file labeled as “10-inch saw file”. Investing in high-quality tools will ensure better results and make the task easier for you.
Step 2: Cleaning the Saw
Before you can sharpen a hand saw, it’s important to clean it thoroughly. Remove any rust, grime, or debris by wiping it with a rag and a suitable cleaning solution. A mixture of vinegar and water can be effective in removing rust, while mild dish soap works well for general cleaning. Allow the saw to dry completely before proceeding to the next step.
Step 3: Setting the Teeth
Setting the teeth involves adjusting the angle at which they lean to either side. This ensures that the saw kerf (the groove created by the saw) is wider than the saw blade, preventing it from getting stuck while cutting. Use a saw set to bend the teeth slightly in alternating directions. Be careful not to set the teeth too aggressively, as this can cause the saw to bind during cutting.
Step 4: Filing the Teeth
Now that the teeth are set, it’s time to sharpen them. Position the saw firmly in a vice to prevent it from moving while you file. Hold the file at the correct angle — typically 60-75 degrees for rip teeth and 75-85 degrees for crosscut teeth — and push it along each tooth using smooth, consistent strokes. Make sure to apply even pressure and avoid putting too much force, as this can damage the teeth.
Step 5: Finishing Touches
After you have filed all the teeth, it’s essential to do some finishing touches to ensure a smooth and effortless cutting experience. Use a small triangular file or a feather-edge file to remove burrs from the sides and tips of the teeth. This will eliminate any rough edges and improve the overall performance of the saw. Finally, lubricate the teeth with a suitable lubricant to minimize friction and restore the saw’s cutting efficiency.
Benefits of Sharpening a Hand Saw
Sharpening a hand saw can significantly enhance its performance and longevity. By restoring the sharpness of the teeth, you’ll be able to achieve cleaner and more accurate cuts, saving time and effort in your woodworking projects. Additionally, sharpening your own hand saw can be a cost-effective solution, as professional sharpening services can be quite expensive in the long run.
Common Mistakes to Avoid
While sharpening a hand saw can be a rewarding task, there are some common mistakes that beginners should avoid. One of the most common errors is applying too much pressure while filing, which can lead to damaged teeth or an uneven saw blade. It’s crucial to maintain a steady pace and use gentle and controlled strokes to ensure consistent results.
Another mistake to avoid is neglecting to set the teeth before filing. Setting the teeth ensures that the saw doesn’t bind or get stuck while cutting, resulting in smoother and more efficient cuts. Additionally, using the wrong file size or not properly cleaning the saw before sharpening can also negatively impact the results.
Tips for Successful Hand Saw Sharpening
Follow these tips to ensure successful hand saw sharpening:
- Select the right file size for your saw.
- Ensure the teeth are properly set before filing.
- Maintain a consistent filing angle for each tooth.
- Take breaks to avoid overheating the file.
- Inspect the teeth regularly during the sharpening process.
- Avoid applying too much pressure while filing.
- Remove burrs for a clean finish.
- Lubricate the teeth after sharpening to reduce friction.
- Practice on a spare or old saw before sharpening your main saw.
Hand Saw Sharpening: Professional Vs. DIY
Many people question whether they should sharpen their hand saws themselves or leave the task to professionals. While professional sharpening services offer convenience, they can be costly and may require you to be without your saw for several days. On the other hand, sharpening a hand saw can be a rewarding experience for DIY enthusiasts.
By sharpening your own hand saw, you gain greater control over the process and can achieve a level of sharpness that meets your specific needs. Additionally, it can save you money in the long run, as you won’t have to rely on external services for routine maintenance.
Sharpening a Hand Saw: Final Thoughts
If you’re a woodworking enthusiast or a professional carpenter, learning how to sharpen a hand saw is a valuable skill that can enhance your cutting efficiency and save you money in the long run. While it may seem daunting at first, with the right tools and techniques, you’ll be able to maintain and sharpen your saws like a pro. Follow the steps outlined in this article, avoid common mistakes, and practice regularly. With time and experience, you’ll become proficient in sharpening your hand saws and achieve precise, clean, and effortless cuts in your woodworking projects.
Can I Sharpen a Hand Saw?
Yes, you can sharpen a hand saw to improve its cutting ability.
- Regular sharpening ensures smooth and efficient cuts.
- Use a file or a saw set to sharpen the teeth.
- Follow the proper angle and direction for sharpening.
- Remove any rust or dirt before sharpening.
- Test the sharpness by making a few test cuts.
Frequently Asked Questions
In this section, we will answer some common questions about sharpening a hand saw.
1. Why should I sharpen my hand saw?
Sharpening your hand saw is important to maintain its cutting efficiency. Over time, saw teeth can become dull and less effective, making it harder to cut through materials. By sharpening your hand saw, you can restore its cutting ability and make your work easier and more efficient.
Regular sharpening also helps prolong the lifespan of your hand saw. When the teeth are sharp, they require less force to cut, reducing the strain on the saw blade. This can prevent the blade from wearing out quickly and save you money in the long run.
2. How do I know if my hand saw needs sharpening?
There are a few signs that indicate your hand saw needs sharpening. First, if you notice that the saw is no longer cutting through materials as easily as it used to, it’s a sign that the teeth have become dull. You may also see burn marks on the wood or notice that the saw is leaving rough and uneven cuts.
Another test is to run your finger along the cutting edge of the saw teeth. If they feel smooth instead of sharp and slightly jagged, it’s time to sharpen the saw. Regular maintenance and sharpening will ensure that your hand saw stays in top condition and performs optimally.
3. Can I sharpen a hand saw myself?
Yes, you can sharpen a hand saw yourself, but it requires some knowledge and the right tools. If you’re comfortable with DIY projects and have experience with sharpening blades, you can try sharpening your hand saw at home.
Before sharpening, make sure to research the proper technique and invest in a quality saw file or a sharpening kit specifically designed for hand saws. Follow the instructions carefully and take your time to ensure the best results. If you’re unsure or unfamiliar with the process, it’s always a good idea to consult a professional or seek guidance from experienced woodworkers.
4. How often should I sharpen my hand saw?
The frequency of sharpening your hand saw will depend on how often you use it and the materials you cut. As a general guideline, it’s recommended to sharpen your hand saw every few months if you’re using it regularly. However, if you’re working with more abrasive materials or notice a decline in cutting performance, you may need to sharpen it more frequently.
Ultimately, it’s best to sharpen your hand saw when you notice a decrease in its cutting ability or when the saw starts showing signs of dullness. Regular maintenance and sharpening will help keep your hand saw in optimal condition, ensuring that it performs at its best.
5. Can I use a hand file to sharpen my hand saw?
Using a hand file to sharpen a hand saw is not recommended. Hand files are typically designed for smaller blades and may not provide the best results for a hand saw. Instead, it’s better to use a saw file or a sharpening kit specifically made for hand saws.
Saw files have a triangular shape that matches the tooth geometry of a hand saw, allowing for more precise sharpening. They are available in different sizes to match the tooth size and pitch of your hand saw. Investing in the right tools will ensure that you can effectively sharpen your hand saw and maintain its cutting performance.
How To Sharpen A Crosscut Hand Saw
Summary
So, can you sharpen a hand saw? Yes, you can! To sharpen a hand saw, you’ll need a saw file and a vise to securely hold the saw. Start by cleaning the saw and remove any rust or debris. Then, use the file to sharpen the teeth, making sure to maintain the original angles. Remember to file the teeth in one direction only, and apply even pressure. Finally, take your time, be patient, and test the sharpness of the saw by making a few cuts. With practice, you’ll be able to sharpen your hand saw like a pro!
In conclusion, sharpening a hand saw is a simple process that requires a few tools and some practice. By following the steps outlined above, you can keep your hand saw in top shape, ensuring that it cuts smoothly and efficiently. So, don’t be afraid to give it a try and bring new life to your old hand saw!