
When it comes to crafting with acrylic, you might be wondering, “Can you cut acrylic on a table saw?” Well, let’s dive in and find out! Acrylic, also known as Plexiglas or acrylic glass, is a versatile material commonly used in DIY projects and crafts. But can you safely use a table saw to cut it?
Using a table saw can be a great option for cutting acrylic, but there are a few things to consider. First, it’s important to choose the right blade. A fine-toothed blade with carbide tips is ideal for achieving clean, precise cuts.
Safety is paramount when working with power tools, so make sure you wear protective gear like safety glasses and gloves. Additionally, take it slow and steady, allowing the saw to do the work without forcing the material through. With the right precautions and techniques, cutting acrylic on a table saw can be a breeze!
Discover the Best Practices for Cutting Acrylic on a Table Saw
If you’re wondering how to cut acrylic on a table saw, follow this step-by-step guide. Remember to prioritize your safety by wearing protective gear and taking precautionary measures.
- Prepare the table saw by setting the blade height and adjusting the fence.
- Mark the acrylic where you want to make the cut.
- Secure the acrylic to prevent it from moving during cutting.
- Turn on the table saw and slowly push the acrylic through the blade.
- Once the cut is complete, turn off the saw and carefully remove the acrylic.
Remember to practice caution and precision when cutting acrylic on a table saw to achieve the best results.
Can You Cut Acrylic on a Table Saw?
Introduction: Acrylic is a versatile material that is commonly used in various applications, including crafting, construction, and signage. However, if you are considering cutting acrylic on a table saw, it is important to understand the potential challenges and risks involved. In this comprehensive article, we will delve into the topic of cutting acrylic on a table saw, providing you with the necessary information to make an informed decision and ensure safe and accurate cuts.
Understanding Acrylic and its Properties
Acrylic, also known as Plexiglas or acrylic glass, is a type of plastic that offers exceptional transparency and weather resistance. It is a popular alternative to traditional glass due to its lightweight nature and impact resistance. Acrylic can be found in various thicknesses and colors, making it suitable for a wide range of applications.
When it comes to cutting acrylic on a table saw, it is important to understand the material’s properties. Acrylic is brittle and prone to cracking or chipping if not handled correctly. It also has a tendency to melt when subjected to high heat. Therefore, proper precautions and techniques must be followed to achieve clean and accurate cuts without damaging the material.
Choosing the Right Blade
When it comes to cutting acrylic on a table saw, the choice of blade is crucial. A general-purpose blade with a high tooth count is recommended for cutting acrylic. Blades with many teeth, such as an 80-tooth or 100-tooth blade, are ideal as they produce smoother cuts with minimal chipping or melting. It is crucial to ensure that the blade is sharp, as a dull blade can cause more heat buildup and increase the risk of melting or chipping the acrylic.
Additionally, consider using a blade with a low cutting angle, such as a triple-chip grind (TCG) blade or an alternate top bevel (ATB) blade. These types of blades help reduce heat buildup and minimize the chances of melting the acrylic. Avoid using rip-cutting blades or cross-cutting blades with large gullets, as they are not designed for cutting acrylic and may result in rough cuts or excessive chipping.
Tips:
- Choose a blade with a high tooth count (80-tooth or 100-tooth) for cleaner cuts.
- Ensure the blade is sharp to minimize heat buildup.
- Consider using a blade with a low cutting angle (TCG or ATB) to reduce the chances of melting the acrylic.
Preparing the Table Saw for Acrylic Cuts
Prior to cutting acrylic on a table saw, it is essential to properly prepare the table saw for the task. Follow these steps to ensure a smooth and safe cutting process:
Step 1: Adjust the Blade Height
Set the blade height to approximately 1/8 inch higher than the thickness of the acrylic sheet. This allows for a cleaner cut without excessive friction or heat buildup.
Step 2: Install a Zero-Clearance Insert
Installing a zero-clearance insert around the blade reduces the risk of the acrylic sheet from splintering or chipping as it passes through the blade. This insert provides support throughout the entire cutting process and helps maintain cleaner cuts.
Step 3: Use a Fence or Guide
Whenever possible, use a fence or guide to ensure straight and precise cuts. This helps maintain control over the acrylic sheet and minimizes the chances of the blade catching or causing the material to splinter.
Step 4: Ensure Dust Collection
Acrylic produces fine dust particles when cut, which can be hazardous if inhaled. It is important to have proper dust collection mechanisms in place to minimize the release of dust into the air. Use a dust collection system or wear a protective mask to reduce the risk of inhaling the particles.
Tips:
- Set the blade height slightly higher than the thickness of the acrylic sheet for cleaner cuts.
- Install a zero-clearance insert to minimize splintering or chipping.
- Utilize a fence or guide to ensure straight and precise cuts.
- Keep dust collection mechanisms in place to reduce the risk of inhaling acrylic dust particles.
Common Challenges and Safety Precautions
Challenges
Cutting acrylic on a table saw can present several challenges, including:
- Friction and Heat Buildup: Acrylic has a low melting point, and excessive heat can cause the material to chip or melt. To prevent this, it is important to use a sharp blade and avoid feeding the acrylic too slowly or too quickly.
- Chipping and Splintering: Acrylic is prone to chipping or splintering if not properly supported. Using a zero-clearance insert and a fence or guide can help mitigate this issue.
- Vibrations: Acrylic can vibrate or chatter during the cutting process, resulting in rough cuts or inaccurate measurements. Ensuring the acrylic is properly secured and using a push stick or featherboard can help minimize vibrations and achieve smoother cuts.
Tips:
- Feed the acrylic steadily, neither too slowly nor too quickly, to minimize heat buildup.
- Provide adequate support and use a zero-clearance insert and a fence or guide to prevent chipping and splintering.
- Secure the acrylic sheet and use a push stick or featherboard to minimize vibrations.
Safety Precautions
When cutting acrylic on a table saw, it is important to prioritize safety. Here are some key safety precautions to follow:
- Wear Protective Gear: Always wear safety goggles to protect your eyes from flying debris and dust. Additionally, consider wearing gloves to prevent cuts or scratches while handling the acrylic sheet.
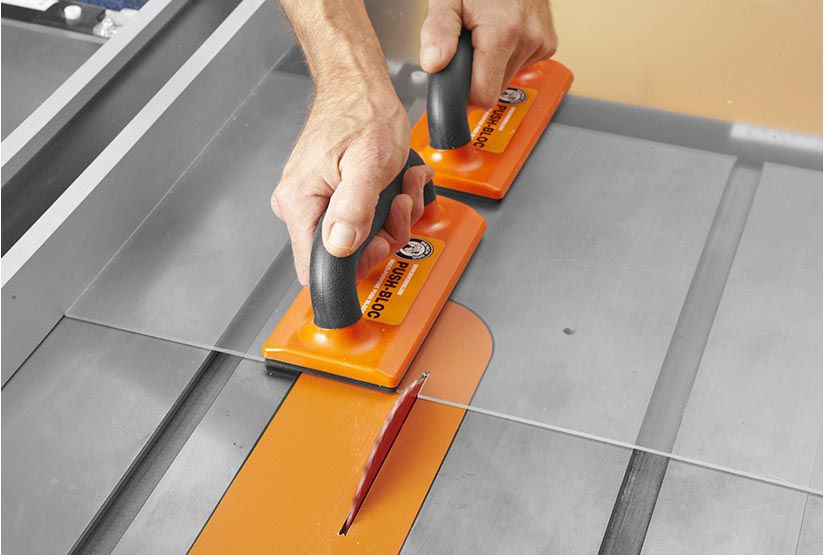
- Maintain a Safe Distance: Keep your hands and fingers at a safe distance from the blade to avoid accidents. Use a push stick or other appropriate tools to guide the acrylic through the saw.
- Be Mindful of Dust: Acrylic dust can be harmful if inhaled. Wear a mask or use a dust collection system to minimize exposure to the dust particles.
- Work in a Well-Ventilated Area: Cutting acrylic can release fumes. It is important to work in a well-ventilated area to minimize the inhalation of potentially harmful gases.
Tips:
- Wear safety goggles and gloves to protect yourself from debris and potential injuries.
- Use appropriate tools like push sticks to maintain a safe distance from the blade.
- Utilize a mask or dust collection system to minimize exposure to acrylic dust.
- Work in a well-ventilated workspace to reduce the inhalation of fumes.
Table Saw Alternatives for Acrylic Cutting
If you are uncomfortable cutting acrylic on a table saw or do not have access to one, there are alternative methods that you can consider:
Using a Circular Saw with a Fine-Toothed Blade
A circular saw equipped with a fine-toothed blade can be used to cut acrylic. Follow similar precautions as cutting on a table saw, such as wearing protective gear and ensuring proper support and guidance for the acrylic sheet. Keep in mind that a circular saw may not provide the same level of precision as a table saw.
Using a Jigsaw with a Downward Cutting Blade
A jigsaw with a downward cutting blade can also be used to cut acrylic. This method allows for more intricate cuts and curved shapes. However, it may require more care and attention to achieve clean and accurate cuts.
Using Laser Cutting or CNC Machining
If precision and intricate cuts are essential, consider outsourcing the cutting process to professionals with access to laser cutting or CNC (Computer Numeric Control) machining. These methods offer high accuracy and are ideal for complex designs or intricate patterns.
Whether you choose to cut acrylic on a table saw or explore alternative methods, it is important to prioritize safety and follow the appropriate guidelines and precautions.
In Summary
While cutting acrylic on a table saw is possible, it requires careful consideration and adherence to safety precautions. Choose the right blade, prepare the table saw appropriately, and be mindful of the challenges and risks involved. If you are uncomfortable or unsure, alternate methods such as using a circular saw or jigsaw, or outsourcing to professionals with laser cutting or CNC machining capabilities, are viable options. Prioritize safety at all times and make informed decisions to achieve clean and accurate cuts on your acrylic projects.
Key Takeaways – Can You Cut Acrylic on a Table Saw?
- Yes, you can cut acrylic on a table saw, but proper safety measures should be taken.
- Acrylic is a brittle material and can crack easily, so it’s important to use the right blade.
- Using a high tooth count blade with fine teeth can reduce the risk of chipping and cracking.
- Slow down the feed rate when cutting acrylic to prevent heat buildup and melting.
- Wearing safety glasses and using a splitter or riving knife can help prevent kickback and ensure a smoother cut.
Frequently Asked Questions
When it comes to cutting acrylic, many people wonder if it can be done on a table saw. Here, we address some common questions about cutting acrylic on a table saw, providing answers that are easy to understand.
Q: What precautions should I take when cutting acrylic on a table saw?
A: When cutting acrylic on a table saw, safety should be a top priority. Wear protective gear such as safety glasses and gloves to protect your eyes and hands from any potential debris. Make sure the saw blade is suitable for cutting acrylic and adjust the blade height to minimize the risk of chipping or cracking. It’s also beneficial to use a push stick or push block to maintain a safe distance from the blade.
While cutting, feed the acrylic slowly and steadily, ensuring that it doesn’t bind or flex, as this can lead to inaccurate cuts or damage. Additionally, it is recommended to make multiple light passes rather than one heavy pass to avoid putting excessive strain on the acrylic and reduce the likelihood of mistakes or accidents.
Q: Can I use any type of blade to cut acrylic on a table saw?
A: No, not all blades are suitable for cutting acrylic. To ensure a clean and accurate cut, it is important to use a blade specifically designed for cutting acrylic or plastic. These blades typically have a high tooth count and a low or negative hook angle to prevent chipping and minimize heat buildup. Using a regular wood-cutting blade can result in rough edges, melting, or even the blade getting stuck in the material, posing a safety hazard.
Investing in the right blade will not only improve the quality of your cuts but also prolong the life of your blade by reducing stress and wear caused by cutting materials it is not designed for.
Q: How should I prepare the acrylic sheet before cutting it on the table saw?
A: Before cutting acrylic on a table saw, it is important to prepare the sheet properly. Start by removing any protective films or coatings from both sides of the acrylic to prevent them from melting or interfering with the blade. Next, ensure that the sheet is securely clamped or supported to prevent it from moving or vibrating during the cutting process. This will help maintain accurate cuts and prevent accidents.
Carefully measure and mark the cutting line on the acrylic using a straight edge and a marker that is suitable for marking on plastic. Double-check the measurements to ensure accuracy. Taking these steps to prepare the acrylic sheet will help you achieve clean and precise cuts.
Q: Can I cut complex shapes out of acrylic using a table saw?
A: While a table saw is great for straight cuts, cutting complex shapes out of acrylic is better suited for other tools like a jigsaw or a scroll saw. These tools allow for more intricate and curved cuts with better control. Trying to cut complex shapes on a table saw can be challenging and may result in inaccurate cuts or damage to the acrylic sheet. Consider choosing the appropriate tool for the job to achieve the best results.
For more complex shapes, using a pattern or stencil can also help guide the cutting process. Attach the pattern securely to the acrylic sheet to ensure it doesn’t move or shift while cutting. Take your time and proceed with caution to achieve precise and accurate cuts.
Q: Are there any alternative methods for cutting acrylic besides using a table saw?
A: Yes, there are a few alternative methods for cutting acrylic if you don’t have access to a table saw or if you need to make more complex cuts. One option is using a circular saw with a fine-toothed blade designed for cutting plastic. Another option is using a handheld rotary tool with a cutting wheel attachment for smaller cuts or precise detailing.
Another common method is using a scoring knife to create a groove along the desired cutting line and then snapping the acrylic along the scored line. This method is suitable for thinner acrylic sheets and can result in clean cuts with minimal chipping.
Summary
Here’s what you need to know about cutting acrylic on a table saw. Acrylic is a type of plastic that can be easily cut with a table saw, as long as you use the right blade and take appropriate safety precautions. Make sure to use a blade specifically designed for cutting plastics, and set the height of the blade so it just barely clears the thickness of the acrylic. Remember to wear safety goggles and gloves, and use a push stick or sled to guide the acrylic through the blade. Go slow and steady, and you’ll have a clean cut in no time.
However, it’s important to note that cutting acrylic on a table saw does come with some risks. Acrylic can chip or crack during the cutting process, so it’s always a good idea to practice on scrap pieces first. Additionally, the process can create a lot of heat, so be careful not to overheat the blade or the acrylic. With the right precautions, cutting acrylic on a table saw can be a safe and effective way to achieve precise cuts for your projects.