Can you cut dado with a circular saw? If you’re curious about this woodworking technique, you’ve come to the right place! In this article, we’ll explore the possibilities of using a circular saw to create dados and share some tips and tricks along the way. So, grab your safety goggles and let’s dive into the world of dado cutting!
Circular saws are versatile tools that are commonly used for making straight cuts in various materials like wood and plastic. But can they handle the precision and accuracy required for cutting dados? The answer is yes, with the right setup and approach, you can use a circular saw to create dado joints for your woodworking projects.
Now, you might be wondering, what exactly is a dado? Well, imagine a groove or channel that runs across the grain of a piece of wood. That’s a dado! Dados are commonly used to join pieces of wood together, creating strong and secure connections. Whether you’re building shelves, cabinets, or other types of furniture, knowing how to cut dado joints can take your woodworking skills to the next level.
So, if you’re ready to learn more about using a circular saw to cut dados and unlock a world of woodworking possibilities, let’s get started!
– Set the blade depth to the desired width of the dado.
– Mark the starting and stopping points of the dado.
– Adjust the saw fence to guide the cut.
– Make multiple passes to fully remove the material.
– Clean up the edges with a chisel or dado clean-out tool.
With this guide, you’ll be able to make precise dado cuts using a circular saw.

Can You Cut Dado with a Circular Saw? A Comprehensive Guide
When it comes to woodworking, one common technique that often arises is creating dado joints. These joints are used to join two pieces of wood together, providing strength and stability. While dado joints can be made with specialized tools like a table saw or a dado blade, many woodworkers wonder if they can achieve the same results with a circular saw. In this article, we will explore the possibility of cutting dado joints with a circular saw and provide you with all the information you need to know to successfully accomplish this technique.
Understanding Dado Joints
Before we dive into the details of using a circular saw for dado joints, it is essential to have a clear understanding of what dado joints are. A dado joint is a square or rectangular groove cut across the grain or along the length of a piece of wood. These grooves are then used to fit another piece of wood, forming a strong bond between the two. Dado joints are commonly used in cabinetry, bookshelves, and other woodworking projects where additional support and stability are required. They provide a seamless connection between the pieces of wood and allow for easy assembly and disassembly.
Can You Cut Dado Joints with a Circular Saw?
The short answer is yes, you can cut dado joints with a circular saw. However, it requires some additional equipment and careful setup to achieve accurate and precise cuts. Unlike a table saw or a specialized dado blade, a circular saw does not have the ability to make straight and wide cuts in a single pass. Therefore, you will need to make multiple cuts to create a dado joint using a circular saw. Although it may require more time and effort compared to using a dedicated tool, it is still a viable option for those who do not have access to a table saw or a dado blade.
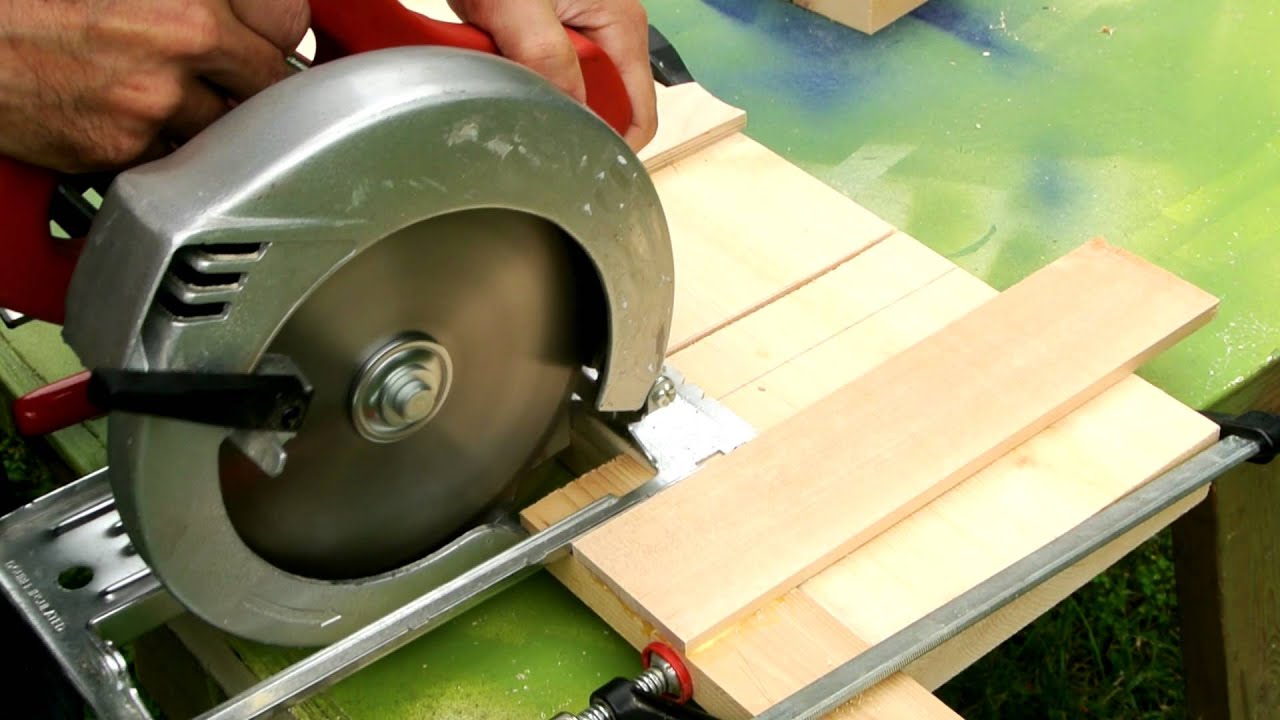
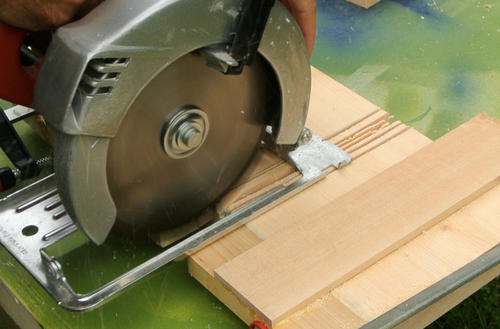
When cutting dado joints with a circular saw, you will need to use a guide or a jig to ensure straight and precise cuts. A guide can be a straight piece of wood clamped to the workpiece, or you can purchase a commercial guide specifically designed for dado cuts. Additionally, it is crucial to select the appropriate blade for the job. A dado set or a specialized dado blade is not compatible with a circular saw, so you will need to use a regular blade and make multiple passes to achieve the desired width of the dado groove.
The Process of Cutting Dado Joints with a Circular Saw
Now that we have established that you can indeed cut dado joints with a circular saw, let’s dive into the step-by-step process to help you achieve accurate and clean cuts.
Step 1: Gather the Necessary Tools
Before you begin, it is essential to gather all the tools and materials you will need for the job. Here is a list of the items you should have on hand:
- Circular saw
- Straight guide or jig
- Clamps
- Measuring tape or ruler
- Pencil or marking tool
- Safety gear (goggles, ear protection, and a dust mask)
Step 2: Prepare the Workpiece
Once you have gathered all the tools, it is time to prepare the workpiece. Start by marking the locations where you want to cut the dado grooves. Measure and mark the depth and width of the dado according to your project specifications. Remember that you will need to make multiple passes with the circular saw to achieve the desired width. Ensure that the workpiece is securely clamped down to prevent any movement during the cutting process.
Step 3: Set Up the Guide
Attach the guide or jig to the workpiece, ensuring that it is straight and aligned with the marked dado lines. The guide will help the circular saw move in a straight path and ensure accurate cuts. Secure the guide to the workpiece using clamps or any other suitable method that provides stability.
Step 4: Adjust the Circular Saw Depth
Set the depth of the circular saw blade to match the desired depth of the dado groove. This can be done by adjusting the depth adjustment lever or knob on the saw. It is important to set the depth carefully to avoid cutting too deep or shallow.
Key Takeaways: Can You Cut Dado with a Circular Saw?
– To cut dado, you need a dado blade or a stacked dado set.
– Make sure the blade is the same width as the desired dado width.
– Adjust the height of the blade to match the desired dado depth.
– Use a guide or jig to ensure straight and accurate cuts.
Frequently Asked Questions
Looking to cut a dado with a circular saw? Check out these frequently asked questions!
1. How can I cut a dado with a circular saw?
To cut a dado with a circular saw, you’ll need a dado blade or a stacked dado set. First, equip your circular saw with the appropriate dado blade set. Then, measure and mark the location of the dado on your workpiece. Use a straight edge or a guide to ensure precise cuts. Set the depth of the blade according to the desired width and depth of your dado. Finally, make multiple passes, gradually widening the dado until you reach the desired dimensions.
Remember to wear appropriate safety gear, such as protective goggles and gloves, and always follow the manufacturer’s instructions for your specific circular saw and dado blade set.
2. Can any circular saw cut a dado?
Not all circular saws are designed to cut dados. To cut a dado, you’ll need a circular saw that can accommodate a dado blade or a stacked dado set. These specialized blades are wider and have chippers between the teeth, allowing for the creation of wider and deeper cuts. Check your circular saw’s manual or consult the manufacturer to determine if it is compatible with dado blades. If your circular saw does not support dado blades, you may need to consider alternative tools, such as a table saw or a router with a dado bit.
Remember to always prioritize safety and consult the manufacturer’s instructions for your specific circular saw model.
3. What is the advantage of using a dado blade for a circular saw?
The main advantage of using a dado blade for a circular saw is that it allows you to create wider and deeper cuts, such as dados or grooves. This can be particularly useful for woodworking projects that require precise joinery, such as building shelves or cabinetry. By using a dado blade, you can achieve cleaner and more efficient cuts compared to using multiple passes with a regular saw blade. It can save you time, effort, and produce more professional-looking results.
However, it’s important to note that dado blades require careful handling and safety precautions due to their larger size and the increased risk of kickback. Always follow the manufacturer’s instructions and wear appropriate safety gear while using a dado blade.
4. Can I use a circular saw with a dado blade to make different width dados?
Yes, you can use a circular saw with a dado blade to make dados of different widths. The width of the dado is determined by the width of the dado blade or the combination of blades in a stacked dado set. These blades come in various sizes, allowing you to adjust the width of the dado according to your needs. To create different width dados, simply swap out the dado blades or adjust the configuration of the stacked dado set before making your cuts.
Remember to measure and mark the desired width of the dado on your workpiece accurately, and adjust the dado blade or stacked dado set accordingly. Take your time and make multiple passes, gradually widening the dado until it reaches the desired width.
5. What safety precautions should I take when cutting a dado with a circular saw?
When cutting a dado with a circular saw, it’s essential to prioritize safety. Here are some precautions you should take:
First, always wear appropriate safety gear, including protective goggles, gloves, and hearing protection. Ensure that you are working in a well-ventilated area and have a clear workspace.
Second, carefully read and follow the manufacturer’s instructions for your specific circular saw and dado blade set. Make sure the blade is securely attached and properly aligned. Use a push stick or another suitable device to keep your hands away from the blade and maintain control of the workpiece.
Lastly, take your time and make controlled, precise cuts. Avoid rushing or forcing the saw. Always be mindful of your surroundings and the potential risks involved. If you’re unsure or uncomfortable, it’s best to seek guidance from a professional or consider alternative tools.
Dado cuts with a circular saw
Summary
So, can you cut dado with a circular saw? The answer is no. The circular saw is not designed for this kind of cut. A dado cut requires a specialized tool like a dado blade or a dado stack on a table saw. Trying to make a dado cut with a circular saw can be dangerous and may lead to uneven and inaccurate results. It is always best to use the right tool for the job to ensure safety and achieve the desired outcome.