Can you hand plane end grain? If you’re curious about the woodworking technique of planing end grain, you’ve come to the right place! Whether you’re a woodworking enthusiast or just starting out, understanding how to work with end grain can be a game-changer for your projects. So, grab your tools and let’s dive into the world of hand planing end grain!
When it comes to woodworking, end grain refers to the cut surface of a piece of wood that exposes the tree’s growth rings. It’s often considered challenging to work with because of its porous nature and tendency to absorb moisture unevenly. However, with the right techniques and tools, you can achieve smooth and polished end grain that enhances the overall look of your projects.
Hand planing end grain involves using a hand plane—a versatile tool that removes thin layers of wood—to smooth, shape, and refine the end grain surfaces. While it may take some practice to master the technique, the results are well worth the effort. So, if you’re ready to take your woodworking skills to the next level and create stunning pieces, let’s explore the ins and outs of hand planing end grain together!

Can You Hand Plane End Grain?
When it comes to woodworking, one common question that often arises is whether or not it is possible to hand plane end grain. End grain refers to the orientation of the wood fibers at the end of a board, and it presents a unique challenge due to its tendency to splinter and tear. In this article, we will explore the techniques and considerations involved in hand planing end grain, and provide you with tips and insights to achieve successful results.
Understanding the Nature of End Grain
Before diving into the specifics of hand planing end grain, it is important to understand the characteristics and challenges it presents. End grain is porous and absorbs moisture more readily than other parts of the wood, which can cause it to swell and potentially distort the shape of the workpiece. Additionally, the orientation of the wood fibers in end grain creates a cross-cutting situation, which makes it prone to tear-out, splintering, and rough surfaces. These factors make hand planing end grain a more delicate and precision-based process.
The Techniques for Hand Planing End Grain
While hand planing end grain may require a bit more finesse compared to planing with the grain, it can indeed be done successfully with the right approach. Here are some key techniques to consider:
- Use a sharp blade: A sharp blade is crucial when planing end grain. Dull blades are more likely to tear and splinter the wood fibers. Regularly sharpen and hone your blade to maintain optimal cutting performance.
- Take lighter passes: Unlike planing with the grain, where you can take deeper cuts, it is recommended to take lighter passes when planing end grain. This reduces the likelihood of tear-out and ensures a smoother surface.
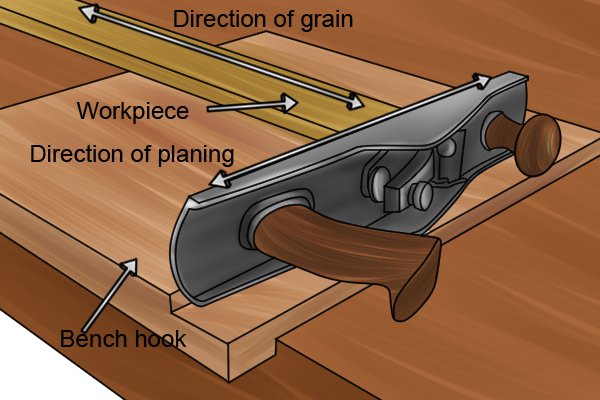
- Work with a skew angle: Tilting the plane at a slight skew angle, typically around 3-5 degrees, can help reduce tear-out and achieve cleaner cuts. Experiment with different angles to find what works best for your specific wood species and grain orientation.
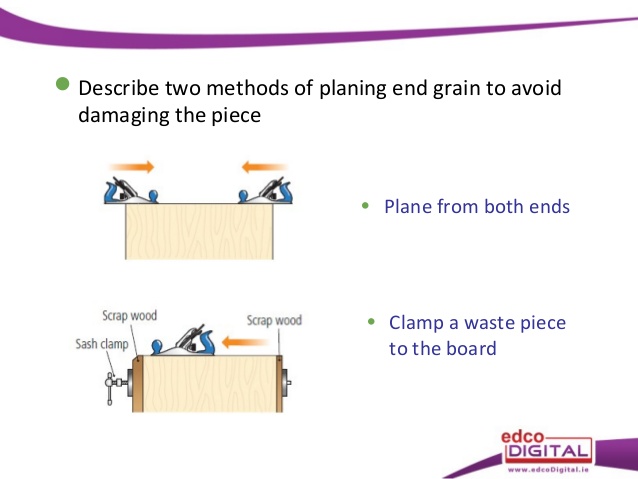
- Support the workpiece: To minimize the risk of splintering and tear-out, it is important to adequately support the workpiece when planing end grain. Consider using a sacrificial backing board or a planing sled to provide additional support and stability.
The Benefits of Hand Planing End Grain
While hand planing end grain comes with its challenges, it offers several benefits that make it a valuable technique in woodworking:
- Increased surface quality: Hand planing end grain allows you to achieve a smooth and polished surface, enhancing the overall appearance of your woodwork.
- Perfectly fitting joints: When working on joinery projects, hand planing the end grain can ensure a tight and snug fit for a seamless assembly.
- Greater control and precision: Hand tools provide a level of control and precision that power tools may not always achieve. Hand planing end grain allows you to finesse and refine your work for the best possible results.
Common Challenges and How to Overcome Them
Despite the techniques mentioned above, hand planing end grain can still present certain challenges. Here are a few common issues and tips to overcome them:
Tear-out and splintering
Tear-out and splintering are common issues when planing end grain. To minimize these problems, try the following:
- Ensure a sharp blade: Regularly sharpen and hone your plane’s blade to maintain optimal cutting performance.
- Take lighter passes: Gradually remove material with lighter cuts to reduce the likelihood of tear-out.
- Utilize a backer board: Use a sacrificial backing board to support the end grain and minimize tear-out.
Warping and distortion
End grain’s porous nature makes it more susceptible to moisture absorption, which can lead to warping and distortion. To minimize these issues, consider the following:
- Properly seal the end grain: Apply a suitable sealant or finish to the end grain to reduce moisture absorption.
- Allow for proper drying time: Give the wood sufficient time to acclimate to its environment before finalizing the project.
- Store and handle with care: Properly store and handle the finished workpiece to prevent warping and damage.
Difficulties with precision
Attaining precision when planing end grain can be challenging. Here are some tips to improve your precision:
- Use a marking gauge: Marking out the desired dimensions and using a marking gauge can help guide your planing efforts and ensure accuracy.
- Work in small increments: Take your time and work in small increments to achieve the desired results. It is easier to remove more material if needed than to fix an over-planed surface.
- Practice and patience: Like any woodworking skill, hand planing end grain requires practice and patience. Continuously refine your techniques through trial and error.
Conclusion
Hand planing end grain can be a challenging but rewarding woodworking technique. With the proper techniques, tools, and practice, you can achieve smooth surfaces, precise dimensions, and perfectly fitting joints. Remember to use a sharp blade, take lighter passes, and provide adequate support to minimize tear-out and splintering. Embrace the unique nature of end grain and enjoy the process of working with this beautiful and versatile material.
Key Takeaways: Can You Hand Plane End Grain?
- Hand planing end grain can be challenging because it is prone to tearing and splintering.
- Using a very sharp hand plane and making light, shallow cuts can help reduce tear-out on end grain.
- Back-beveling the blade of the hand plane can also minimize tear-out when working with end grain.
- Working with a low angle block plane or a shooting board can provide better control when planing end grain.
- Practice and patience are key when hand planing end grain to achieve smooth and clean results.
Frequently Asked Questions
Below are some commonly asked questions about hand planing end grain.
1. How do I hand plane end grain?
Hand planing end grain can be a bit challenging as the end grain fibers tend to tear out easily. To accomplish this task successfully, you can use the following technique:
First, make sure your hand plane is sharp and properly set up. Begin by setting the plane with a shallow depth of cut. Rather than making full-length passes, take lighter shaving cuts and gradually work your way across the entire end grain surface. This will help minimize the risk of tearing out the fibers. Additionally, using a slower, deliberate pace with consistent pressure will contribute to a cleaner cut. Remember to check your progress frequently and adjust the plane as needed.
2. What type of hand plane is best for working with end grain?
When working with end grain, a low-angle block plane is often the tool of choice. The low-angle blade combined with the adjustable mouth allows for more control, reducing tear-out and delivering cleaner cuts. The small size of a block plane also makes it easier to maneuver and fit into tight areas.
However, if you need to plane larger end grain surfaces, a bench plane with a higher-angle blade might be more suitable. The higher-angle blade helps to reduce tear-out by presenting a steeper cutting angle to the end grain fibers. It’s recommended to experiment with different planes to find the one that works best for your specific project.
3. What is the proper technique for preventing tear-out when planing end grain?
To prevent tear-out when planing end grain, there are a few techniques you can employ:
One technique is to score or make shallow cross-grain cuts across the end grain using a sharp knife or chisel. This weakens the fibers and helps prevent tear-out as you plane. Additionally, you can try changing the cutting angle by skewing the plane slightly. This can minimize the risk of tear-out by slicing through the grain instead of directly cutting across it.
Another effective method is to use a backer board or sacrificial piece of wood placed behind the end grain you’re planing. The backer board supports the fibers and helps prevent tear-out by providing additional support during the planing process.
4. Can I use a power planer on end grain?
Using a power planer on end grain is not recommended as it can result in severe tear-out and damage to the wood fibers. Power planers have rotating knives that can cause the end grain fibers to chip or splinter. Hand planing with a sharp hand plane is a better option for controlling tear-out and achieving cleaner results when working with end grain.
If you must use a power tool for planing end grain, using a spiral cutterhead planer or a router with an appropriate end grain-cutting bit can help minimize tear-out. However, hand planing is generally the preferred method for end grain surfaces.
5. Are there any specific safety precautions when hand planing end grain?
When hand planing end grain, it is important to follow some safety precautions to ensure a safe working environment:
First and foremost, always wear appropriate protective gear such as safety glasses to protect your eyes from flying debris. Additionally, make sure your workpiece is securely held in place to prevent any accidents. Use a vise or clamp the workpiece down to a stable work surface.
When using a hand plane, make sure to grip the handle firmly and position your body so that you have good control and balance. Finally, be mindful of the direction of the plane’s blade to avoid unintentional cuts or injuries. Maintaining proper safety measures will ensure a smooth and accident-free hand planing experience.
Planing end grain (4K)
Summary
So, can you hand plane end grain? The answer is yes, but it requires some skill and technique. First, make sure your plane is sharp and properly set up. Then, make shallow cuts and take your time to avoid tear-out. Remember to adjust the angle and pressure as needed. It may take some practice, but with patience and the right approach, you can successfully hand plane end grain and achieve smooth, clean results.
In conclusion, while planing end grain can be challenging, it is not impossible. By following the proper techniques and taking your time, you can achieve good results. So go ahead, give it a try and see what you can accomplish with your hand plane!