
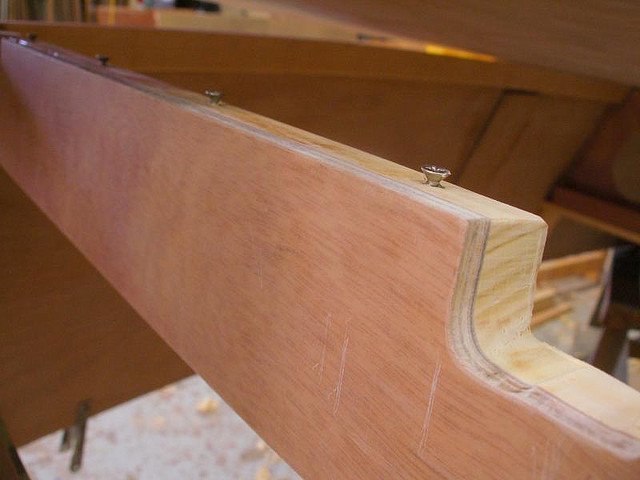
Can you nail plywood? Absolutely! Whether you’re a DIY enthusiast or just starting your woodworking journey, nailing plywood is a fundamental skill you’ll definitely want to master. It’s a versatile material that can be used for various projects like building shelves, cabinets, or even constructing walls. So, let’s dive in and explore the art of nailing plywood!
When it comes to nailing plywood, there are a few things to keep in mind. First, using the right type and size of nails is crucial for a strong and secure connection. Additionally, understanding the proper nailing techniques and having the right tools will ensure a successful outcome.
In this guide, we’ll walk you through the step-by-step process of nailing plywood with ease. From selecting the right nails to tips for preventing splitting, we’ve got you covered. So, grab your hammer, put on your tool belt, and let’s get nailed!
- Choose the right nails for the job.
- Position the plywood in place.
- Pre-drill pilot holes.
- Start hammering the nails into the pilot holes.
- Ensure the nails are securely fastened.
By following this step-by-step guide, you’ll be able to successfully nail plywood for your project.
Can You Nail Plywood?: A Guide to Using Nails with Plywood
The Basics of Nailing Plywood
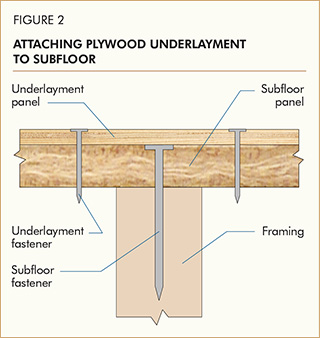
When it comes to working with plywood, nailing is a common method used to secure the material. Nailing plywood provides stability and strength, especially when used in construction projects. The process involves driving nails into the plywood sheets to connect them to other materials, such as framing or subflooring.
Before nailing plywood, it is important to consider a few factors. First, ensure that the nails you use are appropriate for the thickness of the plywood. A general rule of thumb is to use nails with a length that is at least 1.5 times the thickness of the plywood. Additionally, the nailing pattern and spacing between nails should be chosen carefully to maximize the holding power of the plywood.
Another important consideration is the type of nails to use. Common nails are suitable for most plywood applications, but if you are working with hardwood plywood or require superior holding power, consider using ring-shank or screw-shank nails. These nails have grooves or threads that provide extra grip and prevent the nails from loosening over time.
The Process of Nailing Plywood
Before you start nailing plywood, ensure that the surface is clean and free from any debris or protruding materials that could hinder the nailing process. It is also advisable to pre-drill pilot holes, especially near the edges of the plywood, to prevent splitting.
When nailing, position the nail at a slight angle to increase the holding power. Start by driving the first nail near the edge of the plywood, making sure it is aligned with the adjacent piece of material. Use a hammer to drive the nail into the plywood, ensuring that it goes in straight and flush with the surface. Repeat this process along the edge and continue nailing through the middle of the plywood, making sure to maintain even spacing between nails.
For thicker or heavier plywood, it may be necessary to use a nail gun or pneumatic nailer to ensure a secure connection. These tools can speed up the nailing process and provide consistent nail depth and placement. However, it is important to practice caution when using power tools and always follow the manufacturer’s safety guidelines.
Tips for Nailing Plywood
Here are some additional tips to keep in mind when nailing plywood:
- Use the proper nail size and type for the thickness and application of the plywood.
- Consider using adhesive in addition to nails for added strength and stability.
- Avoid over-nailing, as this can weaken the plywood and may cause splitting.
- When nailing near the edges, use caution to prevent splitting by pre-drilling pilot holes or using specialized trim nails.
- Ensure that the nails are driven straight and flush with the surface of the plywood to create a seamless finish.
- For larger projects, use clamps or a temporary bracing system to hold the plywood sheets in place while nailing.
- Regularly inspect the nails and plywood for any signs of damage or loosening, and make any necessary repairs to maintain the integrity of the structure.
Additional Considerations for Nailing Plywood
The Benefits of Nailing Plywood
Nailing plywood offers several benefits, including:
- Secure and strong connections: Nailing plywood provides a sturdy connection between the plywood sheets and other materials, ensuring structural integrity.
- Quick and efficient installation: Nailing is a fast method of joining plywood, making it an ideal choice for time-sensitive projects.
- Cost-effective: Nails are a relatively inexpensive option compared to other joining methods, making nailing plywood a cost-effective solution.
- Diverse applications: Nailing can be used in various applications, including construction, cabinetry, and woodworking projects.
Nailing Plywood vs. Other Joining Methods
While nailing plywood is a commonly used method, it is important to consider other joining methods for specific applications. Here are a few alternatives to nailing:
- Screwing: Using screws instead of nails provides a stronger hold and allows for easy removal if adjustments are needed. Screws are ideal for applications where the plywood may undergo movement or stress.
- Gluing: Adhesive bonding offers additional strength and stability to the plywood joints. This method is commonly used in conjunction with nailing or screwing for added reinforcement.
- Dovetail joints: Dovetail joints offer exceptional strength and are commonly used in high-end cabinetry and furniture-making.
Considering the Material: Can You Nail All Types of Plywood?
It is important to note that not all types of plywood are suitable for nailing. While standard plywood can be easily nailed, other specialized plywood materials may require different joining methods. For example, plywood made from metals or composites may require specialized fasteners or adhesives. Always refer to the manufacturer’s guidelines for the specific type of plywood you are working with to ensure the appropriate joining method is used.
Conclusion
Nailing plywood is a common and effective method for joining plywood sheets. By following proper techniques and using the right nails and spacing, you can create secure and strong connections. Consider the specific type of plywood and the application when choosing the appropriate joining method. Whether using nails, screws, or adhesives, the goal is to create a stable and durable structure that will withstand the test of time.
Key Takeaways: Can You Nail Plywood?
- Nailing plywood is possible and commonly done in various DIY projects.
- It is important to use the correct type and size of nails for plywood.
- Pre-drilling holes can help prevent the plywood from splitting when nailing.
- Securing the plywood with nails can provide structural stability and durability.
- Proper nailing techniques, such as using a hammer or nail gun, ensure secure attachments.
Frequently Asked Questions
Here are some commonly asked questions about nailing plywood:
1. What type of nails should I use to nail plywood?
When nailing plywood, it’s best to use ring-shank or screw-shank nails. These types of nails provide better holding power compared to smooth-shank nails. The ring or screw shanks grip the wood fibers, reducing the chances of the nails coming loose over time.
Additionally, make sure the nails are long enough to penetrate through the plywood and reach the underlying material securely. 2 to 2.5 inches long nails typically work well for most plywood applications.
2. Should I pre-drill holes before nailing plywood?
Pre-drilling holes in plywood before nailing is generally not necessary. Plywood is a strong material and can handle nails without splitting. However, if you’re concerned about splitting or have a specific reason to pre-drill holes, you can do so. Just make sure the holes are slightly smaller than the diameter of the nails to ensure a tight fit.
If you choose to pre-drill, remember that it may weaken the holding power of the nails slightly. It’s important to strike a balance between avoiding splits and maintaining the necessary strength for the task at hand.
3. Can I use a regular hammer to nail plywood?
Yes, a regular hammer is suitable for nailing plywood. When using a hammer, choose one that’s appropriate in size and weight for the job. A 16-ounce hammer is a common choice for general plywood nailing tasks. Make sure to hold the hammer correctly, with a firm grip, and strike the nail head squarely to avoid bending or damaging it.
If you’re planning to do a large plywood nailing project, an alternative option is to use a pneumatic nail gun. This tool can speed up the nailing process and provide consistent nail placement and depth.
4. Can you nail plywood without a stud?
Yes, you can nail plywood without a stud. In situations where you can’t find a stud to nail into, you can use other methods to secure the plywood. One option is to use construction adhesive in addition to the nails. Apply a bead of adhesive along the surface where the plywood will be placed and then nail it down securely.
Another option is to use wall anchors or toggle bolts to provide extra support. These can be inserted into the drywall and provide a strong backing for the nails, allowing the plywood to be securely attached to the wall.
5. Can you nail plywood to concrete?
Nailing plywood directly to concrete is not recommended. Concrete is a hard and dense material, making it difficult for nails to penetrate and hold. Instead, it’s better to use concrete screws or anchors specifically designed for attaching wood to concrete.
Another option is to use adhesive suitable for bonding wood to concrete. Apply the adhesive to the back of the plywood and press it firmly against the concrete surface. This method provides a strong bond between the two materials.
NAILS vs. SCREWS…Which Should You Choose?! (Pros + Cons of Nails And Screws For Your Projects!)
Summary
Nailing plywood can be a tricky task, but with the right tools and techniques, you can do it! First, make sure you have a good hammer and nails that are the right size for your plywood. Use a punch to create starter holes and then gently tap the nails in. Be careful not to hit your fingers! Remember to space the nails evenly and use enough of them to keep the plywood secure.
It’s also important to consider the type of plywood you’re using and the surface you’re nailing it to. If the plywood is thin or the surface is soft, you may need to pre-drill holes to avoid splitting. And if you’re attaching plywood to a vertical surface, like a wall, consider using adhesive in addition to nailing for added security. With these tips in mind, you’ll be able to confidently nail plywood for your next project!