
Are you wondering if you can use an orbital sander to sand joint compound? Well, you’ve come to the right place! Sanding joint compound is an important step in achieving that smooth and flawless finish for your walls. In this article, we’ll explore whether an orbital sander is the right tool for the job and provide you with some handy tips along the way.
When it comes to sanding joint compound, using the right tool can make all the difference. An orbital sander is a popular choice for many DIY enthusiasts and professionals alike. Its oscillating motion can easily remove imperfections and create a smooth surface. But the question remains, can you trust your orbital sander to tackle that joint compound?
The answer is yes, you can definitely use an orbital sander to sand joint compound. However, there are a few things to keep in mind to ensure optimal results. In the following sections, we’ll delve into the specifics and guide you through the process. So, let’s get started on your journey to perfectly sanded walls!

Can You Sand Joint Compound with an Orbital Sander?
Joint compound is commonly used in the process of drywall installation and repair. One of the key steps in achieving a smooth and seamless finish on drywall is sanding the joint compound. Many DIY enthusiasts and professionals wonder if using an orbital sander is a viable option for this task. In this article, we will explore whether you can effectively sand joint compound with an orbital sander, the benefits and drawbacks, and some tips for achieving the best results.
Understanding Joint Compound
Before we delve into the topic, let’s first understand what joint compound is. Joint compound, also known as drywall mud or simply mud, is a thick, plaster-like substance used to fill and seal joints, cracks, and seams in drywall. It is applied on top of the drywall tape to create a smooth and seamless surface. While joint compound typically dries to a hardened state, it still requires sanding to achieve a perfectly smooth finish. Traditionally, manual sanding with sandpaper has been the go-to method for this step. However, using an orbital sander can offer a faster and more efficient alternative.
The Benefits of Using an Orbital Sander for Sanding Joint Compound
Using an orbital sander for sanding joint compound offers several benefits. Firstly, it saves a significant amount of time and effort compared to manual sanding. The orbital sander’s rotating motion and high-speed sanding pad allow for quick and efficient sanding, making the process much faster. Additionally, the uniform sanding pattern of the orbital sander ensures a consistent finish, reducing the risk of uneven patches or visible sanding marks. Another advantage of using an orbital sander is the reduced physical strain on the user. Manual sanding can be tiring and can strain the arms and wrists, especially when sanding large areas. With an orbital sander, the tool does the bulk of the work, allowing for a more comfortable sanding experience.
However, it’s important to note that using an orbital sander for sanding joint compound also has some drawbacks. The main concern is the potential for creating airborne dust particles. Unlike manual sanding, which produces less dust due to controlled movements, an orbital sander generates a significant amount of dust. This can lead to a messier workspace and may require additional precautions such as wearing a dust mask and covering nearby surfaces. Additionally, an orbital sander may not be suitable for certain intricate or hard-to-reach areas, requiring manual sanding to achieve the desired finish.
Tips for Sanding Joint Compound with an Orbital Sander
If you decide to use an orbital sander for sanding joint compound, here are a few tips to help you achieve the best results:
- Choose the right grit sandpaper: For initial sanding, use a medium-grit sandpaper (around 120-150 grit) to remove major imperfections. Then, switch to a fine-grit sandpaper (around 220-240 grit) for the final smoothing and blending.
- Use a vacuum attachment: To minimize dust production, consider using an orbital sander with a built-in vacuum attachment or attach a separate vacuum hose to the sander. This will help capture a significant portion of the dust, keeping your workspace cleaner.
- Apply light pressure: Let the orbital sander do the work for you. Apply gentle and even pressure, allowing the sander’s motion and weight to smooth out the joint compound. Avoid pressing too hard, as it can lead to uneven sanding and potential damage to the drywall.
- Frequently check your progress: Regularly inspect the sanded area to ensure that you are achieving a smooth and even finish. This will help you make any necessary adjustments and prevent over-sanding in certain areas.
- Finish with hand sanding: While an orbital sander can handle the bulk of the sanding, consider using a finer grit sandpaper and sanding block for any final touch-ups. This will allow for more control and precision in hard-to-reach areas or corners.
Choosing the Right Orbital Sander for Sanding Joint Compound
When selecting an orbital sander for sanding joint compound, there are a few factors to consider. Firstly, opt for a random orbital sander rather than a traditional orbital sander. Random orbital sanders have a round sanding pad that moves in an elliptical pattern, reducing the risk of leaving swirl marks on the surface. Secondly, choose a sander with variable speed settings. This will allow you to adjust the sanding speed based on the task at hand and the level of aggression required to achieve the desired finish. Lastly, consider the size and weight of the sander. A lightweight and compact sander will provide better maneuverability and control, especially when sanding large areas or overhead.
The Importance of Proper Preparation for Sanding Joint Compound
Before you start sanding joint compound with an orbital sander, it is crucial to prepare the surface properly. Ensure that the joint compound has fully dried and hardened before attempting to sand. This will prevent the sandpaper from clogging and ensure a smooth sanding process. Additionally, be sure to clean the surface of any dust or debris before sanding. This will help maintain the effectiveness of the sandpaper and prevent particles from getting trapped and scratching the surface during sanding.
Frequently Asked Questions about Sanding Joint Compound with an Orbital Sander
1. Can I use a belt sander instead of an orbital sander for sanding joint compound?
While a belt sander is a powerful tool, it is generally not recommended for sanding joint compound. Belt sanders are more aggressive and can easily remove too much material, especially on drywall surfaces. The high-speed sanding action of a belt sander can also create noticeable sanding marks that are difficult to blend into the surrounding area.
2. How long does it take for joint compound to fully dry before sanding?
The drying time of joint compound can vary depending on factors such as humidity, temperature, and the thickness of the applied compound. On average, it takes around 24 to 48 hours for joint compound to fully dry. However, it is recommended to check the manufacturer’s instructions for specific drying times.
3. Is it necessary to apply primer after sanding joint compound?
Applying a primer after sanding joint compound is highly recommended. Primer helps to seal the sanded surface, create an even base for paint or wallpaper, and enhance the overall appearance of the finished wall. It also improves paint adhesion and reduces the chances of the paint peeling or flaking over time.
#Conclusion
In conclusion, sanding joint compound with an orbital sander is a viable and efficient option for achieving a smooth and seamless finish on drywall surfaces. It offers several benefits, such as time savings, consistent results, and reduced physical strain. However, it is essential to consider the potential for increased dust production and the limitations of an orbital sander in certain areas. By following the tips mentioned above and choosing the right orbital sander for the task, you can achieve professional-looking results. Remember to always prepare the surface properly and select the appropriate grit sandpaper for each stage of the sanding process. With the right technique and tools, sanding joint compound with an orbital sander can be a breeze.
Can You Sand Joint Compound with an Orbital Sander?
In simple terms, yes, you can sand joint compound with an orbital sander.
Using an orbital sander can make the sanding process smoother and more efficient compared to hand sanding.
It’s important to use fine-grit sandpaper and start with a lower speed setting to avoid damaging the joint compound.
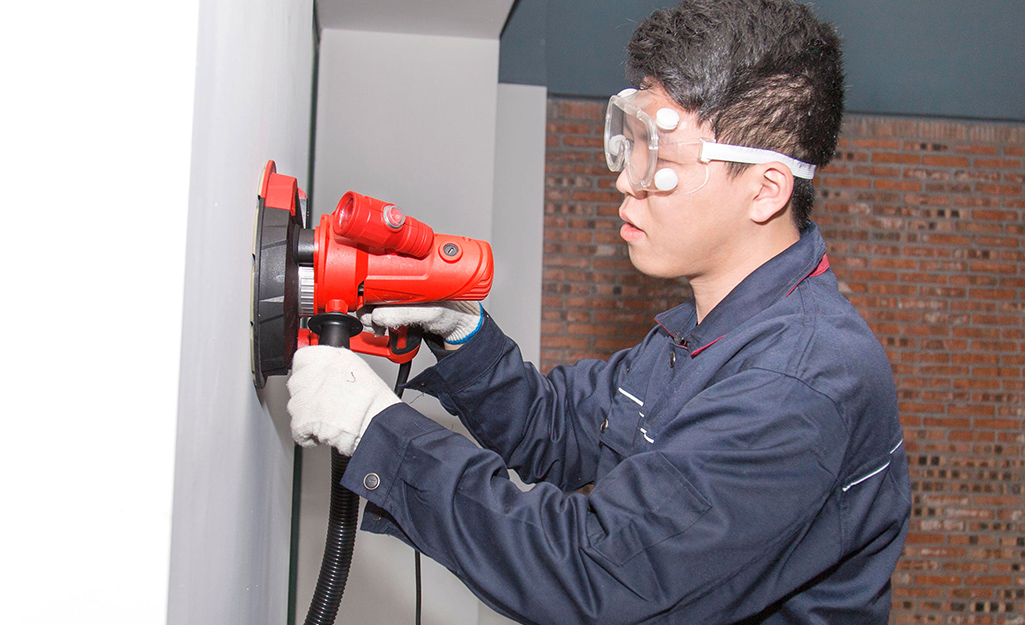
Wear protective gear, such as goggles and a mask, to prevent inhaling dust particles while sanding.
Remember to clean up thoroughly after sanding to remove any remaining dust or debris.
Frequently Asked Questions
Here are some commonly asked questions about sanding joint compound with an orbital sander:
Q: Can an orbital sander be used to sand joint compound?
A: Yes, an orbital sander can be used to sand joint compound. The orbital sander is a versatile tool that is commonly used for sanding various surfaces, including joint compound. Its random orbital motion helps to prevent swirl marks and provides a smooth finish. However, it’s important to use the right sandpaper grit and apply the appropriate pressure to avoid damaging the joint compound or the underlying surface.
When using an orbital sander to sand joint compound, it’s recommended to start with a medium grit sandpaper, such as 120 or 150 grit, and gradually work your way to a finer grit, such as 220. This will help remove any imperfections and leave a smooth surface for painting or finishing. Remember to let the sander do the work and avoid applying too much pressure, as it may cause uneven sanding or damage the joint compound.
Q: What type of sandpaper should I use with an orbital sander for sanding joint compound?
A: When sanding joint compound with an orbital sander, it’s important to use the right type of sandpaper to achieve the desired results. For initial sanding of joint compound, it’s recommended to use a medium grit sandpaper, such as 120 or 150 grit. This will help remove any high spots or imperfections in the compound.
After the initial sanding, you can switch to a finer grit sandpaper, such as 220 grit, for the final sanding. This will help achieve a smooth and even finish on the joint compound. It’s important to regularly check the sandpaper for wear and replace it if necessary, as worn sandpaper may not provide the desired results and can potentially damage the joint compound or the surface being sanded.
Q: Do I need to wear any safety equipment when sanding joint compound with an orbital sander?
A: Yes, it’s important to wear appropriate safety equipment when sanding joint compound with an orbital sander. The sanding process can generate dust, which may contain harmful particles. To protect yourself, it’s recommended to wear a dust mask or respirator to prevent the inhalation of dust particles.
In addition to a dust mask, it’s also advisable to wear safety goggles to protect your eyes from any flying debris. Furthermore, wearing ear protection can help reduce the noise generated by the orbital sander. Always make sure to follow the manufacturer’s instructions and guidelines for safety when using any power tool, including an orbital sander.
Q: Can I use an orbital sander to sand joint compound on walls and ceilings?
A: Yes, an orbital sander can be used to sand joint compound on both walls and ceilings. The random orbital motion of the sander helps to prevent swirl marks and provides an even finish on large surfaces like walls and ceilings.
When sanding joint compound on walls and ceilings, it’s important to use proper technique and to work in a systematic manner. Start at one end of the surface and move the sander in a smooth, circular motion, overlapping each pass to ensure even sanding. Pay close attention to the edges and corners, as these areas may require additional sanding by hand or with a sanding block to achieve a smooth and uniform finish.
Q: Can an orbital sander be used to remove excess joint compound?
A: Yes, an orbital sander can be used to remove excess joint compound, but caution should be exercised. The orbital sander is primarily designed for sanding and smoothing surfaces, so it’s important to avoid using excessive force or prolonged sanding in one spot, as it may damage the underlying surface.
If there are large amounts of excess joint compound that need to be removed, it’s best to use a scraper or putty knife to remove the bulk of the compound first. Once the majority of the excess compound is removed, the orbital sander can be used to smooth out the remaining compound and achieve a consistent surface. Always be mindful of the pressure applied and the speed at which you move the sander to avoid any mishaps.
How To Sand Drywall With An Orbital Sander Fast and Easy!
Summary
So, can you use an orbital sander to sand joint compound? The answer is yes! Sanding joint compound with an orbital sander can make the process faster and smoother. Just remember to use a fine-grit sandpaper, go slowly, and use light pressure. And always wear safety goggles and a dust mask to protect yourself. Happy sanding!
In conclusion, sanding joint compound with an orbital sander is a great option. It can save you time and effort, but be careful and follow safety precautions. Remember, slow and steady wins the race!