
Can you use a table saw to cut acrylic? If you’ve ever wondered about this, you’re in the right place! Acrylic is a popular material used in various DIY and crafting projects, and knowing how to cut it safely and accurately is essential. In this article, we’ll explore the possibilities of using a table saw for cutting acrylic and provide you with useful tips and insights. Excited to learn more? Let’s dive in!
Table saws are incredibly versatile tools that can handle a wide range of cutting tasks. But when it comes to acrylic, there are a few things to consider. While a table saw can be used to cut acrylic, it’s crucial to choose the right blade and take proper safety precautions. In the following sections, we’ll discuss the steps you need to follow to achieve clean and precise cuts with a table saw, all while ensuring your safety.
Now that we’ve established the question at hand and hinted at the potential of using a table saw, let’s explore the process in detail. By understanding the proper techniques and safety measures involved, you can confidently unleash your creativity and craft amazing projects with acrylic. So, without further ado, let’s get started on this exciting journey of table saws and acrylic cutting techniques!
No, it is not recommended to use a table saw to cut acrylic. Acrylic is a soft and brittle material that requires a different approach. It is best to use a tool specifically designed for cutting acrylic, such as a circular saw with a fine-toothed blade or a scoring knife. These tools minimize the risk of cracking or chipping the acrylic, ensuring smooth and precise cuts.
Can You Use a Table Saw to Cut Acrylic?
Acrylic, also known as plexiglass, is a versatile material that is commonly used in various DIY projects, signage, and even in some industrial applications. When it comes to cutting acrylic, many people wonder if they can use a table saw for this task. In this article, we will explore whether using a table saw is a suitable method for cutting acrylic and discuss the factors to consider when working with this material.
The Challenges of Cutting Acrylic with a Table Saw
While table saws are excellent tools for cutting wood, cutting acrylic with a table saw can present some challenges. One of the main issues is the potential for the acrylic to chip or shatter during the cutting process. Acrylic is a brittle material, and the high-speed rotation of the table saw’s blade can cause the material to crack.
Additionally, the table saw’s blade leaves behind sharp edges, which can be a safety hazard when working with plastic. The heat generated by the friction between the blade and the acrylic can also melt the material, leading to a less precise and clean cut. These factors make cutting acrylic with a table saw less than ideal.
However, with proper technique, the right blade, and necessary precautions, it is possible to use a table saw to cut acrylic effectively. Let’s explore the steps and considerations for safely and accurately cutting acrylic on a table saw.
Steps for Cutting Acrylic on a Table Saw
1. Choose the right blade: When cutting acrylic, it is crucial to use a blade specifically designed for cutting plastics. These blades typically have a high tooth count and a negative hook angle, which helps reduce the risk of chipping and melting. A crosscut or triple-chip blade is often recommended for cutting acrylic.
2. Set up the table saw: Ensure that the table saw is properly set up with a sharp blade and aligned fence. Precision is key when cutting acrylic, so take the time to make any necessary adjustments before starting the cutting process.
3. Mark the cut line: Use a non-permanent marker or painter’s tape to mark the desired cut line on the acrylic sheet. This will serve as a guide during the cutting process.
4. Take safety precautions: Always wear appropriate personal protective equipment (PPE), such as safety glasses and gloves, when working with power tools and sharp materials. Additionally, consider using a zero-clearance insert to minimize the risk of small acrylic pieces being trapped or pulled into the blade.
5. Cut at a slower speed: To reduce the risk of chipping or melting, it is advisable to cut acrylic at a slower speed than you would cut wood. This allows for greater control and minimizes the heat generated during the cutting process.
6. Support the material: When working with larger sheets of acrylic, ensure proper support on both sides of the blade to prevent the material from sagging or chipping. This can be achieved by using auxiliary fence extensions or additional supports.
7. Smooth the edges: After cutting the acrylic, the edges may be rough or uneven. To achieve a clean and polished finish, you can use sandpaper, a file, or a router with a flush-trim bit to smooth the edges.
Benefits of Using a Table Saw to Cut Acrylic
While cutting acrylic on a table saw may present some challenges, there are also several benefits to consider:
- Accuracy: A table saw allows for precise and repeatable cuts, ensuring consistency throughout your project.
- Versatility: If you already have a table saw, using it for cutting acrylic eliminates the need to invest in additional specialized equipment.
- Control: With proper technique and the right blade, you can achieve clean and smooth cuts, giving your project a professional finish.
- Efficiency: Table saws are powerful tools that can make quick work of cutting through acrylic, resulting in a faster completion time for your project.
Tips for Cutting Acrylic Safely
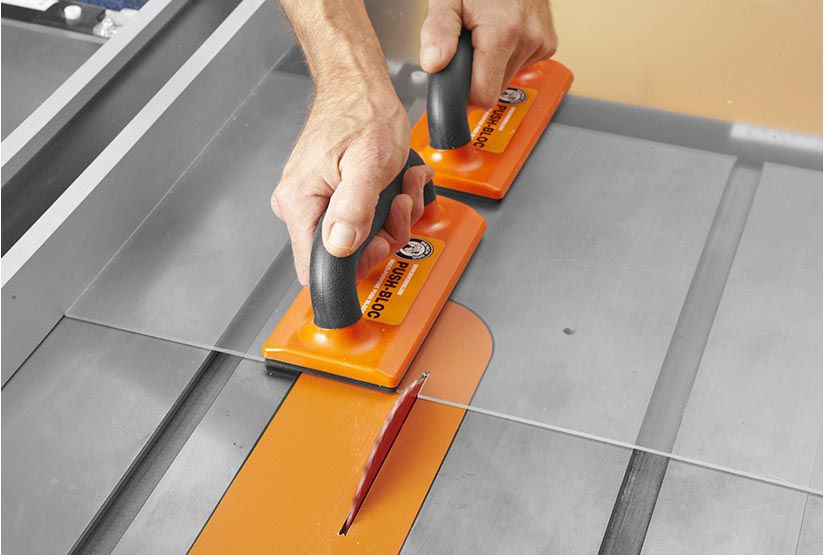
1. Use a push stick: When cutting small pieces of acrylic, use a push stick to keep your hands safely away from the blade.
2. Take breaks: The heat generated during the cutting process can cause the acrylic to become soft. If you notice the material starting to melt or warp, take a break and allow it to cool before continuing.
3. Test on scrap material: Before cutting your desired piece, practice on a scrap piece of acrylic to familiarize yourself with the process and confirm that your setup is correct.
Additional Information
Tips for Choosing the Right Blade for Cutting Acrylic
When it comes to cutting acrylic, selecting the right blade is crucial for achieving clean and accurate cuts. Here are some tips to help you choose the right blade for cutting acrylic:
Precautions to Take When Cutting Acrylic on a Table Saw
While it is possible to use a table saw to cut acrylic, it is important to take certain precautions to ensure safety and achieve optimal results. Here are some precautions to consider when cutting acrylic on a table saw:
Can You Use a Miter Saw to Cut Acrylic?
A miter saw, also known as a chop saw or a drop saw, is a versatile tool commonly used for making crosscuts and angle cuts in various materials. But can you use a miter saw to cut acrylic? In this section, we will explore whether using a miter saw is suitable for cutting acrylic and discuss the factors to consider.
Key Takeaways: Can You Use a Table Saw to Cut Acrylic?
- Table saws can be used to cut acrylic, but precautions must be taken.
- Make sure to use a fine-toothed carbide-tipped blade specifically designed for cutting acrylic.
- Acrylic should be clamped securely to the table saw before cutting.
- Feed the acrylic slowly and steadily through the blade to prevent cracking or chipping.
- Wear appropriate safety gear, such as goggles and gloves, when working with acrylic.
Frequently Asked Questions
Have you ever wondered if you can use a table saw to cut acrylic? Below are some common questions and answers about cutting acrylic with a table saw.
1. What type of blade should I use on a table saw to cut acrylic?
When cutting acrylic on a table saw, it is important to use a blade specifically designed for acrylic or plastic cutting. These blades typically have a high number of teeth and a low tooth angle. They help reduce chipping and cracking in the acrylic material, resulting in cleaner cuts.
Using a regular wood-cutting blade or a general-purpose saw blade can lead to rough cuts, melting, or even damage to both the material and the blade.
2. Is it necessary to use a guide or fence when cutting acrylic on a table saw?
Yes, using a guide or fence is highly recommended when cutting acrylic on a table saw. A guide or fence helps to ensure straight and accurate cuts, reducing the risk of binding or kickback. It helps maintain control over the material and improves overall safety.
Make sure the guide or fence is secured tightly and parallel to the blade. This will limit any movement of the acrylic and help you achieve precise cuts.
3. What safety precautions should I take when cutting acrylic on a table saw?
When cutting acrylic on a table saw, always wear appropriate personal protective equipment (PPE), including safety goggles, a dust mask, and gloves. Acrylic chips and dust are hazardous and can cause eye and respiratory irritation.
Ensure the table saw is equipped with a blade guard and anti-kickback device. Use a push stick or push block to keep your hands away from the blade and maintain a safe distance. Always follow the manufacturer’s instructions for safe operation of the table saw.
4. Can I cut intricate shapes and curves in acrylic using a table saw?
While a table saw is primarily designed for straight cuts, it is not the ideal tool for cutting intricate shapes and curves in acrylic. For such cuts, it is better to use a scroll saw, jigsaw, or a handheld rotary tool with a cutting bit specifically designed for acrylic.
Using a table saw for intricate cuts may lead to cracking, melting, or imprecise results. It is important to choose the right tool for the type of cut you need to achieve.
5. Are there any other methods I can use to cut acrylic apart from a table saw?
Absolutely! If you don’t have access to a table saw or prefer alternative methods, there are several options to cut acrylic. These include using a circular saw with a fine-tooth blade, a band saw, a coping saw, or even scoring and snapping the acrylic.
Each method has its own advantages and limitations, so consider the complexity of the cut, the available tools, and your personal experience before choosing the best method for your needs.

Summary
So, can you use a table saw to cut acrylic? The answer is yes! However, there are a few things you need to keep in mind. Acrylic is a brittle material, so you need to use the right blade and take it slow. A carbide-tipped blade or a blade specifically designed for acrylic cutting will work best. It’s important to make sure the blade is sharp and clean for clean cuts. Additionally, be sure to wear safety gear like gloves and goggles to protect yourself. And remember, practice makes perfect, so start with small cuts before moving on to bigger projects.