Do you need a nail gun for quarter round? If you’re tackling a quarter round installation project, you may be wondering if a nail gun is necessary. Well, let’s dive into the world of quarter round trim and find out if this powerful tool is a must-have or not!
When it comes to installing quarter round, there are multiple options to consider. The traditional method involves using finishing nails and a hammer. This approach requires precision and patience, ensuring each nail is driven in straight and flush with the trim. But what if there’s a faster and more efficient way?
Enter the nail gun, a tool that can streamline your quarter round installation process. With its quick and accurate nail placement, the nail gun can save you time and effort. But is it really necessary? Let’s explore the benefits and drawbacks of using a nail gun for quarter round installation.

Do I Need a Nail Gun for Quarter Round: Exploring the Advantages and Considerations
When it comes to installing quarter round moldings, many DIY enthusiasts and homeowners wonder if they need a nail gun for the job. While it is possible to install quarter round using traditional hand tools, a nail gun can drastically speed up the process and provide a professional finish. In this article, we will explore the advantages of using a nail gun for installing quarter round, considerations to keep in mind, and helpful tips to make the installation process seamless.
The Advantages of Using a Nail Gun for Quarter Round Installation
1. Efficiency and Time-Saving: One of the biggest advantages of using a nail gun for quarter round installation is the efficiency and time-saving it offers. With a nail gun, you can drive nails quickly and accurately, reducing the time spent on each piece of quarter round. This is particularly beneficial if you have a large area to cover or multiple rooms to work on.
2. Improved Precision: When installing quarter round, precision is key to achieving a polished look. A nail gun allows for precise placement of nails, preventing any visible damage or splitting of the quarter round. It ensures that each nail is driven in at the perfect angle and depth, resulting in a clean and professional finish.
3. Ease of Use: Nail guns are designed to be user-friendly and ergonomic, making them easy to handle and operate. They eliminate the need for manual hammering, reducing the strain on your hands and wrists. Even for those with limited experience or lacking in carpentry skills, a nail gun can make the installation process more accessible and error-free.
Considerations When Using a Nail Gun for Quarter Round
1. Safety Precautions: Before using a nail gun, it is essential to prioritize safety. Ensure that you wear protective gear, including safety goggles and ear protection, to shield yourself from flying debris and loud noise. Familiarize yourself with the specific safety features and functions of your nail gun, such as safety locks and trigger mechanisms, to prevent accidental discharge.
2. Type of Nail Gun: There are two main types of nail guns commonly used for quarter round installation: brad nailers and finish nailers. Brad nailers use smaller nails, typically 18-gauge, making them suitable for thinner quarter round moldings. Finish nailers, on the other hand, use larger nails, typically 15 or 16-gauge, which are more suited for thicker quarter round or baseboards. Consider the size and thickness of your quarter round when choosing the appropriate nail gun.
3. Nail Selection: The type and length of nails you use can significantly impact the stability and longevity of the quarter round installation. It is recommended to use nails that are at least as long as the thickness of the quarter round, ensuring a secure attachment. Additionally, opt for galvanized nails as they are less likely to rust and cause discoloration of the quarter round over time.
Tips for Using a Nail Gun for Quarter Round Installation
1. Test on Scrap Pieces: Before starting the actual installation, practice using the nail gun on scrap pieces of quarter round. This will help you get a feel for the tool and adjust the nail depth if necessary. It is also a good opportunity to test the stability of the quarter round once it is attached with nails.
2. Mark the Stud Locations: To ensure a secure installation, identify the stud locations beforehand. Use a stud finder or tap on the wall to locate the framing studs. Mark these locations on the wall so that you can drive the nails directly into the studs, providing extra support and stability to the quarter round.
3. Maintain Consistent Nail Spacing: To achieve a professional and cohesive look, maintain consistent spacing between the nails along the length of the quarter round. Use a measuring tape and mark the desired nail spacing beforehand. This will help create a uniform and visually appealing final result.
Choosing the Right Nail Gun for Your Quarter Round Installation
When it comes to choosing the right nail gun for your quarter round installation, it’s important to consider the size and thickness of your moldings. Two popular options are brad nailers and finish nailers, each with their own benefits and considerations. Let’s explore these options in detail.
Brad Nailers: Perfect for Thin Quarter Round
Brad nailers are a popular choice for installing thin quarter round moldings. They use smaller gauge nails, typically 18-gauge, which are less likely to split the quarter round. On top of that, the smaller size of brad nails means they can be easily concealed with putty, resulting in a seamless and finished appearance.
When using a brad nailer, it’s important to consider the length of the nails. Ensure that the nails are long enough to penetrate the quarter round and secure it firmly to the baseboard or wall. Additionally, make sure to adjust the air pressure on the nail gun to prevent overdriving or underdriving the nails, which can lead to an unstable installation or visible damage to the quarter round.
Benefits of Using a Brad Nailer for Quarter Round
1. Prevents Splitting: The smaller gauge nails used by brad nailers are less likely to split thin quarter round moldings, ensuring a clean and intact installation.
2. Concealed Fastening: Due to their small size, brad nails can be easily concealed with putty or wood filler, resulting in a seamless and finished appearance.
3. Versatility: Brad nailers can be used for more than just quarter round installation. They are suitable for various woodworking projects, making them a versatile investment for DIY enthusiasts.
Finish Nailers: Ideal for Thicker Quarter Round
Finish nailers are a suitable choice when working with thicker quarter round moldings. They use larger gauge nails, typically 15 or 16-gauge, providing greater holding power and stability. The larger size of the nails allows for a secure attachment, especially when dealing with heavier or wider quarter round profiles.
When using a finish nailer, it’s important to adjust the nail depth to ensure that the nails are driven in flush with the surface of the quarter round. This will prevent any visible nail heads and provide a smooth, professional finish. Additionally, consider the length of the nails to ensure they penetrate the quarter round sufficiently and provide a strong hold.
Benefits of Using a Finish Nailer for Quarter Round
1. Increased Holding Power: The larger gauge nails used by finish nailers provide greater holding power, ensuring a secure and stable installation, particularly for thicker quarter round profiles.
2. Efficient Installation: Finish nailers allow for quick and accurate installation, saving time and effort, especially when working with a larger area or multiple rooms.
3. Suitable for Baseboards: In addition to quarter round installation, finish nailers can also be used for installing baseboards, making them a versatile tool for various carpentry projects.
Tips for a Seamless Quarter Round Installation with a Nail Gun
Installing quarter round with a nail gun can streamline the process and provide professional results. To ensure a seamless installation, consider the following tips:
1. Measure Twice, Cut Once: Before cutting your quarter round pieces, double-check your measurements to ensure accuracy. Remember, it’s always better to have slightly longer pieces that can be trimmed later than cutting them too short.
2. Use a Miter Saw: Invest in a miter saw or miter box for precise cutting of the quarter round angles. This will help achieve tight and seamless corners when installing the moldings.
3. Start at One End: Begin the installation process at one end of the wall or room and work your way around. This will help ensure a consistent and visually appealing installation.
4. Securely Attach to Studs: Whenever possible, drive the nails directly into the wall studs for added stability and support. Use a stud finder or tap on the wall to locate the framing studs before installation.
5. Fill Nail Holes: After installing the quarter round, fill any nail holes or gaps with wood filler or putty. Sand the filled areas smooth and paint or stain the quarter round for a flawless finish.
Following these tips, combining them with the advantages of using a nail gun, will result in a seamless and professional-looking quarter round installation. Remember to always prioritize safety when using power tools and conduct any necessary research or consult professionals to ensure the best possible outcome.
Key Takeaways
- 1. A nail gun can make the installation of quarter round molding much faster and easier.
- 2. However, it is not mandatory to use a nail gun for quarter round.
- 3. You can also use a hammer and nails to secure the quarter round in place.
- 4. If you don’t have a nail gun, using a hammer and nails is a perfectly fine option.
- 5. Consider your own comfort level and the amount of time you’re willing to invest when deciding whether to use a nail gun or not.
**
Frequently Asked Questions
**
**Introduction:**
If you’re looking to install quarter round moulding, you might be wondering if you need a nail gun to get the job done efficiently and effectively. In this section, we’ll address this common question and provide you with all the information you need to make an informed decision.
**
Q1: What tools do I need for installing quarter round moulding?
**
**A1:** Although a nail gun can make the installation process faster, you can still install quarter round moulding using traditional hand tools. Here’s what you’ll need:
* A miter saw or coping saw to cut the quarter round at the correct angles.
* A tape measure or ruler to measure the length of the moulding and mark where it needs to be cut.
* A pencil or marker to make the cutting lines clearly visible.
* A finish nail set to countersink the nails into the moulding.
* A hammer or a brad nailer to secure the quarter round to the baseboard or wall.
While a nail gun can be a convenient option, it’s not a necessity. With some patience and the right tools, you can achieve professional-looking results without using a nail gun.
**
Q2: Are there any advantages to using a nail gun for installing quarter round moulding?
**
**A2:** Yes, there are advantages to using a nail gun for installing quarter round moulding. It can make the process faster, especially when you’re working with a large area or multiple rooms that require installation. A nail gun also provides consistent and evenly driven nails, reducing the chances of splitting or damaging the moulding.
Additionally, a nail gun allows for quicker nail placement, freeing up your other hand to hold the moulding securely in place. It can also make it easier to work in tight corners or areas where using a hammer may be challenging. However, it’s important to note that while a nail gun offers these advantages, it’s not absolutely necessary to use one for installing quarter round moulding.
**
Q3: Can I use a hammer and nails instead of a nail gun for installing quarter round moulding?
**
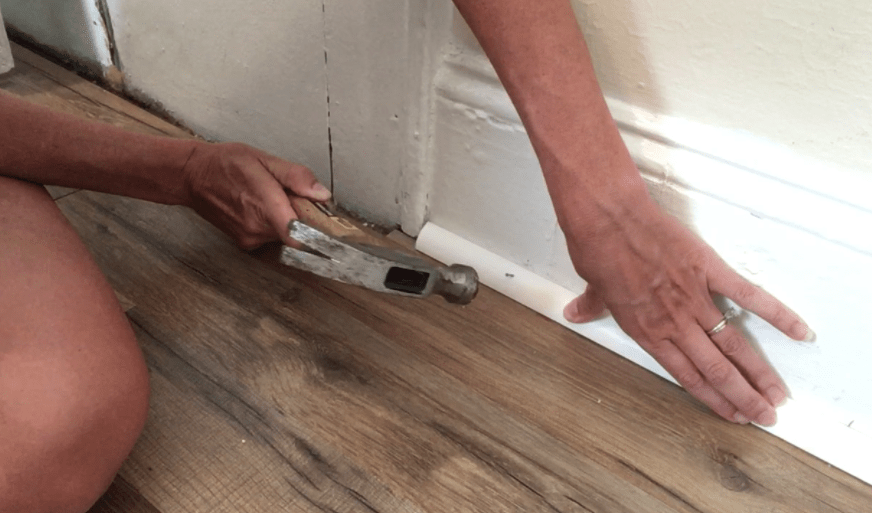
**A3:** Yes, you can absolutely use a hammer and nails to install quarter round moulding. It’s a more traditional method and can yield excellent results if done properly. Start by pre-drilling small pilot holes to avoid splitting the moulding. Then, use a hammer to drive the finish nails into the holes, making sure they are countersunk.
To prevent any damage to the moulding, use a nail set to sink the nail heads just below the surface. If you prefer a more manual approach or don’t have access to a nail gun, using a hammer and nails can still achieve professional-looking results with a bit of patience and attention to detail.
**
Q4: Can I use an adhesive instead of nails for installing quarter round moulding?
**
**A4:** While it’s possible to use an adhesive to install quarter round moulding, it’s generally not recommended as the primary method of attachment. Adhesives alone may not provide enough holding power to keep the moulding securely in place over time. They also don’t provide the same level of structural support as nails.
If you choose to use an adhesive, ensure it’s specifically designed for trim and moulding. Apply it according to the manufacturer’s instructions and consider using it in conjunction with nails to provide additional support. Nails not only secure the moulding but also help keep it straight and aligned with the baseboard or wall.
**
Q5: Do I need any special skills to install quarter round moulding with or without a nail gun?
**
**A5:** Installing quarter round moulding doesn’t require any special skills. With some practice and attention to detail, it’s a project that can be accomplished by most DIY enthusiasts. If you’re using a nail gun, make sure you familiarize yourself with the tool’s safety features and operating instructions before use. If you’re using hand tools, take your time and ensure accurate measurements and clean cuts.
As with any home improvement project, take the time to plan and prepare adequately. Measure the area where the quarter round will be installed, cut the moulding pieces at the correct angles, and double-check your measurements before securing them in place. Whether you decide to use a nail gun or traditional hand tools, remember that practice makes perfect, and don’t hesitate to seek advice or assistance if needed.

Summary
So, do you really need a nail gun for quarter round? Well, it depends. If you want a quicker and more efficient installation, a nail gun can be helpful. However, if you don’t have one or prefer a more traditional method, a hammer and nails will do just fine. Ultimately, it’s up to you and what you feel comfortable using.
Remember, safety should always come first. Whether you’re using a nail gun or hammer, be sure to wear protective gear and follow instructions carefully. And don’t forget to measure twice and cut once to get those quarter rounds looking perfect in your home!