If you’re wondering whether you need to clamp wood glue, you’ve come to the right place! Wood glue is a versatile adhesive used in various woodworking projects, but the clamping process can sometimes be confusing. So, let’s dive in and find out if clamping is necessary when using wood glue.
Imagine this: you’ve got your woodworking project all planned out, and now it’s time to bond those pieces of wood together using wood glue. But the big question is, do you really need to use clamps? Well, the answer depends on the type of wood you’re working with and the strength of the bond you want to achieve.
Now, let me break it down for you in simple terms. When you apply wood glue to two wooden surfaces, the glue creates a strong bond as it dries. However, without clamping, the pressure required for a secure bond may not be achieved. So, clamping helps to hold the pieces in place while the glue dries, ensuring a sturdy connection. But don’t worry, it’s not always mandatory. Stay tuned to discover when clamping is necessary and when you can skip it!
Do I Need to Clamp Wood Glue?
Wood glue is a common adhesive used in woodworking projects. One question that often arises is whether it is necessary to clamp wood glue while it dries. Some people argue that clamping is essential for a strong bond, while others believe it can be skipped. In this article, we will delve into the reasons behind clamping wood glue, the benefits it offers, and alternative methods for achieving a secure bond without clamps. So, if you’re wondering whether you need to clamp wood glue, read on to find out!
Why is Clamping Wood Glue Important?
Clamping wood glue is an important step in ensuring a strong and lasting bond between wooden pieces. When glue is applied between two surfaces, it first needs to be spread evenly and then given time to dry. During the drying process, the glue undergoes a chemical reaction known as co-polymerization, where the molecules in the glue bond with each other and with the wood fibers. Clamping helps to maintain pressure on the joint while the glue dries, resulting in a tight and secure bond.
Without clamping, the glue may not be able to bond properly because the surfaces may separate or move before the glue sets. This can weaken the overall strength of the joint and lead to failure over time. Clamping ensures that the surfaces are held in place firmly, allowing the glue to bond effectively and create a strong connection between the pieces of wood.
Additionally, clamping wood glue helps to minimize any gaps or voids that may occur between the surfaces. These gaps can occur due to uneven application of glue or inconsistencies in the wood. By applying pressure through clamping, any excess glue is squeezed out, filling in these gaps and creating a solid bond along the entire joint.
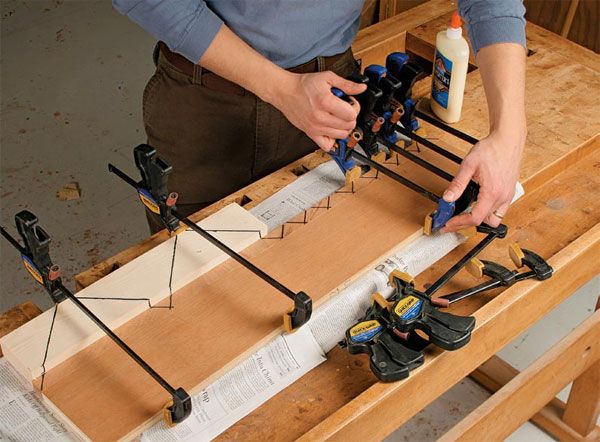
Types of Clamps for Wood Glue
When it comes to clamping wood glue, there are various types of clamps that can be used. Let’s explore some of the most commonly used clamps for woodworking:
1. Bar Clamps
Bar clamps are versatile and can be used for a wide range of woodworking projects. They consist of a long steel bar with adjustable clamp heads on both ends. The clamp heads can be moved along the bar to accommodate different sizes of workpieces. Bar clamps provide strong and even pressure, making them ideal for gluing large and heavy pieces of wood.
When using bar clamps for wood glue, it’s important to ensure that the pressure is evenly distributed across the joint. This can be done by tightening the clamp heads gradually and alternating between them to prevent any warping or bowing of the workpiece.
2. Pipe Clamps
Pipe clamps are similar to bar clamps but use pipes instead of a solid steel bar. They are a cost-effective option and are commonly used in woodworking shops. Pipe clamps consist of two clamp heads that attach to the ends of a pipe. The length of the pipe can be adjusted to accommodate different workpiece sizes.
When using pipe clamps for wood glue, it’s important to ensure that the pipe is straight and doesn’t have any sagging in the middle. This will ensure that the pressure is applied evenly across the joint. Pipe clamps are especially useful for projects where longer clamps are needed.
3. Spring Clamps
Spring clamps are small, lightweight clamps that are easy to use and offer quick application and removal. They are often used for holding smaller pieces together during glue-up or for temporarily clamping while permanent clamps are being set up. Spring clamps are not as powerful as other types of clamps and may not provide as much pressure, so they are better suited for lighter-duty applications.
When using spring clamps for wood glue, it’s important to remember that they may not provide enough pressure for a strong bond on their own. They can be used in combination with other clamps to ensure sufficient pressure is applied while the glue dries.
Alternative Methods for Clamping Wood Glue
While clamping is the traditional and most effective method for ensuring a strong bond with wood glue, there are alternative methods that can be used in certain situations. Here are a few options to consider:
1. Weighted Objects
If clamps are not available or suitable for your project, weighted objects can be used to apply pressure on the joint. This method involves placing heavy objects on top of the glued joint to hold it in place while the glue dries. This could include books, bricks, or even weights from a gym. The weight should be evenly distributed over the joint to ensure equal pressure on all areas.
However, it is important to note that this method may not provide the same level of pressure and uniformity as clamps, which can affect the overall strength of the bond. It is recommended to use this method for smaller and less critical projects rather than larger or load-bearing ones.
2. Tape
Tape can be used to hold the joint together while the glue dries. This method is particularly useful for smaller projects or when clamping is not practical. Apply strips of tape parallel to the joint to hold the pieces together firmly. The tape should be tight enough to hold the pieces in place but not so tight that it squeezes out all of the glue.
While tape can provide some pressure and alignment for the joint, it may not be as effective as clamps in terms of ensuring a strong bond. It is best suited for projects where the joint is not under high stress or load-bearing.
3. Dowels or Biscuits
An alternative method to achieve a strong bond without clamps is the use of dowels or biscuits. These are wooden pins or small wooden biscuits that are inserted into matching holes in the wood pieces. The glue is then applied to the holes before inserting the dowels or biscuits, creating a strong mechanical connection in addition to the adhesive bond.
This method can be effective in situations where clamping is not possible or desired. The dowels or biscuits help to align the wood pieces and hold them together while the glue dries. However, it is important to ensure that the holes are accurately drilled and that the dowels or biscuits fit tightly for a secure bond.
The Benefits of Clamping Wood Glue
Clamping wood glue offers several benefits that contribute to a strong and reliable bond. Here are some of the key advantages of using clamps:
- Enhanced Bond Strength: Clamping ensures that the glue makes full contact with both surfaces, resulting in a stronger bond.
- Even Pressure Distribution: Clamps help to apply even pressure along the entire joint, minimizing any gaps or voids.
- Reduced Glue Drying Time: With proper clamping, the glue can dry more quickly and efficiently, allowing you to move on to the next steps of your project.
- Improved Durability: A properly clamped joint is less likely to fail under stress or over time, providing a longer-lasting result.
- Greater Versatility: Clamps can be used for a wide range of woodworking projects, accommodating various sizes and shapes of workpieces.
Tips for Clamping Wood Glue
To achieve the best results when clamping wood glue, here are some useful tips to keep in mind:
- Prepare Your Surfaces: Before applying glue and clamping, ensure that the surfaces are clean, dry, and free from any dust or debris. This will help the glue to adhere properly.
- Apply the Right Amount of Glue: Apply a thin and even layer of wood glue to both surfaces, avoiding excessive amounts that can squeeze out during clamping.
- Use Adequate Clamping Pressure: Apply enough pressure to create a tight bond, but avoid over-tightening, as it can cause warping or damage to the workpiece.
- Regularly Check and Readjust: As the glue dries, it may shrink or expand slightly, affecting the clamped joint. Regularly check the clamps and readjust them if necessary.
- Allow Sufficient Drying Time: Follow the manufacturer’s instructions for the specific wood glue you are using to determine the recommended drying time before removing the clamps.
Alternative Glues to Consider
While wood glue is commonly used in woodworking, there are alternative adhesives that can be considered depending on the specific project requirements. Here are a few options:
1. Epoxy:
Epoxy is a durable adhesive that offers high bonding strength and resistance to moisture. It is particularly useful for projects that involve outdoor furniture or applications where water exposure is a concern. Epoxy typically requires mixing two components together before application.
Unlike wood glue, epoxy does not require clamping for a strong bond. However, it may have a longer curing time and be less forgiving in terms of clean-up. It is important to follow the manufacturer’s instructions for the specific epoxy product being used.
2. Polyurethane Glue:
Polyurethane glue is a versatile adhesive that offers excellent bonding strength and is suitable for a wide range of materials, including wood. It expands as it cures, filling gaps and providing a strong bond. Polyurethane glue can be resistant to moisture, making it suitable for outdoor applications or areas with high humidity.
Similar to epoxy, polyurethane glue does not necessarily require clamping for a strong bond but may have a longer curing time. It is important to read and follow the manufacturer’s instructions for the specific polyurethane glue product being used.
3. Cyanoacrylate Glue (Super Glue):
Cyanoacrylate glue, commonly known as super glue, is a fast-setting adhesive that bonds quickly and offers high strength. It is suitable for smaller woodworking projects or for bonding smaller pieces of wood together. Super glue is not as forgiving as wood glue and may not provide the same level of flexibility or elongation.
When using super glue, it is important to work quickly as it sets rapidly. Clamping is not necessary for most super glue applications, but it can be beneficial for larger or more critical projects.
Before selecting an alternative glue, it is essential to consider the specific requirements and constraints of the project to determine the most suitable adhesive.
In Summary
While it is possible to bond wood without clamping, using clamps with wood glue is generally recommended for the best results. Clamping wood glue ensures that the adhesive makes full contact with the surfaces, minimizes gaps, and creates a strong and lasting bond. Various types of clamps, such as bar clamps, pipe clamps, and spring clamps, can be used depending on the project and requirements.
However, in certain situations, alternative methods like weighted objects, tape, or the use of dowels or biscuits can be employed. It is important to consider the specific project requirements and limitations before choosing the appropriate method.
Remember to prepare your surfaces properly, apply the right amount of glue, use adequate clamping pressure, and allow sufficient drying time for the best results. If wood glue is not suitable for your project, explore alternative adhesives like epoxy, polyurethane glue, or cyanoacrylate glue.
Ultimately, the choice of whether to clamp wood glue depends on the specific woodworking project, the type of wood being used, and the desired strength and durability of the joint. So, assess your project’s requirements and make an informed decision to ensure a successful woodworking endeavor!
Key Takeaways: Do I Need to Clamp Wood Glue?
- Clamping wood glue is highly recommended to ensure a strong and secure bond.
- Applying pressure with clamps helps remove air bubbles and improves adhesion.
- Clamping prevents the wood from shifting or warping during the drying process.
- Not all wood glues require clamping, so always check the manufacturer’s instructions.
- If clamping is not possible, use alternative methods like weights or tape to apply pressure.
Frequently Asked Questions
Are you wondering about the proper use of wood glue and whether clamping is necessary? Look no further! We’ve answered some common questions to guide you on your woodworking journey.
Can I use wood glue without clamping?
Technically, you can use wood glue without clamping, but it is highly recommended to use clamps for the best results. Clamping ensures proper bonding between the wood pieces and allows the glue to dry under pressure, creating a strong bond. Without clamping, the glue may not hold the pieces together securely, leading to potential issues down the line. While clamping is not always essential for certain applications like simple repairs, it is crucial for larger projects or when joining pieces permanently.
Moreover, clamping helps in preventing any gaps between the wood pieces, ensuring a flush and seamless joint. It also minimizes the chances of the pieces shifting or moving during the drying process. So, while you can technically skip clamping in certain situations, it is generally recommended to use clamps for the best results and a strong, durable bond.
How long should I clamp wood glue?
The duration for clamping wood glue largely depends on the type of glue used. Generally, most wood glues require some clamp time to fully dry and form a strong bond. The minimum recommended clamp time is typically mentioned on the glue bottle or packaging. However, it is always better to keep the pieces clamped for longer to ensure a reliable bond.
For most common woodworking projects, a clamp time of at least 30 minutes to 1 hour is often sufficient. However, leaving the pieces clamped for an extended period can give you even better results. It is advisable to carefully follow the instructions provided by the glue manufacturer and allow ample time for the glue to cure and bond properly. This will help ensure a strong and long-lasting joint that won’t come apart easily.
What happens if I don’t clamp wood glue long enough?
If you don’t clamp wood glue for the recommended amount of time, the bond between the wood pieces may not be as strong as desired. Insufficient clamp time can lead to a weaker connection, increasing the chances of the pieces separating in the future. The glue needs adequate time under pressure to properly cure and create a strong bond.
Furthermore, if you remove the clamps too soon, the pieces may shift or move before the glue has fully dried, resulting in misaligned joints or gaps between the wood. This can compromise the structural integrity and overall appearance of your project. To ensure a reliable bond and a quality end result, it is important to be patient and allow the appropriate clamp time as suggested by the manufacturer or woodworking experts.
Are there any alternatives to clamping wood glue?
If clamps are not available or suitable for your specific project, there are alternative methods you can use to secure wood pieces while the glue dries. One option is to use heavy objects like books, weights, or even sandbags to apply pressure on the joint. These objects can help keep the pieces in place and ensure a tight bond.
Another technique is to utilize specialized woodworking tools like strap clamps, band clamps, or even tape. These tools can provide the necessary pressure to hold the wood pieces together until the glue sets. However, it is important to note that while these alternative methods can be effective, they may not offer the same level of stability and reliability as traditional clamps. It is always best to use clamps whenever possible to achieve the strongest and most secure bond.
Do I need to remove the clamps after the wood glue dries?
Once the wood glue has dried and cured according to the manufacturer’s instructions, you can remove the clamps from your project. The glue should have formed a strong bond, securely holding the wood pieces together. It is important to be patient and not rush the process. Removing the clamps prematurely can disrupt the bond and potentially weaken it.
After removing the clamps, it is recommended to allow the glue to fully cure and harden for an additional amount of time. This will ensure that the bond is fully set and strong. Consult the manufacturer’s guidelines for the specific glue you are using to determine the recommended curing time. Once the glue has fully cured, you can proceed with any additional woodworking steps or finishings on your project.

How To Clamp Boards For Glue Up – WOOD magazine
Summary
So, to sum it up, clamping wood glue is not always necessary. It depends on the project and the type of wood glue being used.
If you’re working on a small project or using a quick-setting glue, clamping may not be needed. However, for larger projects and slower-drying glue, clamping can help ensure a strong bond.
Remember, it’s always a good idea to follow the instructions on the glue bottle and test your bond before removing the clamps.