
Have you ever wondered if a planer has to be level? Well, you’re in the right place! In this article, we’ll explore the importance of having a level planer and the impact it can have on your woodworking projects.
When it comes to planers, being level is crucial for achieving accurate and precise results. A level planer ensures that the material you’re working with is evenly shaved down to the desired thickness. Without a level planer, you might end up with uneven surfaces, making it difficult to achieve the desired finish.
Not only does a level planer guarantee consistent results, but it also helps in preventing unnecessary stress on the machine. By maintaining a level position, you distribute the workload evenly, prolonging the lifespan of your planer. So, whether you’re a professional woodworker or just getting started, ensuring that your planer is level is essential for quality craftsmanship. Stick around to learn more about the best practices for leveling your planer. Let’s dive in!
Does a Planer Have to be Level?
When it comes to using a planer, one common question that arises is whether or not the planer has to be level. This is an important consideration because the levelness of the planer can affect the quality and accuracy of the finished product. In this article, we will explore the significance of maintaining a level planer and provide tips on how to achieve proper leveling for optimal results.
Importance of a Level Planer
A planer is a woodworking tool used to smooth and shape wooden boards by removing layers of material. The primary purpose of a planer is to create a flat and uniform surface on the wood. A planer that is not level can lead to uneven and inconsistent results. If the planer is not level, it can cause the wood to be cut at varying depths, resulting in an uneven surface and potentially ruining the project.
Furthermore, a planer that is not level may also pose a safety risk. An unbalanced planer can cause the wood to catch on the blades, leading to kickbacks and potential injuries. It is essential to ensure the planer is level to promote smooth and safe operation.
How to Level a Planer
Now that we understand the importance of a level planer, let’s explore how to achieve proper leveling. Follow these steps to ensure your planer is level and ready for use:
- Check the table surfaces: Start by examining the table surfaces of your planer. Look for any visible signs of warping or unevenness. If you notice any issues, you may need to make adjustments or seek professional assistance to fix the problem.
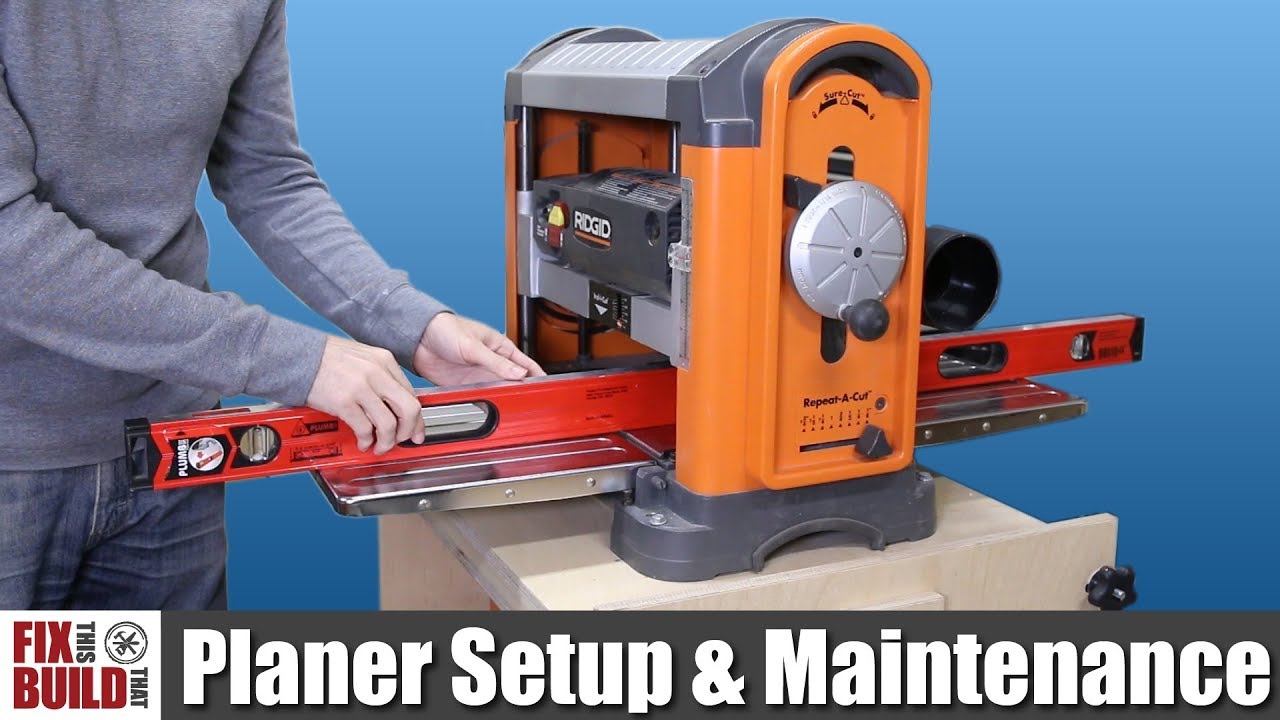
- Use a spirit level: Place a spirit level across the planer’s table to determine its levelness. Adjust the leveling screws or knobs on the planer until the bubble in the spirit level is centered. Repeat this process for each section of the table.
- Check the blades: Ensure that the blades of the planer are properly aligned and at the correct height. Misaligned or improperly set blades can contribute to an uneven planer surface. Refer to the manufacturer’s instructions for guidance on adjusting and aligning the blades.
- Inspect the infeed and outfeed tables: The infeed and outfeed tables should be parallel to the planer’s table. Use a straight edge or a measurement tool to verify their alignment. Adjust as necessary to achieve parallelism.
- Regular maintenance: Finally, regular maintenance is crucial for keeping your planer level. Clean the planer regularly to remove debris and inspect for any signs of wear or damage. Lubricate moving parts as recommended by the manufacturer.
By following these steps, you can ensure that your planer is level and ready for use, resulting in precise and consistent woodworking projects.
Common Issues with an Unlevel Planer
An unlevel planer can lead to several issues that affect the quality and functionality of your woodworking projects. Here are a few common problems that may arise:
1. Uneven thickness:
If the planer is not level, it can cause the wood to be cut at varying depths, resulting in an uneven thickness across the board. This can be particularly problematic when working on projects that require precise measurements, such as fitting wooden pieces together.
2. Snipe:
Snipe refers to a phenomenon where the planer cuts a deeper or shallower section at the beginning or end of a board, causing an uneven surface. This can be caused by an unlevel planer or incorrect feeding technique. Ensuring the planer is level can help minimize or eliminate snipe.
3. Safety hazards:
An unlevel planer may pose safety risks, as it increases the likelihood of kickbacks. When the blades are not cutting evenly, the wood can jam and kick back forcefully. This can cause injuries to the operator and damage to the workpiece. Keeping the planer level reduces the chances of kickbacks and promotes safer operation.
When to Seek Professional Help
In some cases, leveling a planer may require professional assistance, especially if the issue is related to significant warping or damage. If you’ve followed the steps outlined above and are unable to achieve a level planer, it’s best to consult a professional woodworking technician who can assess and repair the planer effectively.
Conclusion
Maintaining a level planer is crucial for achieving accurate and consistent results in woodworking projects. A level planer not only ensures the quality of the finished product but also promotes safety during operation. By carefully inspecting and adjusting the planer’s table surfaces, blades, and tables, you can achieve optimal leveling and enjoy precise and satisfying woodworking experiences.
Key Takeaways: Does a Planer Have to be Level?
- A planer should ideally be set up on a level surface to ensure accurate results.
- Having a level planer helps prevent snipe, which is when the ends of a board are unevenly planed.
- Even if a planer is not perfectly level, adjustments can be made to minimize snipe.
- Using a level during setup can help achieve better planing results.
- Regular maintenance and calibration are important for a planer’s performance, including keeping it level.
Frequently Asked Questions
When working with a planer, it’s important to understand the role of leveling. Here are some commonly asked questions about the levelness of a planer.
1. Why does a planer need to be level?
A planer needs to be level to ensure consistent and accurate cuts. When a planer is not level, it can result in uneven material removal, causing flaws and inconsistencies in the finished product. Levelling the planer helps to maintain precision and produce high-quality work.
To level a planer, you can use a bubble level or other leveling tools and adjust the machine’s feet or base accordingly. This ensures that the planer is parallel to the work surface and reduces the risk of errors, such as material snipe (excess removal at the beginning or end of a board).
2. Can I use a planer on an uneven surface?
Using a planer on an uneven surface is not recommended. Planers work best on flat and level surfaces to achieve consistent and accurate cuts. When used on an uneven surface, the planer may not remove material evenly, leading to imperfections in the workpiece.
If you encounter an uneven surface, it’s advisable to level it before using a planer. This can be done by sanding or planing the surface until it’s level or using leveling compounds to rectify the unevenness. Always ensure that the surface is flat and stable before operating a planer.
3. How can I check if my planer is level?
To check if your planer is level, you can use a leveling tool such as a bubble level or a machinist’s straightedge. Place the level or straightedge on the bed of the planer and check for any gaps or areas where the tool doesn’t sit flush.
If there are gaps or unevenness, you may need to adjust the planer’s feet or base. Refer to the manufacturer’s instructions for the specific model or consult a professional to ensure the planer is properly leveled for optimal performance.
4. What are the consequences of using an unlevel planer?
Using an unlevel planer can have several consequences. Firstly, it can result in uneven material removal, leading to inconsistencies in the thickness of your workpiece. This can affect the overall dimensions and the quality of the finished product.
Additionally, an unlevel planer can cause snipe, which is when the planer removes excess material at the beginning or end of a board, often leaving visible flaws. Snipe can be particularly problematic when working with longer boards or when precise dimensions are required.
5. How often should I check and level my planer?
It’s a good practice to check and level your planer periodically, especially if you notice any issues with the performance or the quality of your work. If you frequently work with your planer or if you move it often, you may need to check and level it more frequently.
Regular maintenance and inspection will help ensure that your planer is always in optimal condition and producing accurate results. Following the manufacturer’s guidelines for maintenance and adjusting the planer’s level will help you maintain the best possible performance from your machine.
Clever things you can do with an ELECTRIC hand planer
Summary
So, does a planer have to be level? Yes, it’s important for a planer to be level because it ensures accurate and consistent results. When a planer is not level, it can lead to uneven cuts, which can ruin the wood and waste your time and effort. Additionally, an uneven planer can also cause safety issues, as it may cause the wood to kick back or result in an unstable working environment. Therefore, it’s crucial to check and adjust the level of your planer before using it.
However, leveling a planer is not a difficult task. You can easily do it using a basic level and adjusting the feet of the planer accordingly. By taking this small step, you can improve the performance, accuracy, and safety of your planer, ultimately achieving the best results in your woodworking projects.