If you’ve ever wondered how to align a tap when threading a hole on a lathe, you’re in the right place! Threaded holes are essential for securing screws and bolts, and getting the alignment right is crucial for a strong and secure fit. In this article, we’ll explore the steps and techniques involved in aligning a tap on a lathe to thread a hole accurately. So, let’s dive in and discover how to achieve precise threading on a lathe!
Threading a hole on a lathe involves rotating a tap to create internal threads inside the hole. However, aligning the tap correctly is essential to ensure the threads are straight and properly matched with the corresponding screw or bolt. Otherwise, you might end up with a loose or misaligned fit. But don’t worry, aligning a tap is not as complicated as it sounds. In the following sections, we’ll break down the process and guide you through the necessary steps to achieve accurate alignment every time.
Ready to learn the tips and tricks for aligning a tap when threading a hole on a lathe? Great! We’ll show you how to position the tap, set the lathe speed, and adjust the alignment to achieve precise threading. By following these steps, you’ll gain the skills and knowledge needed to tackle threading tasks confidently and efficiently. So, let’s get started and explore the fascinating world of tap alignment on a lathe!
- Choose the correct tap: Select a tap that matches the size and thread pitch of the hole you want to thread.
- Secure the workpiece: Clamp the workpiece securely to prevent it from moving during the threading process.
- Align the tap: Use a center drill or centering device to create a starting point for the tap. Align the tap perpendicular to the workpiece.
- Start tapping: Slowly rotate the tap clockwise while applying downward pressure to enter the hole.
- Advance and reverse: Rotate the tap clockwise to advance and counterclockwise to reverse. Use cutting fluid to lubricate the tap and chips.
- Check alignment: Periodically check the alignment of the tap to ensure it remains perpendicular as you continue threading.
- Complete the thread: Continue tapping until the desired thread depth is achieved.
- Remove the tap: Reverse the tap and carefully remove it from the threaded hole.

How to Properly Align a Tap When Threading a Hole on the Lathe
When it comes to threading a hole on the lathe, aligning the tap is a crucial step to ensure precise and accurate threading. Improper alignment can result in damaged threads, a misaligned hole, or even breakage of the tap. In this article, we will explore the best practices and techniques for aligning a tap when threading a hole on the lathe, ensuring successful results and minimizing the risk of errors.
Understanding the Importance of Tap Alignment
Proper alignment of the tap is crucial for achieving accurate and functional threads. When a tap is not aligned correctly, it can create off-center threads, resulting in a loose fit or even a stripped hole. Additionally, misalignment can cause excessive cutting forces, leading to tap breakage or damage to the lathe. Therefore, taking the time to ensure proper tap alignment is essential for achieving high-quality threaded holes.
There are several factors to consider when aligning a tap on the lathe. One important aspect is aligning the tap with the centerline of the hole. This ensures that the threads are evenly distributed and centered, providing a solid and secure connection. Additionally, aligning the tap perpendicular to the workpiece’s surface is crucial for achieving straight and accurate threads.
Tools and Techniques for Tap Alignment
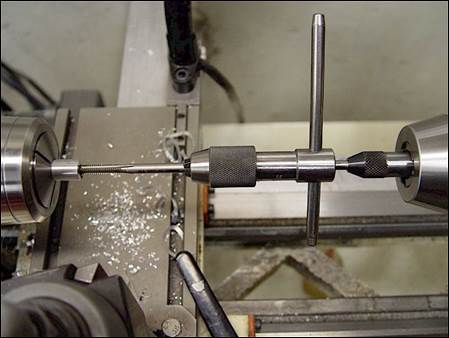
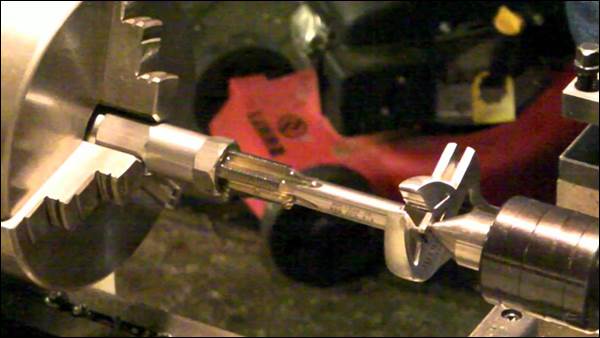
Fortunately, there are various tools and techniques available to help with tap alignment when threading a hole on the lathe. One commonly used tool is a tap alignment guide, also known as a tap guide. This tool fits onto the lathe’s tailstock and helps guide the tap into the hole, ensuring proper alignment. The tap guide keeps the tap centered and perpendicular to the workpiece, preventing misalignment and promoting accurate threading.
Another technique for tap alignment is the use of a center drill. By drilling a center hole before tapping, you create a guide for the tap to follow, ensuring alignment with the hole’s centerline. Center drilling also helps prevent the tap from wandering off-course, especially when working with harder materials or larger holes. Using a center drill in conjunction with a tap guide provides a reliable method for precise tap alignment.
Common Challenges and Tips for Tap Alignment
While tap alignment is a crucial step, it can present some challenges, especially for beginners. One common challenge is ensuring a secure grip on the tap while aligning it. It is recommended to use a tap wrench fitted securely onto the tap’s square shank to provide a firm grip and prevent slippage. Additionally, applying cutting fluid during the threading process reduces friction and helps facilitate smoother alignment.
Another challenge is maintaining a consistent feed rate while threading. Rapid or uneven feed can lead to misalignment and poor thread quality. It is essential to take your time and maintain a steady and controlled feed rate to ensure the tap follows the correct path. Being patient and applying even pressure will help you achieve precise alignment and high-quality threads.
Lastly, it is crucial to periodically back off the tap while threading to remove chips and reduce stress on the tap. This helps prevent chip buildup, which can affect alignment and increase the risk of tap breakage. Taking short intervals to back off the tap, clean the chips, and apply cutting fluid will contribute to a successful threading process and ensure proper tap alignment.
The Benefits of Proper Tap Alignment
Proper tap alignment offers a range of benefits, both in terms of the final product’s functionality and the overall efficiency of the threading process. Some of the key benefits include:
- Accurate Threads: Proper tap alignment ensures evenly distributed and centered threads, resulting in a tight and secure fit.
- Reduced Risk of Damage: Aligning the tap correctly minimizes the risk of tap breakage, stripped threads, or other forms of damage.
- Time and Cost Savings: By achieving accurate taps on the first attempt, you can minimize the need for rework or repairs, saving time and costs.
- Improved Overall Quality: Proper tap alignment contributes to the overall quality and reliability of the threaded holes, enhancing the functionality of the workpiece.
Tips for Ensuring Proper Tap Alignment
In addition to the techniques mentioned earlier, here are some additional tips to ensure proper tap alignment:
1. Secure the workpiece:
Ensure that the workpiece is securely clamped or held in place to prevent movement or vibration during the tapping process. A stable workpiece promotes accurate tap alignment.
2. Use the right tap:
Choose the appropriate tap for the material being threaded. Using the wrong tap can result in poor alignment and compromised thread quality.
3. Take small cuts:
When using a lathe, avoid taking large cuts with the tap. Instead, opt for smaller cuts and gradually increase the depth to ensure better alignment and prevent excessive strain on the tap.
4. Regularly check alignment:
Periodically check the tap’s alignment during the threading process. This can be done visually or by using a dial indicator to ensure that the tap remains centered and perpendicular to the workpiece.
Conclusion
Proper tap alignment is crucial for achieving accurate and functional threaded holes on the lathe. By understanding the importance of tap alignment, utilizing the right tools and techniques, and implementing the suggested tips, you can ensure precise alignment and high-quality threads. Remember to take your time, be patient, and maintain a steady feed rate to achieve optimal results. With proper tap alignment, you can confidently thread holes on the lathe and achieve the desired outcome with minimal errors or complications.
How can a tap be aligned when threading a hole on the lathe?
- Make sure the tap is centered correctly in the hole.
- Use a tap guide or a center punch to mark the center of the hole.
- Securely clamp the workpiece in the lathe chuck.
- Use a tailstock center for additional support.
- Apply cutting oil to the tap to reduce friction and extend tool life.
Frequently Asked Questions
When threading a hole on the lathe, it’s crucial to align the tap properly for successful results. Here are some common questions about aligning a tap and their answers:
1. Why is it important to align the tap when threading a hole on the lathe?
Aligning the tap is crucial because it ensures that the threads are cut straight and properly aligned with the existing hole. If the tap is not aligned correctly, it can result in damaged threads, difficulty in screwing or unscrewing, or even a stripped hole.
By aligning the tap properly, you minimize the risk of these issues and ensure a smooth and functional threading process. It’s important to take the time to align the tap correctly to avoid any complications down the line.
2. What are the steps to align a tap when threading a hole on the lathe?
The first step is to choose the appropriate tap size for the hole you want to thread. Insert the tap into the tap wrench. Align the tap with the hole, making sure it’s perpendicular to the workpiece’s surface. Slowly and steadily rotate the tap while applying consistent downward pressure.
Make sure to use cutting fluid to lubricate the tap and reduce friction. Monitor the alignment and adjust as needed. Continue rotating the tap until the desired depth is reached. Remember to periodically reverse the tap to break the chips and clear the cutting path.
3. Are there any tips for ensuring accurate alignment of the tap?
One helpful tip is to use a center drill to create a small divot in the center of the hole before threading. This can serve as a reference point and help guide the tap into accurate alignment. Additionally, securing the workpiece tightly in the lathe and using a steady hand while rotating the tap will contribute to better alignment.
Using a tapping guide or thread pitch gauge can also be beneficial to ensure the tap is properly aligned and matched to the existing threads. It’s essential to take your time and pay careful attention to detail during the alignment process to achieve accurate results.
4. What are some common mistakes to avoid when aligning a tap?
One common mistake is applying excessive force while turning the tap. This can result in misalignment and potentially break the tap or damage the threads. It’s important to apply steady, controlled pressure and let the tap do the cutting work.
Another mistake to avoid is not using cutting fluid or lubricant. Lubrication helps reduce friction, dissipates heat, and prolongs the life of the tap. Insufficient lubrication can lead to poor alignment and premature wear of the tap.
5. How do I know if the tap is properly aligned when threading a hole on the lathe?
A properly aligned tap should move smoothly and evenly without any resistance as it cuts the threads. If you notice any slipping, wobbling, or resistance, it’s an indication that the tap is not aligned correctly. Stop immediately, realign the tap, and continue threading from where you left off.
Additionally, inspect the threads after threading is complete. If they appear straight, evenly spaced, and aligned with the original hole, it indicates successful alignment. However, if you notice any irregularities or roughness, it may be an indication of misalignment or other issues that need to be addressed.
Summary
Here’s a quick summary of how to align a tap when threading a hole on a lathe:
First, make sure your tap matches the hole size you want to thread.
Next, secure the tap in the lathe using a tap holder or a drill chuck.
Then, position the tap perpendicular to the workpiece, ensuring it is straight.
Use the lathe’s tailstock for support to keep the tap steady while threading.
Turn on the lathe and slowly start feeding the tap into the hole.
Apply cutting fluid for lubrication and to prevent the tap from overheating.
Keep checking the tap’s alignment periodically to make sure it stays straight.
Once the tapping is complete, turn off the lathe and remove the tap carefully.
Remember to clean the threads to remove any debris and ensure a smooth finish.
By following these steps, you can align a tap properly and thread a hole accurately on a lathe.