Looking to add some grooves to your woodworking project? Well, you’ve come to the right place! In this article, we’ll explore how you can cut a groove with a chisel, giving your work a professional and intricate finish. Whether you’re a novice or an experienced woodworker, mastering this technique will take your craftsmanship to the next level.
Have you ever wondered how those beautifully carved grooves are made on furniture or decorative pieces? It’s all about using the right tools and techniques. A chisel, one of the most versatile tools in woodworking, can be your secret weapon for creating those perfect grooves.
In this guide, we’ll walk you through the step-by-step process of cutting a groove with a chisel. Get ready to unlock the secrets of this age-old technique and elevate your woodworking skills to new heights! So, grab your chisel and let’s get started on this exciting journey into the world of groove cutting!
1. Measure and mark the desired groove location on the workpiece.
2. Secure the workpiece in a vise or clamp to prevent movement.
3. Choose a chisel with the appropriate width for your groove.
4. Hold the chisel with one hand and tap gently with a mallet to make a shallow cut along the marked line.
5. Continue tapping and gradually deepen the groove until the desired depth is achieved.
6. Clear any debris from the groove for a clean finish.

How to Cut a Groove with a Chisel: A Step-by-Step Guide
Introduction:
If you’re looking to add a decorative groove or channel to your woodworking project, using a chisel is an effective and precise method. Cutting a groove with a chisel requires the right technique and tools, but with some practice, you can achieve clean and accurate results. In this article, we’ll guide you through the process of cutting a groove with a chisel, providing you with all the information you need to get started.
1. Selecting the Right Chisel
The first step in cutting a groove with a chisel is to choose the right tool for the job. Chisels come in various shapes and sizes, but for grooving, a narrow chisel with a beveled edge is ideal. This type of chisel allows for precise control and clean cuts. Look for a chisel with a comfortable handle and a sharp cutting edge. Ensure that the chisel is in good condition and free from any chips or signs of wear.
Once you have selected the appropriate chisel, it’s important to keep it sharp. A dull chisel will not only make it harder to cut the groove but can also cause splintering and tearout. Regularly sharpen your chisel using a sharpening stone or honing guide to maintain its cutting edge.
2. Marking the Groove
Before you start cutting the groove, it’s essential to accurately mark its location on your workpiece. Use a ruler or a marking gauge to measure and mark the groove’s width and depth. You can also use a pencil or a marking knife to make the lines more visible. Take your time during this step, as precision is key to achieving a clean and professional-looking groove.
Consider the purpose of the groove and how it will fit into your overall design. Take into account the width and depth of any material that will fit into the groove, such as a panel or trim. Once you have marked the groove, double-check your measurements and alignment before proceeding.
3. Establishing a Guide Line
To help guide the chisel during the cutting process, it’s beneficial to establish a guide line along the marked groove. This can be done by using a straightedge or a chisel guide. Place the guide along the marked line and secure it in place. This will serve as a reference point and ensure that your groove remains straight and even throughout the cutting process.
If you’re working on a curved or irregular surface, you may need to freehand the groove without a guide. In this case, go slowly and carefully, following your marked lines as closely as possible.
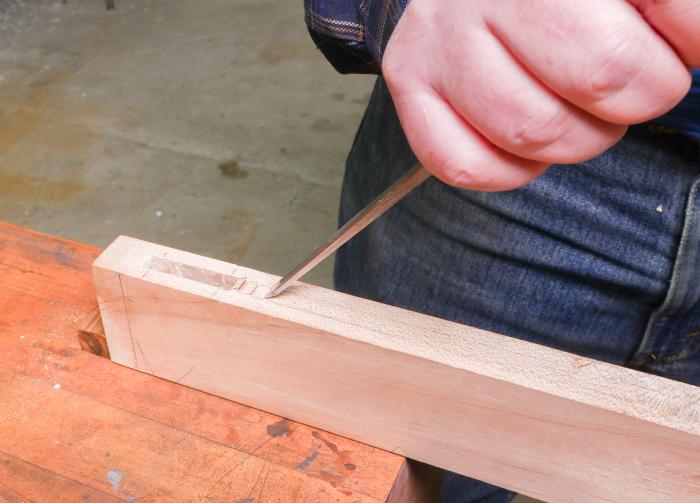
4. Making Initial Cuts
With your chisel, begin by making a series of shallow cuts along the marked groove. Position the chisel with the beveled edge facing down and the flat side against the waste material. Hold the chisel with both hands, using your dominant hand to guide the chisel and your non-dominant hand to provide support and stability.
Apply gentle pressure and strike the chisel with a wooden mallet or a hammer. Start from the groove’s entrance and work your way toward the end, making only shallow cuts initially. This will help establish the groove’s boundaries and prevent any splintering or tearout. Remember to consistently check the chisel’s alignment and adjust as needed.
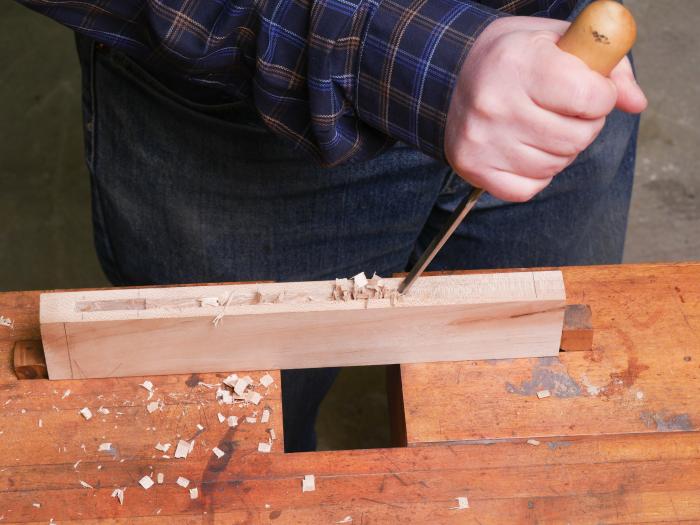
5. Deepening the Groove
Once you have made the initial cuts, you can now begin to deepen the groove. Working in small increments, gradually increase the force of your strikes and the depth of the chisel. Be mindful of the grain direction as you deepen the groove, as cutting against the grain can lead to tearout. Take your time and go slowly, ensuring that your cuts are controlled and accurate.
To prevent the chisel from accidentally cutting too deep, periodically measure the groove’s depth using a depth gauge or a ruler. Aim for a consistent and even depth throughout the entire groove.
6. Finishing and Smoothing the Groove
Once you have reached the desired depth, it’s time to clean up and smooth the groove. Using light and controlled cuts, remove any remaining waste material and make any necessary adjustments to the groove’s shape and dimensions. Pay attention to the groove’s edges, ensuring that they are crisp and clean.
To achieve a smooth and polished finish, use sandpaper or a small file to gently smooth the groove’s bottom and sides. Start with coarse-grit sandpaper and gradually work your way to finer-grit sandpaper for a polished result. Take your time during this step, as it can greatly impact the overall quality of the groove.
7. Finishing Touches and Considerations
After cutting and smoothing the groove, inspect it for any imperfections or irregularities. Make any necessary adjustments or refinements to ensure that the groove meets your desired specifications. Sand any rough edges or surfaces to create a finished look. Finally, clean the groove and surrounding area to remove any sawdust or debris.
Remember to always prioritize safety when working with chisels and other sharp tools. Wear protective goggles and gloves to prevent any accidents or injuries. Additionally, take breaks as needed and maintain proper posture and hand positioning to prevent fatigue.
With practice and patience, cutting a groove with a chisel can become a valuable skill in your woodworking repertoire. Experiment with different chisel sizes and techniques to achieve varying groove widths and depths. Whether you’re adding decorative touches or constructing joinery, mastering the art of cutting a groove with a chisel will enhance your woodworking projects and allow you to create beautiful and functional pieces.
Key Takeaways: How Can You Cut a Groove with a Chisel?
- 1. Start by marking the groove’s boundaries on the wood using a pencil or knife.
- 2. Position the chisel on the marked line and tap gently with a mallet to create a small groove.
- 3. Gradually deepen the groove by increasing the force of your strikes on the chisel.
- 4. Use a chisel with the appropriate width to match the desired groove size.
- 5. Take breaks to clean out the wood chips from the groove for better visibility and control.
Frequently Asked Questions
Here are some commonly asked questions about cutting a groove with a chisel:
1. How can I create a groove with a chisel?
To cut a groove with a chisel, start by marking the desired location and width of the groove on your workpiece using a pencil or a marking knife. Next, firmly hold the chisel with one hand and position the beveled edge of the chisel at the starting point of the groove. Gently tap the chisel with a mallet or a hammer to create a shallow pilot groove. Then, repeat the process, gradually deepening the groove with each pass of the chisel. Remember to apply firm and controlled pressure as you move along the marked line. Take your time and make multiple passes until the desired groove depth is achieved.
It’s important to note that if you’re cutting a wider groove, you may need to use multiple chisels of different sizes or opt for a specialized grooving chisel to achieve accurate results. Additionally, always wear appropriate safety gear such as safety glasses and work gloves when working with chisels.
2. What types of chisels are best for cutting grooves?
When it comes to cutting grooves, the best types of chisels to use are either a flat chisel or a mortise chisel. Flat chisels are ideal for shallow grooves, while mortise chisels are better suited for deeper grooves and larger scale projects. Both types have beveled edges that allow for precise cutting and shaping.
It’s also worth mentioning that the size of the chisel should be chosen based on the width and depth of the groove you want to create. Using a chisel that is wider than the desired groove width and gradually working your way towards the desired measurements can help ensure accuracy and control as you cut the groove.
3. What are some useful techniques to cut a clean and straight groove?
To cut a clean and straight groove with a chisel, it’s important to maintain control and make precise movements. Here are some techniques that can help:
– Use a marking knife or a pencil to clearly mark the desired location and width of the groove. This will serve as a guide as you chisel.
– Hold the chisel firmly and make controlled, straight movements along the marked line.
– Take your time and make multiple passes, gradually deepening the groove with each pass.
– Use light taps with a mallet or hammer to reduce the risk of chisel slipping and causing damage.
– Regularly check the depth and width of the groove as you work to ensure accuracy.
– Consider using a guide or a jig to help you maintain a straight path and prevent the chisel from drifting off the designated line.
4. How can I prevent tearout when cutting a groove with a chisel?
Tearout refers to the splintering or chipping of wood fibers along the edges of the groove. To prevent tearout when cutting a groove with a chisel, you can try the following techniques:
– Score the groove’s edges lightly with a marking knife before chiseling to create a clean starting point.
– Use a sharp chisel to minimize the force required and achieve cleaner cuts.
– Secure your workpiece firmly in place to prevent it from moving or vibrating as you chisel.
– Cut the grain in multiple passes, taking shallower cuts each time to reduce the chances of tearing the wood fibers.
– Consider using a backer board behind your workpiece to prevent any tearout on the underside as you chisel through the surface.
By employing these techniques, you’ll have a better chance of achieving clean and tearout-free grooves in your woodworking projects.
5. Can I use a chisel to cut grooves on materials other than wood?
While chisels are commonly used for woodworking, they can also be used to cut grooves on other materials like metal, plastic, and even stone. However, it’s important to select the appropriate type of chisel for the specific material.
For example, when working with metal, a cold chisel or a specific metalworking chisel is recommended. Similarly, for plastic and stone, there are specialized chisels available that are designed to work effectively with these materials.
When working with non-wood materials, it’s crucial to adapt your technique and tool choice accordingly. Each material may require different cutting speeds, pressures, and angles to achieve the desired groove. Always refer to manufacturer guidelines and ensure you have the proper safety measures in place when working with different materials.
Summary
Cutting a groove with a chisel is easy if you follow these steps. First, mark the groove using a ruler or pencil. Then, make a starter hole by tapping the chisel gently with a hammer. Next, use the chisel to remove the waste wood by cutting along the marked lines. Finally, smooth out the groove with sandpaper for a clean finish.
Remember to always wear protective gear like goggles and gloves when using a chisel. Take your time and be patient, as rushing can lead to accidents. With practice, you’ll become skilled at cutting grooves and creating beautiful woodworking projects. Keep practicing and have fun!