Ever wondered how does an orbital sander work? Well, you’re in for a treat! Get ready to dive into the world of woodworking and discover the magic behind this handy tool.
Picture this: you have a piece of wood that needs a smooth finish, free from any imperfections. That’s where the orbital sander comes in, like a superhero on a mission to make your woodworking dreams come true.
But how does it work, you ask? Think of the orbital sander as a mini tornado, swirling sandpaper around at high speeds. As you guide the sander along the surface of your project, it not only spins the sandpaper in circles but also moves it in an orbital motion. Talk about multitasking!
So, are you ready to uncover the secrets of the orbital sander and take your woodworking skills to the next level? Let’s jump right in and explore this incredible tool in more detail. Buckle up, because it’s going to be a smooth ride!
An orbital sander is a versatile tool used for sanding various surfaces. Here’s how it works:
1. Attach sandpaper to the sander’s pad.
2. Turn on the sander and hold it firmly.
3. Move the sander in circular or back-and-forth motions.
4. Apply even pressure to achieve consistent results.
5. Keep the sander moving to prevent damage to the surface.
Remember to start with a coarse grit and gradually switch to finer grits for a smooth finish. Happy sanding!

How Does an Orbital Sander Work?
An orbital sander is a versatile power tool commonly used in woodworking projects. It is designed to rapidly remove material from the surface of a workpiece through the use of an oscillating sanding pad. This article will delve into the inner workings of an orbital sander, exploring its components and mechanisms, and explain how it operates to achieve smooth and consistent sanding results. Whether you’re a DIY enthusiast or a professional woodworker, understanding the functionality of an orbital sander will help you make the most of this essential tool in your projects.
1. Understanding the Components
An orbital sander is composed of several key components that work together to create the sanding motion. The main parts of an orbital sander include:
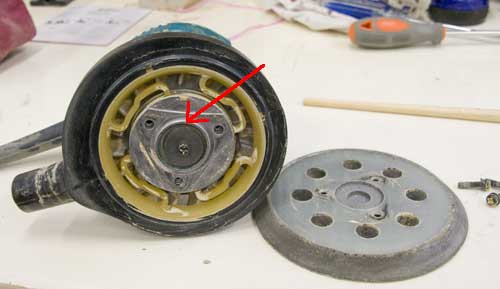
- Sanding Disc: This is the circular disc to which the sandpaper is attached. It connects to the orbital sander via a backing pad.
- Backing Pad: The backing pad acts as a cushion between the sanding disc and the sander’s body. It also allows the sanding disc to move in an orbital motion.
- Motor: The motor is the heart of the orbital sander. It generates the power that drives the oscillating motion of the sanding pad.
- Orbit Mechanism: The orbit mechanism is responsible for the random circular motion of the sanding pad. It typically consists of an eccentric bearing or a cam, which creates the orbital pattern.
- Variable Speed Control: Many orbital sanders offer variable speed settings, allowing you to adjust the sanding speed based on the material and desired finish.
- Dust Collection System: To minimize airborne dust particles and keep your work area clean, orbital sanders often feature a dust collection system. This can include a dust bag or a connection for a vacuum cleaner.
Now that you have a better understanding of the components, let’s explore how they work together to achieve the orbital sanding action.
2. The Orbital Sanding Motion
The orbital sanding motion is what sets an orbital sander apart from other sanding tools. It is a combination of random circular and back-and-forth motions, resulting in a smooth and swirl-free finish. The key steps of the orbital sanding process are as follows:
Step 1: Power On
When you switch on the orbital sander, the electric motor activates, providing rotational power to the sanding disc through a system of gears. This spinning motion alone would create a scratchy and uneven sanding pattern.
Step 2: Eccentric Orbit
Inside the orbital sander, the eccentric bearing or cam assembly is constantly forcing the backing pad, and consequently, the sanding disc, to move in a random circular motion. This means that while the sanding disc is spinning, it is also moving in an eccentric orbit around a central point. This random circular motion eliminates noticeable scratch patterns, giving a smoother finish.
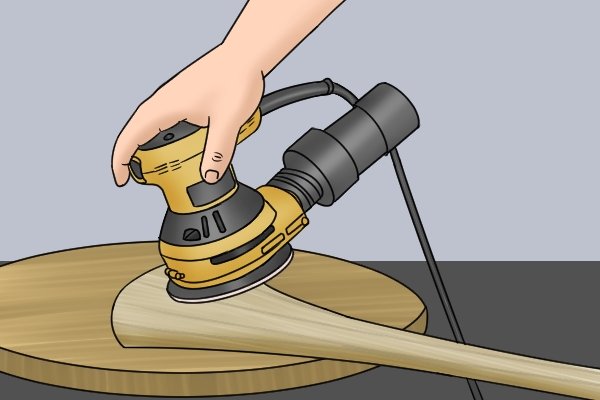
Step 3: Pressure and Sanding Direction
When using an orbital sander, you apply downward pressure on the sanding disc, ensuring it makes contact with the workpiece. As you move the sander across the surface, the sanding disc also moves in a back-and-forth motion along the direction of pressure. This back-and-forth sanding motion further contributes to achieving an even finish without leaving swirl marks.
By combining these three steps, an orbital sander achieves its unique sanding motion, making it efficient for quickly smoothing surfaces and removing material. As you sand, the sanding disc rotates and moves randomly, preventing any noticeable patterns or scratches from forming.
Benefits of Using an Orbital Sander
Using an orbital sander offers several benefits, making it a popular choice among woodworkers and DIY enthusiasts. Here are some notable advantages:
- Smooth and Swirl-Free Finish: The unique orbital motion of the sanding pad ensures a smooth and swirl-free finish, reducing the need for extensive hand sanding.
- Faster Material Removal: The oscillating motion of an orbital sander enables efficient material removal, saving time and effort compared to manual methods.
- Versatility: Orbital sanders can be used on various materials, including wood, metal, and plastics, making them versatile tools for different types of projects.
- Easy to Use: Orbital sanders are relatively easy to operate, making them suitable for both beginners and experienced craftsmen.
- Dust Collection: Many orbital sanders come equipped with a dust collection system, reducing the amount of airborne dust and creating a cleaner work environment.
Tips for Efficient Orbital Sanding
To make the most of your orbital sander and achieve outstanding results, consider the following tips:
- Select the Right Sandpaper Grit: Different projects require different sandpaper grits. Use a coarser grit to remove material quickly and a finer grit for achieving a smooth finish.
- Keep the Sander Moving: Avoid dwelling in one spot for too long to prevent uneven sanding. Keep the sander in motion, maintaining a steady and even pressure while sanding.
- Let the Sander Do the Work: Apply only enough pressure to ensure proper contact between the sanding pad and the workpiece. Let the orbital sander’s motion and the sandpaper’s grit do the actual sanding.
- Use Multiple Sanding Progressions: Start with a coarser grit to remove imperfections and then progress to finer grits for a smoother finish. This gradual approach yields better results.
- Consider Working in Sections: If you’re sanding a large surface, divide it into smaller sections to achieve better control over the sanding process and ensure consistency.
- Wear Protective Gear: Protect your eyes with safety glasses and consider wearing a dust mask or respirator to prevent inhaling fine particles.
In Conclusion
An orbital sander is a powerful tool that can help you achieve smooth and professional-looking results in your woodworking projects. By understanding the components and working principles of an orbital sander, as well as following the provided tips, you can maximize the efficiency and effectiveness of this versatile tool. Remember to always prioritize safety and select the appropriate sandpaper grit for each project. Happy sanding!
Key Takeaways: How Does an Orbital Sander Work?
- An orbital sander is a power tool used for sanding and smoothing surfaces.
- It has a round sanding pad that moves in small, orbital motions.
- The sanding pad spins in circles while also moving back and forth.
- This combination of movements helps to prevent swirl marks and ensures a smooth finish.
- An orbital sander is easy to use and suitable for beginners, providing consistent and even sanding results.
Frequently Asked Questions
Welcome to our Frequently Asked Questions section, where we’ll explore how orbital sanders work. If you’ve ever wondered about the inner workings of these powerful tools, you’re in the right place. Read on to discover the answers to your burning questions!
1. What is the purpose of an orbital sander?
An orbital sander is a versatile power tool designed to sand and smooth various types of surfaces. It is commonly used in woodworking and is particularly effective for removing paint, varnish, and imperfections from wood. Unlike other sanders, orbital sanders create a random pattern of sanding, minimizing swirl marks and producing a more even finish.
The circular motion of the sanding pad combined with the rapid back-and-forth movement allows the orbital sander to remove material efficiently and with less risk of damaging the workpiece. This makes it an essential tool for both professional carpenters and DIY enthusiasts.
2. How does an orbital sander work?
An orbital sander consists of a sanding pad that moves in a circular motion and simultaneously orbits in a random pattern. This combination of movements ensures that the sander avoids creating visible sanding marks or scratches on the material.
Inside the orbital sander, there is an electric motor that drives an offset bearing assembly, causing the sanding pad to oscillate. The sanding pad is then attached to this assembly, allowing it to rotate and move in an elliptical pattern. As the pad moves, the sandpaper attached to it removes material from the surface in a controlled manner.
3. Can I use an orbital sander for different projects?
Absolutely! Orbital sanders are incredibly versatile and can be used for a wide range of projects. Whether you’re refinishing furniture, sanding down a deck, or smoothing out rough edges on trim, an orbital sander can handle the job. It’s even suitable for sanding metals and plastics, giving you plenty of options.
With the right sandpaper grit, an orbital sander can be adjusted to match the task at hand. Coarser grits are ideal for removing paint or varnish, while finer grits are perfect for finishing touches and achieving a smooth surface. Just make sure you choose the appropriate sandpaper for your specific project.
4. Is it easy to control an orbital sander?
Orbital sanders are designed with user-friendliness in mind, making them relatively easy to control. However, as with any power tool, it’s essential to follow some basic safety guidelines. Always hold the sander firmly with both hands, allowing the tool to do the work without applying excessive pressure. Keep the sander moving at all times to prevent over-sanding or uneven results.
Furthermore, it’s crucial to wear appropriate protective gear, such as safety goggles and a dust mask, to protect yourself from flying debris and inhalation of dust particles. Take breaks if needed, and be sure to read the manufacturer’s instructions for your specific orbital sander model for any additional safety precautions.
5. Can an orbital sander be used on curved surfaces?
While orbital sanders are primarily designed for flat surfaces, they can also be used on curved surfaces, albeit with some limitations. The random orbital motion of the sanding pad ensures that it doesn’t leave noticeable circular marks, making it suitable for gentle curves like those found on furniture or moldings.
However, for more intricate or tightly curved surfaces, it’s best to use a specialized tool, such as a detail sander or sanding sponge. These tools provide better control and precision for tackling areas that may be too small or difficult to reach with an orbital sander alone.
Summary
An orbital sander is a handy tool that can make smoothing surfaces a breeze. It works by spinning a round pad in small circles while vibrating at the same time. The combination of these movements helps to remove material quickly and evenly, leaving a smooth finish. This tool is perfect for sanding large areas and can be used on various surfaces like wood, metal, or plastic. Just make sure to keep it moving and apply even pressure to avoid creating grooves or swirl marks. With an orbital sander, you can achieve professional-looking results with ease!