Welcome, curious minds, to the fascinating world of bandsaws! Have you ever wondered how these powerful tools work their magic? Well, today we’re diving deep into the captivating realm of bandsaws and uncovering the secrets behind their functionality. So, without further ado, let’s unravel the mystery together and explore the question: “How does a bandsaw work?”
Picture this: a bandsaw is like a superhero with a sharp blade instead of a cape! It’s a cutting marvel that can slice through various materials like wood, metal, and even foam with remarkable precision. But how does it accomplish this feat? Well, at the core of a bandsaw is a continuous band of teeth that loop around two wheels. These wheels spin, propelling the blade in a smooth, circular motion.
As the bandsaw springs into action, the material you’re working with is guided towards the blade, allowing the teeth to make contact and cut through it effortlessly. With its ability to make intricate curved cuts and straight lines alike, a bandsaw is a versatile tool that offers unparalleled precision and efficiency. Now that we’ve scratched the surface, let’s delve even deeper into the inner workings of this remarkable machine.

How Does a Bandsaw Work? Exploring the Mechanics of a Versatile Cutting Tool
When it comes to power tools, the bandsaw is a key player in the workshop. It’s a versatile cutting tool that can handle a wide range of cutting tasks, from straight cuts to intricate curves. But have you ever wondered how a bandsaw actually works? In this article, we’ll delve into the mechanics of this fascinating tool, exploring its components, operation, and key features. Whether you’re a woodworking enthusiast or simply curious about tools, this article will provide you with a deep understanding of how a bandsaw works.
Understanding the Anatomy of a Bandsaw
Before we dive into the inner workings of a bandsaw, let’s take a closer look at its anatomy. A bandsaw consists of several essential components that work together to ensure smooth and precise cutting:
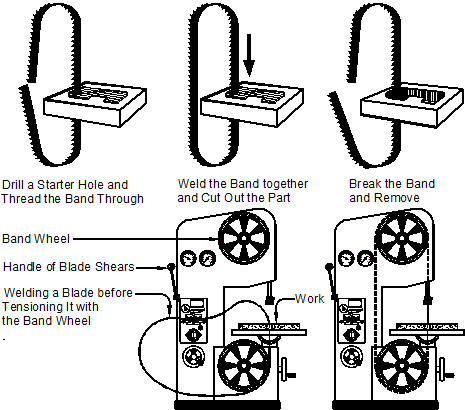
The Blade
The blade of a bandsaw is perhaps its most critical component. It’s a long, continuous loop made of hardened steel with teeth along one edge. The quality of the blade greatly influences the accuracy and efficiency of the cut. The width, thickness, and tooth pattern of the blade can vary depending on the type of material or the desired cut. By selecting the appropriate blade, woodworkers can achieve optimal results for different cutting tasks.
The Wheels
A bandsaw features two wheels – the drive wheel and the idler wheel. The blade wraps around these wheels, creating the continuous loop. The drive wheel is connected to a motor, which provides the power to turn the blade. The idler wheel, on the other hand, supports the blade and helps maintain tension for smooth and precise cuts. The wheels are typically made of cast iron or aluminum alloy, ensuring durability and stability in operation.
The Table
Located below the blade, the table provides a stable surface for supporting the workpiece during cutting. It’s usually made of cast iron or steel, ensuring a flat and rigid platform. The table can be tilted to various angles, allowing for bevel cuts and angled joints. Some bandsaw models also come with extensions to accommodate larger workpieces. The table often features a miter gauge or a fence for accurate and controlled cuts.
The Guides
To maintain the blade’s position and prevent it from deflecting during cutting, bandsaws are equipped with guides. There are typically two types of guides – the upper blade guide and the lower blade guide. The upper guide consists of a set of bearings or blocks that keep the blade aligned and prevent it from twisting. The lower guide, located below the table, works in conjunction with the upper guide to ensure stability and precision. Properly adjusted guides help enhance the overall performance of the bandsaw.
The Motor
Powering the bandsaw is the motor, which provides the rotational force to drive the blade. An electric motor is commonly used, ranging in power from 1/3 horsepower for smaller bandsaws to several horsepower for heavy-duty industrial models. The motor is typically located at the back of the bandsaw, connected to the drive wheel. The power and efficiency of the motor greatly affect the cutting capacity and performance of the bandsaw.
The Tensioning Mechanism
To ensure optimal cutting performance, the blade of a bandsaw needs to be properly tensioned. Bandsaws are equipped with a tensioning mechanism that allows users to adjust the tension of the blade. A tension knob or lever is located near the top of the bandsaw, and by tightening or loosening it, users can achieve the desired level of tension. Proper blade tension is crucial for accurate and efficient cutting, as it affects blade stability, longevity, and cutting precision.
The Coolant System
For more demanding cutting tasks that generate heat, such as cutting metal or thick materials, bandsaws may be equipped with a coolant system. This system helps keep the blade cool, preventing overheating and prolonging the blade’s life. The coolant, typically a water-soluble oil, is sprayed onto the blade during cutting. The coolant also aids in lubrication, reducing friction and ensuring smoother cuts.
Operating a Bandsaw: Step-by-Step Guide
Now that we’ve explored the various components of a bandsaw, let’s walk through the step-by-step process of operating this versatile cutting tool:
Step 1: Prepare the Workpiece
Start by selecting the appropriate material for your project and ensuring it is securely clamped to the bandsaw table. Ensure that the workpiece is stable and won’t shift during cutting.
Step 2: Adjust the Blade Guides
Properly adjust the upper and lower blade guides to minimize blade deflection and ensure precise cutting. Check the blade tension and make any necessary adjustments using the tensioning mechanism.
Step 3: Set the Cutting Speed
Determine the optimal cutting speed for your material. Bandsaws typically have adjustable speed settings, allowing you to match the speed to the material being cut. Consult the manufacturer’s recommendations or experiment with different speeds to find the best setting.
Step 4: Position the Fence or Miter Gauge
If you require a specific width or angle for your cut, position the fence or miter gauge accordingly. This will help guide your workpiece and ensure accurate cuts.
Step 5: Start the Bandsaw
Turn on the bandsaw, making sure the blade is tracking properly on both wheels. Listen for any unusual sounds and check for smooth and consistent movement of the blade.
Step 6: Initiate the Cut
Gently feed the workpiece into the blade, keeping your hands clear of the cutting path. Apply steady, even pressure to guide the workpiece through the blade. Let the blade do the cutting; avoid forcing or pushing the material too quickly.
Step 7: Complete the Cut
Once the cut is complete, turn off the bandsaw and allow the blade to come to a complete stop before removing the workpiece. Inspect the cut for accuracy and make any necessary adjustments for subsequent cuts.
Mastering the Bandsaw: Tips and Techniques
Now that you have a solid understanding of how a bandsaw works and how to operate it, let’s explore some tips and techniques that will help you master this versatile tool:
Tip 1: Choose the Right Blade
Different materials and cutting tasks require different blades. Invest in a selection of blades with varying tooth patterns and widths to cover a wide range of applications. Consult the manufacturer’s recommendations for blade selection.
Tip 2: Use Proper Feed Pressure
Let the blade do the work. Apply gentle, even pressure when feeding the workpiece into the blade. Forcing the material or using excessive pressure can result in blade deflection, inaccurate cuts, and potential safety hazards.
Tip 3: Practice Proper Safety Measures
Always wear safety goggles and hearing protection when operating a bandsaw. Keep your hands and fingers away from the blade and use push sticks or other appropriate tools to guide the workpiece. Familiarize yourself with the manufacturer’s safety guidelines and adhere to them at all times.
Tip 4: Make Test Cuts
Before working on your actual project, make test cuts on scrap material to ensure proper blade alignment, tension, and cutting speed. This will help you fine-tune your setup and achieve the desired results.
Tip 5: Maintain Your Bandsaw
Regularly clean and lubricate your bandsaw to keep it in optimal condition. Check the blade for wear and damage, and replace it when necessary. Keep the wheels clean and free from debris to ensure smooth operation. Consult the manufacturer’s recommendations for proper maintenance.
By following these tips and techniques, you’ll be well on your way to mastering the bandsaw and harnessing its full potential in your woodworking or metalworking projects.
Exploring Advanced Bandsaw Techniques
Once you’ve become comfortable with the basics of operating a bandsaw, you can explore advanced techniques to expand your capabilities. Some of these techniques include:
Curved Cutting
With the maneuverability and precision of a bandsaw, you can create intricate curved cuts in wood or even metal. By using a specialized blade designed for curved cuts and employing proper techniques, you can unleash your creativity and achieve stunning results.
Resawing
Resawing refers to cutting a thick board into thinner pieces. With a bandsaw, you can efficiently resaw large boards and create multiple thin pieces with ease. This technique is commonly used in furniture making, where thin panels are needed for components such as drawer fronts or door panels.
Joinery Cuts
The bandsaw is a versatile tool for creating various types of joinery cuts, including tenons, half-lap joints, and dovetails. With the right blade and careful setup, you can achieve precise and clean joinery cuts that will enhance the strength and aesthetics of your woodworking projects.
By mastering these advanced bandsaw techniques, you can take your woodworking skills to the next level and tackle more complex projects with confidence.
In Summary
The bandsaw is a powerful and versatile tool that finds its place in any well-equipped workshop. By understanding the fundamentals of how a bandsaw works and following proper operating techniques, you can harness the full potential of this tool. Remember to prioritize safety, choose the right blade, and practice on scrap material before starting your project. With time and experience, you’ll become a master of the bandsaw, unleashing your creativity and achieving precise and professional results.
Key Takeaways: How Does a Bandsaw Work?
- A bandsaw consists of a continuous loop of a sharp blade that rotates around two wheels.
- When you turn on the bandsaw, the wheels start spinning, which helps move the blade.
- The blade moves up and down, allowing you to cut through various materials such as wood, metal, or plastic.
- You can adjust the speed and tension of the blade to achieve different cutting results.
- By guiding the material through the blade, you can create straight, curved, or angled cuts.
Frequently Asked Questions
Are you curious about how a bandsaw works? Look no further! Here are some commonly asked questions about the inner workings of a bandsaw, along with detailed answers to satisfy your curiosity.
1. How does the blade stay tensioned on a bandsaw?
Inside a bandsaw, there is a tensioning mechanism that keeps the blade taut. Typically, a bandsaw features a spring-loaded tensioner that applies pressure to the blade, ensuring it remains at the correct tension. This tension is crucial for the blade’s stability and accuracy during cutting. To adjust the tension, you can usually find a knob or lever that allows you to increase or decrease it, depending on the thickness and type of material you are cutting.
When the bandsaw is turned on, the blade stretches slightly due to the tension, which prevents it from becoming loose or slipping off the wheels. The accurate tensioning of the blade is essential for efficient and precise cutting on a bandsaw.
2. What powers the cutting action of a bandsaw?
A bandsaw typically uses an electric motor to power its cutting action. The motor is connected to the bandsaw’s wheels, which rotate to provide the necessary forward motion for cutting. As the wheels turn, they also drive the blade to move in a continuous loop while passing through the cutting area. This motion creates a smooth and efficient cutting action.
The speed at which the bandsaw cuts can be adjusted by changing the motor’s speed settings. Lower speeds are ideal for cutting denser materials, while higher speeds are more suitable for softer materials. The power of the motor and the speed options can vary based on the model and size of the bandsaw.
3. How does a bandsaw guide the cutting direction?
A bandsaw has guides that help control and direct the cutting direction. There are typically two sets of guides: thrust bearings and side guides. The thrust bearings are located behind the blade, near the back of the bandsaw, and prevent it from moving backward during cutting. The side guides are positioned next to the blade, on each side, to keep it stable and minimize lateral movement.
These guides ensure that the blade remains aligned and centered during the cutting process, allowing for precise and accurate cuts. They are adjustable, allowing you to fine-tune their position based on the material you are cutting and the desired outcome.
4. What is the purpose of the bandsaw’s table?
The table of a bandsaw serves as a stable surface for the material being cut. It provides support and helps maintain the material’s position during the cutting process. The table is typically made of cast iron or steel, ensuring durability and stability.
Some bandsaw tables can tilt, allowing angled cuts to be made easily. Additionally, they often come with a miter gauge that helps guide the material at precise angles, enabling accurate cuts for various woodworking projects.
5. How does a bandsaw handle different cutting depths?
A bandsaw can handle different cutting depths by adjusting the height of the upper blade guides, as well as the position of the table. By raising or lowering the upper guides, you can accommodate materials of varying thicknesses.
The table can also be adjusted vertically to control the depth of the cut. Lowering the table allows for deeper cuts, while raising it results in shallower cuts. These adjustments ensure that the blade only cuts through the desired thickness of the material, providing versatility for different woodworking needs.

Summary
Here’s what you need to know about how a bandsaw works: it uses a continuous looped blade to cut materials, like wood or metal. When you turn on the bandsaw, the blade starts moving in a circular motion, guided by wheels in the machine. As you push the material you want to cut into the blade, the teeth on the blade slice through it, creating a smooth, precise cut. Just be careful and always use safety measures when using a bandsaw!
In summary, a bandsaw is a handy tool that uses a rotating blade to cut different materials. By understanding how it works, you can safely and effectively use it for your woodworking or metalworking projects. Remember to ask for help or permission from an adult before using one!