Curious about how an orbital sander works? Well, you’ve come to the right place! Let’s dive in and explore the fascinating world of this handy tool.
To start off, an orbital sander is a power tool used for smoothing and sanding surfaces like wood or metal. It’s called an ‘orbital’ sander because it moves in a circular motion while simultaneously rotating in an elliptical pattern. This combination of motions helps to achieve a smooth and even finish.
So, how does it work? When you turn on the orbital sander, the motor inside spins a sanding pad at high speed. The sanding pad moves in an orbital motion, meaning it goes round and round in small circles. This movement not only removes the top layer of the material you’re sanding, but it also prevents swirl marks or noticeable scratches.
Now that you have a basic understanding of an orbital sander’s mechanics, let’s delve deeper into its functionality and explore the different types and uses. Get ready to discover the ins and outs of this versatile tool!
- Prepare the surface by cleaning and removing any rough edges.
- Select the appropriate sandpaper grit for your project.
- Attach the sandpaper to the base of the orbital sander.
- Hold the sander securely with both hands and switch it on.
- Move the sander in smooth, consistent motions across the surface, going with the grain of the wood.
- Once you’re satisfied with the result, switch off the sander and remove the sandpaper.
An orbital sander is a versatile tool that can be used for various DIY projects. Understanding how to use it properly will ensure you achieve smooth and professional-looking finishes on your woodworking projects.

How Does an Orbital Sander Work?
An orbital sander is a versatile power tool that helps in smoothing and finishing various surfaces. Whether you’re a professional carpenter or a DIY enthusiast, understanding how an orbital sander works is essential for achieving a flawless finish on your projects. In this article, we will delve into the inner workings of an orbital sander, exploring its components and the science behind its sanding motion.
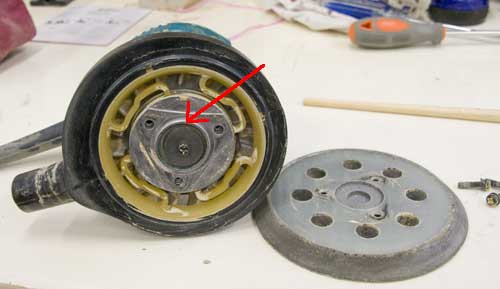
The Components of an Orbital Sander
An orbital sander consists of several key components that work together to deliver optimal sanding performance. These components include:
- Motor: The motor is the heart of the orbital sander, powering the rotation of the sanding pad.
- Sanding Pad: The sanding pad is the part of the sander that comes into direct contact with the surface being sanded. It is usually circular or rectangular, and it attaches to the orbital sander through a hook-and-loop system.
- Base Plate: The base plate is the platform that supports the sanding pad. It is typically made of durable material like aluminum or steel and provides stability during sanding.
- Switch: The switch is the control mechanism that allows you to turn the orbital sander on and off.
- Dust Collection System: Many orbital sanders feature a dust collection system that helps in minimizing dust and debris during sanding.
Now that we have a basic understanding of the components, let’s explore the science behind how an orbital sander works.
The Science Behind Orbital Sanding
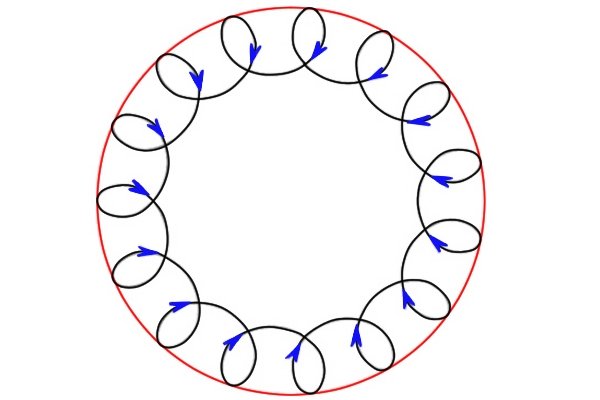
Orbital sanders are known for their unique sanding motion, which sets them apart from other types of sanders. Unlike belt sanders or disc sanders that move in a single linear or rotary motion, an orbital sander combines both circular and random orbital movements. This orbital sanding action is what makes the tool efficient and effective at removing material and achieving a smooth finish.
The circular motion of the sanding pad is generated by the rotation of the motor, while the random orbital motion is created by an offset bearing inside the sander. As the sanding pad spins, the offset bearing causes it to move in an elliptical or oval pattern. This dual motion ensures that the sanding pad doesn’t leave swirl marks or sand in the same direction consistently.
The random orbital motion of the sanding pad provides several advantages. First, it prevents the sander from digging into the surface being sanded, reducing the risk of over-sanding or creating uneven patches. Second, the random orbital motion ensures uniform sanding across the entire surface, resulting in a smooth and even finish. Lastly, it minimizes the likelihood of leaving noticeable scratches or sanding marks on the material.
Tips for Getting the Most Out of Your Orbital Sander
To make the most of your orbital sander and achieve professional-level results, consider the following tips:
- Start with a coarse-grit sandpaper and gradually move to finer grits for a smoother finish.
- Use steady, even pressure while sanding and let the orbital motion of the sander do the work.
- Move the sander in a back-and-forth or side-to-side motion, covering the entire surface evenly.
- Change the sanding pad regularly to ensure optimal performance and prevent damage to the material being sanded.
- Always wear safety goggles and a dust mask to protect yourself from dust and debris.
By following these tips and understanding the inner workings of an orbital sander, you’ll be well-equipped to tackle any sanding project with confidence.
Pros and Cons of Orbital Sanders
An orbital sander is a versatile tool that offers many benefits for woodworkers, professional carpenters, and DIY enthusiasts. However, like any tool, it also has its drawbacks. Let’s explore the pros and cons of orbital sanders to help you determine if it’s the right tool for your needs.
The Benefits of Using an Orbital Sander
There are several advantages to using an orbital sander, including:
1. Versatility:
Orbital sanders can handle a wide range of materials, including wood, metal, plastic, and more. This versatility makes them a valuable addition to any workshop.
2. Time and Effort Savings:
The random orbital motion of an orbital sander allows for efficient material removal and faster sanding compared to other types of sanders. This can save you time and energy, especially when working on larger projects.
3. Enhanced Finish:
The dual motion of an orbital sander helps in achieving a smooth and even finish without swirl marks or sanding patterns. This makes it ideal for fine finishing work, such as preparing surfaces for varnish or paint.
4. Dust Collection:
Many orbital sanders come equipped with a dust collection system or have compatibility with external dust extraction units. This helps in keeping your workspace clean and reduces the risk of inhaling harmful dust particles.
The Drawbacks of Using an Orbital Sander
While orbital sanders have numerous benefits, they also have a few drawbacks to consider:
1. Limited Material Removal:
Orbital sanders are not as effective as belt sanders or disc sanders when it comes to heavy material removal. If you have a large stock to sand down, these other types of sanders may be more suitable.
2. More Expensive:
Compared to some other sanders, orbital sanders can be more expensive. However, their versatility and quality of finish often justify the higher price.
3. Can Leave Circular Patterns:
While the orbital motion of an orbital sander helps prevent swirl marks and sanding patterns, there is still a small risk of circular patterns appearing on certain materials. This can typically be avoided by using finer grit sandpaper and practicing proper sanding techniques.
4. Not Ideal for Detailed Work:
If you’re working on intricate or delicate surfaces that require precise sanding, an orbital sander may not be the best choice. In such cases, hand sanding or other specialized sanding tools may be more suitable.
Maintenance Tips for Your Orbital Sander
Regular maintenance of your orbital sander is crucial for ensuring its longevity and optimum performance. Here are some essential maintenance tips to keep in mind:
1. Clean the Sanding Pad:
As you use your orbital sander, the sanding pad can accumulate dust, debris, and residue. Regularly clean the sanding pad using a cleaning solution or a brush to prevent clogging and maintain optimal sanding efficiency.
2. Check the Dust Collection System:
If your orbital sander features a dust collection system, check it regularly to ensure it’s functioning properly. Empty the dust collection bag or canister and clean any clogged filters to maintain effective dust extraction.
3. Inspect the Sanding Pad and Base Plate:
Inspect the sanding pad and base plate for any signs of wear or damage. Replace them if necessary, as worn or damaged components can affect the quality of sanding and potentially damage the material being sanded.
4. Lubricate Moving Parts:
Apply a small amount of lubricant to the moving parts of your orbital sander, such as the motor shaft and bearing, to reduce friction and ensure smooth operation.
5. Store Properly:
When not in use, store your orbital sander in a clean and dry environment. Protect it from dust, moisture, and extreme temperatures to prevent damage and extend its lifespan.
By following these maintenance tips, you can keep your orbital sander in excellent condition and enjoy reliable performance for years to come.
Key Takeaways: How Does an Orbital Sander Work?
- An orbital sander is a tool used to smooth the surface of wood or other materials.
- It works by rotating the sanding pad in small circles while simultaneously moving it back and forth.
- This random orbital motion helps to prevent swirl marks on the surface being sanded.
- The sandpaper used on the orbital sander comes in various grits, allowing you to choose the right level of abrasiveness for the job.
- By properly using an orbital sander, you can achieve a smooth and even finish on your woodworking projects.
Frequently Asked Questions
Curious about how an orbital sander works? Look no further! We have answered some common questions about this handy tool.
1. What is an orbital sander and how does it work?
An orbital sander is a power tool used for sanding wood, metal, or other materials. It features a sanding pad that moves in tiny circular orbits while simultaneously rotating. This dual-action motion helps to prevent swirl marks and ensures a smooth, even finish. The sanding pad can be attached with sandpaper of varying grits, depending on the desired level of sanding.
When the orbital sander is turned on, the motor inside generates power and drives the pad to move in its distinctive motion. The combination of circular orbits and rotation mimics the natural hand-sanding motion, but at a much faster pace. This allows for efficient and uniform sanding, reducing the effort and time required compared to manual sanding.
2. What are the advantages of using an orbital sander?
Using an orbital sander offers several advantages. First, its dual-action motion ensures a smoother surface compared to other sanding methods, reducing the risk of swirl marks or uneven patches. Second, it allows for faster sanding, making it more efficient when working on larger areas or multiple projects. Third, orbital sanders are available in various sizes and shapes, making them versatile for different sanding tasks.
Furthermore, orbital sanders are relatively easy to use, making them suitable for both professionals and DIY enthusiasts. They also come with dust collection systems or attachments, minimizing the amount of dust generated during the sanding process. Overall, an orbital sander can save time, effort, and provide a high-quality finish.
3. Can an orbital sander be used on different materials?
Yes, an orbital sander can be used on various materials, including wood, metal, plastic, and even drywall. However, it’s important to choose the correct sandpaper grit for each specific material. Finer grits like 120 or 240 are typically used for finishing touches on wood, while coarser grits like 60 or 80 are better for removing paint or smoothing rough surfaces.
When sanding materials other than wood, it’s essential to be mindful of the speed and pressure applied. Different materials may require different sanding techniques. Always consult the manufacturer’s recommendations and test on a small inconspicuous area before proceeding with larger projects.
4. Are there any safety precautions to consider when using an orbital sander?
Yes, safety should always be a priority when using power tools, including orbital sanders. First and foremost, wear appropriate protective gear, such as safety glasses and a dust mask, to shield your eyes and lungs from flying debris and dust particles. Make sure to work in a well-ventilated area or wear a respirator if necessary.
Additionally, secure your workpiece firmly to prevent it from moving or slipping during sanding. Keep your hands and fingers away from the sanding pad to avoid accidental injuries. It’s also important to unplug the sander before changing the sandpaper or making any adjustments to the tool. Following these safety precautions will help ensure a safe and enjoyable sanding experience.
5. Can an orbital sander be used for removing paint?
Yes, an orbital sander can be used for removing paint, especially when equipped with coarser sandpaper. However, it’s important to note that orbital sanders might not be as effective in removing thick layers of paint or removing paint from intricate details or corners. In such cases, using a paint scraper or heat gun may be more suitable.
When using an orbital sander for paint removal, take precautions to protect yourself from lead-based paint or potentially harmful dust. Use a respirator, work in a well-ventilated area, and follow proper disposal regulations for lead-based paint debris. Remember to start with a coarser grit to remove the bulk of the paint and gradually switch to finer grits for a smooth finish.
Summary
So, to summarize, an orbital sander is a handy tool that helps smooth surfaces. It works by spinning in circles while also moving in an elliptical motion. The sandpaper attached to the sander removes the roughness from the material, leaving it nice and smooth. Keep in mind to use the right sandpaper grit for the job, and don’t forget to wear safety goggles!
In conclusion, an orbital sander is a great tool for achieving a smooth surface. By understanding how it works and following safety precautions, you can use it effectively for your DIY projects. Happy sanding!