
Are you wondering how high to set the blade on your table saw? Look no further! In this guide, we’ll walk you through the ins and outs of getting the perfect blade height for your woodworking projects. Whether you’re a beginner or an experienced woodworker, finding the right blade height is essential for achieving clean and accurate cuts. So, let’s dive in and discover the key factors to consider when setting the table saw blade height.
Okay, let’s start with the basics. When it comes to setting the height of your table saw blade, there is no one-size-fits-all answer. The ideal blade height depends on several factors, such as the type of material you’re working with and the type of cut you want to make. But don’t worry, we’ll break it down for you step by step. By the end of this guide, you’ll be equipped with the knowledge to set your table saw blade height like a pro!
Now, before we delve into the specifics, it’s important to emphasize the importance of safety when working with a table saw. Always make sure the saw is turned off and unplugged before adjusting the blade height. And don’t forget to wear the appropriate safety gear, such as safety glasses and hearing protection. Safety first, always! With that said, let’s move on to understanding the nuances of setting the table saw blade height effectively.
Step-by-Step Guide:
- Ensure the table saw is turned off and unplugged for safety.
- Locate the height adjustment mechanism on your table saw.
- Use the adjustment handle or crank to raise or lower the blade.
- Align a square or a height gauge against the saw blade to check its height.
- Adjust the blade height until it is just slightly above the workpiece.
- Double-check the blade height before turning on the table saw.
How High Do You Set a Table Saw Blade? A Guide for Woodworking Enthusiasts
When it comes to woodworking, a table saw is an essential tool that allows you to make precise cuts with ease. But before you begin cutting, it’s important to know how high to set the table saw blade for optimal results. In this guide, we will explore the factors to consider and the steps to follow when setting the blade height on your table saw.
Understanding Blade Height and Its Importance
The height of the table saw blade plays a crucial role in the quality of your cuts. The general rule of thumb is to set the blade height so that it protrudes just above the wood you are cutting. This ensures that the blade’s teeth can effectively remove the material without causing any tear-out or splintering on the surface.
To determine the right blade height, you need to consider the thickness of the wood, the type of cut you want to make, and the safety precautions associated with the particular task. By setting the blade at the correct height, you can achieve cleaner cuts, minimize waste, and prevent accidents.
Factors to Consider
There are several factors you need to consider when determining the right height for your table saw blade:
1. Wood Thickness: The thickness of the wood being cut is a crucial factor in determining the blade height. For thin materials, such as plywood, the blade should extend approximately 1/8 inch above the surface. Thicker boards may require a deeper blade height, but never exceed more than the thickness of the boards being cut.
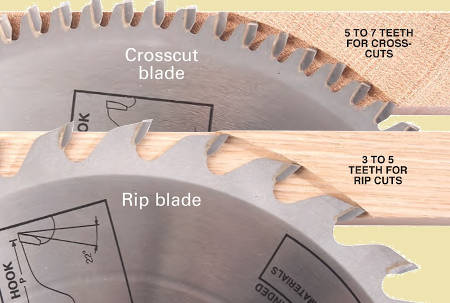
2. Type of Cut: Different cuts require different blade heights. For a basic rip cut, where you are cutting with the grain parallel to the length of the wood, the blade height should be set to just clear the top surface of the wood. For a crosscut, where you are cutting across the grain, the blade should be set higher to minimize tear-out on the bottom surface.
3. Safety: Safety is paramount when working with any power tool, especially a table saw. You should always ensure that the blade height is set at a level that minimizes the risk of accidents and kickback. Avoid setting the blade too high, as this can increase the likelihood of the wood binding and causing the workpiece to kick back towards you.
Setting the Table Saw Blade Height: A Step-by-Step Guide
Now that you understand the importance of blade height and the factors to consider, let’s dive into the step-by-step process of setting the height of the table saw blade:
1. Safety First: Before starting any adjustments, ensure that the table saw is unplugged and the power switch is in the off position. This will prevent any accidental start-ups during the blade height adjustment process.
2. Locate the Elevation Mechanism: Most table saws have an elevation handwheel or crank located on the front or side of the saw. This mechanism allows you to raise or lower the blade.
3. Align the Blade with the Square: Place a square against the blade, ensuring that it is parallel to the miter gauge slot. If necessary, adjust the blade elevation until it is perfectly aligned with the square.
4. Measure the Blade Height: Using a measuring tape or a specialized blade height gauge, measure the distance between the highest point of the blade tooth and the table saw’s tabletop. This measurement will determine the height of the blade above the wood.
5. Adjust the Blade Height: Turn the elevation handwheel or crank in the appropriate direction to raise or lower the blade. Make small adjustments, testing the height after each adjustment, until you reach the desired height based on the factors mentioned earlier.
6. Double-Check and Lock: Once you have set the blade to the desired height, double-check the alignment using the square and ensure that it meets your requirements. Lock the elevation mechanism to secure the blade in place.
By following these steps and considering the factors mentioned earlier, you can confidently set the height of the table saw blade for various woodworking tasks.
Common Mistakes to Avoid When Setting the Blade Height
While setting the blade height on your table saw may seem straightforward, there are a few common mistakes that you should avoid:
Mistake 1: Setting the Blade Too High
Setting the blade too high can result in an increased risk of accidents and kickback. It can also lead to unnecessary tear-out and splintering on the surface of your workpiece. Always ensure that the blade height is set just above the material being cut, minimizing any excess exposure.
Mistake 2: Neglecting Safety Precautions
Safety should always be your top priority when working with table saws. Apart from setting the blade height correctly, you should also use safety features such as a riving knife, blade guard, and push sticks or blocks. Additionally, wearing appropriate safety gear, such as safety glasses and hearing protection, is essential.
Mistake 3: Failing to Consider the Type of Cut
Different types of cuts require varying blade heights to achieve the desired results. Failing to consider the type of cut can result in poor-quality cuts, tear-out, and wasted material. Take the time to understand the requirements of each cut and adjust the blade height accordingly.
Mistake 4: Not Testing the Height
Once you have adjusted the blade height, it’s important to test it before proceeding with your project. Make a sample cut on a scrap piece of wood to ensure that the height is appropriate and that the blade is cutting smoothly and cleanly.
Mistake 5: Rushing the Adjustment Process
Setting the blade height should never be rushed. Take your time to make small adjustments, double-check measurements, and ensure that the blade is aligned correctly. Rushing through the process can lead to inaccurate cuts, wasted material, and potential safety hazards.
By avoiding these common mistakes and following the proper procedures, you can achieve accurate and clean cuts with your table saw.
Tips for Achieving the Best Results
To ensure the best possible results when setting the blade height on your table saw, consider the following tips:
Tip 1: Use a Blade Height Gauge
Investing in a specialized blade height gauge can help you accurately measure the height of the blade above the table. These gauges are designed to fit around the blade and provide precise measurements, saving you time and increasing accuracy.
Tip 2: Take Small Incremental Adjustments
When adjusting the blade height, it’s best to make small incremental changes rather than large adjustments. This allows you to fine-tune the blade’s position and ensures more accurate cuts.
Tip 3: Use a Zero-Clearance Insert
A zero-clearance insert is a detachable throat plate that provides support for the workpiece right up to the blade, reducing tear-out and enhancing the accuracy of your cuts. Consider using a zero-clearance insert for cleaner and more precise cuts.
Conclusion
Setting the table saw blade height correctly is essential for achieving clean, accurate, and safe cuts in your woodworking projects. By considering the factors mentioned earlier, following the step-by-step guide, and avoiding common mistakes, you can confidently set the blade height and enjoy improved results in your woodworking endeavors. Remember to prioritize safety and take your time during the adjustment process to ensure the best possible outcome. Happy woodworking!
Key Takeaways: How High Do You Set Table Saw Blade?
- Setting the table saw blade height correctly is crucial for safety and accurate cuts.
- Start by aligning the blade with the gullets on the tooth, just above the workpiece.
- A good rule of thumb is to set the blade height at 1/8 inch above the material being cut.
- For crosscuts, adjust the blade height to the thickness of the material plus a little extra.
- Always follow the manufacturer’s guidelines and use your best judgment to ensure proper blade height.
Frequently Asked Questions
Welcome to our frequently asked questions section, where we will address common concerns about setting the height of a table saw blade.
1. What factors should I consider when determining the height to set my table saw blade?
Setting the height of your table saw blade depends on a few factors. Firstly, you need to consider the thickness of the material you are cutting. For thicker materials, a higher blade height is recommended, while thinner materials require a lower height. Additionally, the type of cut you are making, such as a clean rip cut or a shallow dado cut, can also affect the blade height.
It’s crucial to follow the manufacturer’s instructions and safety guidelines provided for your specific table saw model when determining the appropriate blade height. These guidelines will help you achieve accurate cuts while ensuring your safety in the workshop.
2. How can I determine the ideal height to set my table saw blade?
To determine the ideal height for your table saw blade, you can use a scrap piece of the material you plan to cut. Start by setting the blade at a lower height, and make a test cut on the scrap piece. Evaluate the quality of the cut and adjust the blade height accordingly.
Keep adjusting the height until you achieve a clean and precise cut. It’s important to take your time and make incremental adjustments to avoid setting the blade too high, which can lead to safety hazards and compromised cutting quality.
3. Are there any general guidelines for setting the height of a table saw blade?
While the specific guidelines may vary depending on your table saw model and the materials you are working with, there are some general recommendations to keep in mind. For standard rip cuts, setting the blade height so that it extends approximately 1/4 – 3/8 inch above the material’s surface is a good starting point.
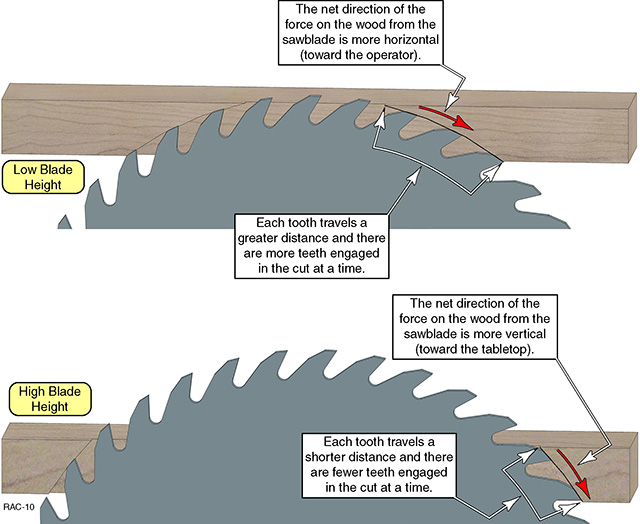
However, when making crosscuts or other types of cuts, the blade should be set as low as possible while still cutting through the material effectively. Always consult your table saw’s user manual for manufacturer-specific recommendations and follow their guidelines to ensure optimal safety and performance.
4. Can I use a ruler or measuring tape to set the height of my table saw blade?
While a ruler or measuring tape can provide a rough estimate, it’s not recommended to solely rely on these tools for setting the blade height. The most accurate method is to use the table saw’s built-in height adjustment mechanism, combined with test cuts on scrap material, to fine-tune the blade height.
The built-in adjustment mechanism allows for precise increments, ensuring that the blade is set at the desired height without compromising your safety or cutting quality. Always prioritize accuracy and safety when setting the height of your table saw blade.
5. Are there any safety precautions I should take when setting the height of a table saw blade?
Safety should always be a top priority when operating a table saw. Before adjusting the blade height, make sure the saw is turned off and unplugged. Wear appropriate safety gear, such as safety glasses and gloves, to protect yourself from potential hazards.
Double-check that the blade guard and riving knife are properly installed and adjusted according to the manufacturer’s instructions. When making test cuts, use a push stick or push block to keep your hands a safe distance from the blade. Remember, it’s better to take the necessary precautions and work slowly and methodically to prevent accidents in the workshop.
ENOUGH BS! Here’s how high your table saw blade should be.
Setting the table saw blade at the right height is important for safe and accurate cuts. To determine the ideal height, consider the type of cut, material being used, and the size of the blade. For general cuts, the blade should protrude about 1/8 inch above the material. When making rip cuts, the blade should be set so the highest point is 1/8 inch above the workpiece. And for crosscuts, set the blade so it is parallel to the workpiece’s top surface.
Additionally, it’s vital to follow safety precautions when adjusting the blade height. Always turn off the saw and unplug it before making any adjustments. Use a combination square or a dedicated blade height gauge for accurate measurements. And never forget to wear safety goggles and keep your hands away from the blade when setting the height. By following these guidelines, you can ensure a safer and more effective table saw experience.