
Are you wondering how high should a table saw blade be? Well, you’ve come to the right place! Understanding the proper height for your table saw blade is crucial for achieving clean and accurate cuts. In this guide, we’ll dive into the importance of blade height and provide you with some handy tips to get it just right.
When it comes to setting the height of your table saw blade, there’s no one-size-fits-all answer. The ideal height will depend on the type of cut you’re making and the thickness of the material you’re working with. Don’t worry, though – we’ll walk you through the process step by step, making it super easy to follow along.
Whether you’re a beginner or a seasoned woodworker, having a good understanding of how high your table saw blade should be is essential. So, let’s roll up our sleeves and dive into the world of table saws together, shall we?
When using a table saw, it’s important to set the blade at the correct height for optimal performance and safety. To determine the height, follow these steps:
- Ensure the blade is completely lowered.
- Check the clearance between the teeth and the table.
- Adjust the blade height so that it extends 1/8 inch above the stock you are cutting.
- Double-check the blade height before making any cuts.
- Always wear appropriate safety gear and follow the manufacturer’s instructions.
By setting the table saw blade at the correct height, you can ensure precise cuts and reduce the risk of accidents.
How High Should a Table Saw Blade Be: A Guide to Optimal Height
Welcome to our comprehensive guide on finding the optimal height for a table saw blade. Whether you’re a seasoned woodworker or just starting out, understanding how to set the blade height correctly is crucial for achieving accurate and safe cuts. In this article, we’ll walk you through the step-by-step process of determining the right blade height and provide you with valuable tips and insights along the way. Let’s dive in!
The Importance of Blade Height
Before we delve into the specifics, let’s take a moment to understand why blade height matters. The height of your table saw blade directly affects the quality of your cuts and the safety of your work. Setting the blade at the right height ensures that you achieve clean, precise cuts without any tear-out, reduces the risk of kickback, and minimizes the chances of accidents or injuries. Additionally, properly positioned blade height optimizes the efficiency of the cutting process, allowing you to work effectively and efficiently. Now, let’s explore the steps to determine the ideal blade height.
Step 1: Consult the Manufacturer’s Guidelines
Every table saw model has specific recommendations regarding the blade height. These guidelines provided by the manufacturer should be your starting point in determining the optimal height. Refer to the user manual or the manufacturer’s website for accurate information on setting the blade height. Following these recommendations ensures that you are working within the safe operating parameters of your specific table saw.
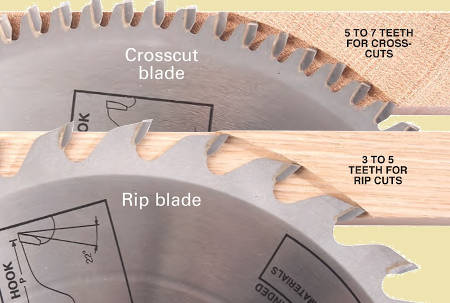
Furthermore, manufacturers often include guidelines for different types of cuts and materials. For instance, the blade height for rip cuts may differ from crosscuts or bevel cuts. Take the time to familiarize yourself with these variations and adjust the blade height accordingly for different cutting tasks.
It’s worth noting that while the manufacturer’s recommendations provide a reliable starting point, your personal preferences and the type of project you’re working on may require slight adjustments to achieve the desired results. Let’s move on to the next step to fine-tune the blade height for your specific needs.
Step 2: Consider the Type of Cut and Workpiece
The type of cut you’re making and the characteristics of the workpiece play a significant role in determining the ideal blade height. For example, when making a rip cut along the grain, it’s generally recommended to set the blade height so that it protrudes above the workpiece by about 1/8 to 1/4 of an inch. This provides enough clearance for the sawdust to escape and minimizes the risk of kickback.
On the other hand, when making crosscuts or cuts across the grain, a blade height that barely clears the thickness of the workpiece is preferable. This minimizes tear-out and ensures a clean, smooth cut. Adjusting the height based on the type of cut and workpiece is essential for achieving optimal results and maintaining safety.
Additionally, take into account the thickness of the workpiece. For thicker materials, a higher blade height may be necessary to ensure a clean cut all the way through. Conversely, when working with thinner stock, lowering the blade height helps prevent excessive splintering or chipping.
Step 3: Perform Test Cuts
Once you have set the initial blade height based on the manufacturer’s recommendations and considered the type of cut and workpiece, it’s time to perform test cuts. This step allows you to assess the quality of the cut and make any necessary adjustments to the blade height.
Select a scrap piece of wood with similar characteristics to your actual workpiece and make a test cut. Observe the surface finish, the presence of tear-out or splintering, and the overall smoothness of the cut. Based on your evaluation, you can fine-tune the blade height by making incremental adjustments and repeating the test cuts until you achieve the desired results.
During this process, it’s essential to be patient and make small adjustments. The goal is to find the sweet spot where you achieve clean, precise cuts without compromising safety. Remember to tighten all the adjustments securely before making any cuts on your actual project.
Blade Height Tips for Optimal Results
Now that we have covered the steps to determine the ideal height for your table saw blade, let’s explore some additional tips to ensure optimal results:
1. Safety First
Always prioritize safety when setting the blade height. Make sure the table saw is turned off and unplugged before making any adjustments. Use push sticks or other appropriate safety devices to keep your hands safely away from the blade while making changes.
2. Use a Blade Height Gauge
A blade height gauge is an incredibly useful tool for accurately setting your table saw blade height. It allows for precise measurements and ensures consistency across multiple cuts. Investing in a quality blade height gauge is worthwhile if you frequently work with a table saw.
3. Consider the Teeth Orientation
Depending on the type of cut you’re making, you may need to align the blade height with the orientation of the teeth. For instance, when making a through-cut, ensuring that the top of the teeth is slightly above the workpiece surface prevents tear-out on the top side of the cut. Conversely, when making a rabbet cut, aligning the bottom of the teeth with the workpiece surface results in a clean, precise cut.
4. Check for Blade Runout
Blade runout can negatively affect the quality of your cuts, even if the blade height is set correctly. To check for blade runout, raise the blade above the table and use a dial indicator to measure any wobbling or eccentricity. If you notice significant runout, consider replacing or servicing the blade to ensure smooth and accurate cuts.
5. Clean the Blade Regularly
A clean blade performs better and delivers cleaner cuts. Over time, sawdust, pitch, and resin can accumulate on the blade, reducing its cutting efficiency. Clean the blade regularly using the appropriate blade cleaning solutions or soak it in a mixture of warm water and dish soap. This helps maintain optimal performance and prolongs the lifespan of the blade.
In conclusion, setting the table saw blade height correctly is essential for achieving precise and safe cuts in your woodworking projects. By following the manufacturer’s guidelines, considering the type of cut and workpiece, and making test cuts, you can determine the optimal blade height for your specific needs. Remember to prioritize safety, use the right tools, and maintain the blade regularly for optimal performance. Happy woodworking!
Key Takeaways – How high should a table saw blade be?
- Always set the table saw blade height slightly above the thickness of the material being cut.
- A good rule of thumb is to have the blade teeth extend about 1/8 inch to 1/4 inch above the top of the material.
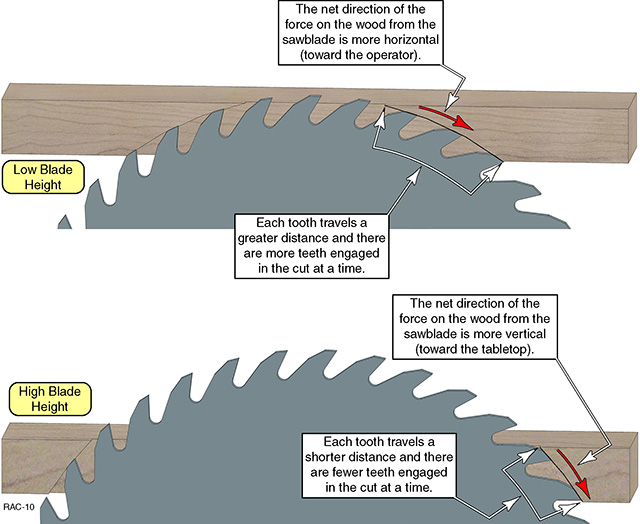
- Setting the blade too high increases the risk of kickback and can produce rougher cuts.
- Setting the blade too low can cause the wood to bind or burn and may damage the blade.
- It’s important to follow the manufacturer’s guidelines and safety recommendations for your specific table saw model.
Frequently Asked Questions
Welcome to our FAQs section, where we’ll address common questions about table saw blades and their heights. Whether you’re a beginner or have been using table saws for years, understanding the optimal blade height is essential for safety and efficiency. Below, we answer some key questions about how high a table saw blade should be.
1. Why is it important to adjust the table saw blade height correctly?
Adjusting the table saw blade height correctly is crucial for several reasons. Firstly, it ensures your safety while operating the saw. A blade set too high can lead to kickback, which can be dangerous and cause serious injuries. Secondly, the proper blade height improves cutting accuracy and reduces tear-out, giving you cleaner cuts. Lastly, adjusting the blade at the right height allows for efficient sawdust removal, preventing clogging and potential hazards. So, taking the time to adjust the blade height correctly is well worth it.
2. How do I determine the right height for my table saw blade?
Determining the right height for your table saw blade may vary depending on the type of cut you need to make. However, a general rule of thumb is to position the blade so that it is just 1/8 to 1/4 inch higher than the surface of your workpiece. This slight elevation helps prevent excessive friction and reduces the chance of the blade getting stuck or binding during the cut. It is also important to consider the saw’s manufacturer instructions and safety guidelines, as they may provide specific recommendations for your particular model.
3. Can the height of the blade affect the quality of the cut?
Absolutely! The height of the blade can significantly impact the quality of your cuts. If the blade is set too low, it may not fully penetrate the workpiece, resulting in an incomplete cut. On the other hand, if the blade is set too high, it may cause tear-out, leaving a rough or splintered edge. Additionally, an improperly set blade height can increase the risk of kickback. To achieve cleaner cuts with minimal tear-out, ensure the blade is set at the appropriate height for the material and type of cut you are making.
4. Are there any safety precautions to keep in mind when adjusting the blade height?
Absolutely! When adjusting the table saw blade height, always prioritize your safety. Here are a few essential precautions to keep in mind:
- Ensure the saw is turned off and unplugged before making any adjustments.
- Use the appropriate tools or accessories provided by the saw’s manufacturer to adjust the blade height.
- Avoid reaching under the table or near the blade when making adjustments.
- Double-check that the blade is properly secured and aligned after adjusting the height.
- Consider using push sticks or other safety devices to keep your hands at a safe distance from the blade.
- Always follow the safety guidelines outlined in your table saw’s manual.
5. Can the height of the blade affect the performance of the table saw?
Indeed, the height of the blade can greatly influence the performance of your table saw. A blade that is set at the correct height allows for smoother and more efficient cuts. It reduces the strain on the motor, helping it run smoothly without bogging down. Additionally, the proper blade height reduces the risk of the motor overheating and extends the life of both the blade and the saw itself. By maintaining the right blade height, you can optimize the performance of your table saw and ensure it operates at its best.
ENOUGH BS! Here’s how high your table saw blade should be.
Summary
So, to sum it up, the height of a table saw blade is an important factor to consider. It should be set just above the thickness of the material being cut to ensure safety and accuracy.
Remember, if the blade is too high, it can cause kickback or lead to rough cuts. If the blade is too low, it may not cut all the way through the material. Finding the right height will result in clean and precise cuts while minimizing the risk of accidents. Always prioritize safety and follow the manufacturer’s instructions for your specific table saw.