
If you’re wondering “how high should table saw blade be set?” then you’ve come to the right place! Using a table saw can be a bit intimidating at first, but with the proper knowledge, you’ll be slicing through wood like a pro in no time.
Setting the height of your table saw blade is crucial for achieving clean, safe, and accurate cuts. Get ready to dive into the world of woodworking as we explore the optimal height for your table saw blade.
So, whether you’re a novice woodworker or a seasoned pro, let’s get started and uncover the secrets of setting the perfect table saw blade height!
- Ensure the saw is off and unplugged for safety.
- Locate the blade height adjustment wheel or crank.
- Rotate the wheel or crank to raise or lower the blade.
- Measure the blade height using a measuring tool.
- Adjust the blade height until it matches the desired depth.
- Double-check the blade height before using the table saw.
Remember, always prioritize safety when working with power tools!
How High Should a Table Saw Blade Be Set?
Introduction: When it comes to using a table saw, one of the most important considerations is how high to set the blade. The height of the blade can greatly impact the quality and safety of your cuts. But finding the optimal height may seem like a daunting task, especially for beginners. In this article, we will provide you with all the information you need to know about setting the table saw blade height correctly for different types of cuts and materials.
Why is Blade Height Important?
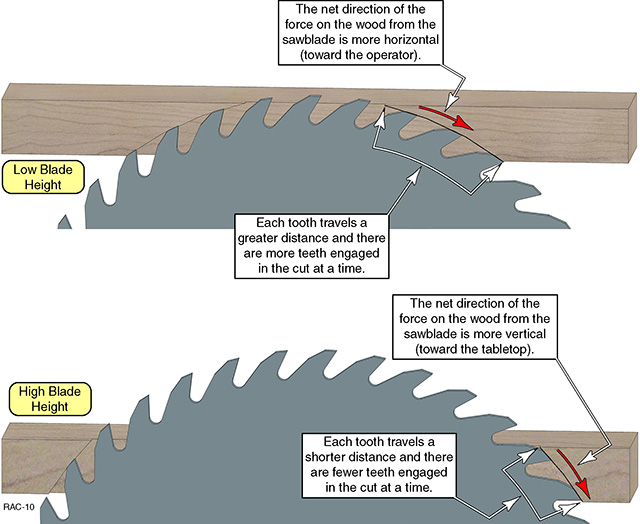
Setting the blade height correctly is crucial for achieving clean, accurate, and safe cuts on the table saw. The height of the blade determines the depth of the cut, and it can greatly affect the quality of the sawing operation. If the blade is set too high, it can cause the material to burn or splinter, leading to rough edges and a poor finish. On the other hand, if the blade is set too low, it may not cut through the material properly, resulting in an uneven or incomplete cut. Moreover, using the wrong blade height can pose a safety risk since it increases the chances of kickback and can cause accidents.
To ensure the best results and minimize the risk of accidents, it is crucial to set the table saw blade height correctly for each specific cutting task. Here are some guidelines for setting the blade height based on the type of cut you are performing:
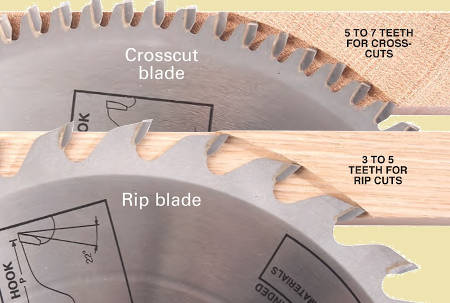
– Rip Cuts: For rip cuts, where you need to cut along the length of the material, the blade should be set so that its highest point is just slightly higher than the thickness of the material being cut. This minimizes the risk of kickback and ensures a clean cut. However, setting the blade too high can lead to burning or splintering, so it’s essential to find the right balance.
– Crosscuts: When making crosscuts, which involve cutting across the grain of the material, the blade should be set at a height that allows it to cut through the material without tearing or chipping the edges. Setting the blade slightly higher than the material thickness is generally a good starting point, but it may require some adjustments based on the specific material you are cutting.
– Dado Cuts: For dado cuts, where you need to make wide grooves or slots in the material, the blade height should be set based on the desired width and depth of the dado. It is essential to follow the instructions provided by the dado set manufacturer to ensure safe and accurate cuts.
How to Set the Blade Height
Now that we understand the importance of setting the blade height correctly, let’s look at the steps involved in doing so:
1. Ensure safety: Before adjusting the blade height, make sure the table saw is turned off and unplugged. This will prevent any accidental starts and keep you safe during the adjustment process.
2. Adjust the height: Most table saws have a handwheel or knob that allows you to raise or lower the blade. Rotate the handwheel or turn the knob to adjust the height of the blade. Start by setting the blade slightly higher than the material thickness for the specific cut you are making.
3. Check the height: Once you have made the initial adjustment, lower the blade guard and use a combination square or a specialized blade height gauge to check the height of the blade. Place the gauge against the blade teeth and ensure that it matches the desired height.
4. Make adjustments: If the blade height is incorrect, make small adjustments using the handwheel or knob until you achieve the desired height. Double-check the height with the gauge to ensure accuracy.
5. Test the cut: After setting the blade height, perform a test cut on a scrap piece of material similar to the one you will be using for your project. Inspect the cut for any burning, splintering, or other issues. If necessary, make further adjustments to the blade height until you achieve the desired results.
Remember, every project and material may require slightly different blade height settings, so it’s essential to experiment and make adjustments to find the best setting for each specific task.
Tips for Setting the Blade Height
Here are some additional tips to keep in mind when setting the blade height on your table saw:
1. Safety first: Always prioritize safety when adjusting the blade height. Never attempt to adjust the blade while the table saw is running or powered on. Use a push stick or other safety devices to keep your hands a safe distance from the blade.
2. Consider the material: Different materials may require different blade height settings. Hardwoods, melamine, and laminates tend to splinter more easily, so setting the blade slightly higher than the material thickness can help prevent chipping. Softer materials like plywood may require a lower blade height for clean cuts.
3. Check the blade alignment: Along with setting the blade height, it’s important to ensure that the blade is aligned parallel to the table saw’s miter gauge or fence. Misaligned blade can cause uneven cuts and increase the risk of kickback. Consult your table saw’s manual for instructions on aligning the blade.
4. Take small increments: When making adjustments to the blade height, it’s best to make small increments rather than large changes. This allows you to fine-tune the height and avoid drastic mistakes.
5. Use accessories and guides: Depending on your cutting needs, consider using accessories such as featherboards, push sticks, or miter gauges to help guide the material and maintain control during the cut. These can improve safety and accuracy, especially when working with smaller or narrower pieces.
In conclusion, setting the blade height correctly is essential for achieving clean and safe cuts on a table saw. By following the guidelines and tips provided in this article, you can confidently adjust the blade height for different types of cuts and materials. Remember, practice and experimentation are key to finding the optimal blade height for your specific projects. So, take your time, prioritize safety, and enjoy the precision and versatility that a well-set table saw blade can offer.
Key Takeaways for “how high should table saw blade be set?”
- The table saw blade should be set at a height where only the top 1/8 to 1/4 inch of the blade is exposed above the material being cut.
- Setting the blade too high can increase the risk of kickback and result in unsafe cuts.
- Conversely, setting the blade too low can lead to inefficient cutting and potential burn marks on the material.
- It’s important to check the manufacturer’s instructions for your specific table saw model, as the recommended blade height may vary.
- Always wear proper safety equipment, such as goggles and gloves, when using a table saw.
Frequently Asked Questions
1. How should I determine the height for setting my table saw blade?
When setting the height of your table saw blade, it’s important to consider the type of cut you’re making and the material you’re working with. As a general rule of thumb, the blade should be set so that it extends approximately 1/8 inch higher than the thickness of the material being cut. This ensures that you achieve a clean and precise cut without putting excessive strain on the blade.
However, it’s crucial to keep safety in mind too. If you’re making a rip cut, where the grain of the wood runs parallel to the blade, the blade height should be set just high enough to clear the material. On the other hand, for cross cuts or cuts across the grain, the blade can be raised slightly higher to minimize tear-out and produce clean edges.
2. Are there any specific guidelines for setting the blade height for different materials?
Yes, there are some general guidelines for setting the blade height based on the material you’re working with. For solid wood, the blade should be set at a height that just clears the material being cut. However, for plywood and other sheet goods, it’s best to raise the blade slightly higher to minimize tear-out on the bottom side of the cut.
When cutting melamine or other laminates, the blade should be set at approximately 1/4 inch higher than the thickness of the material to prevent chipping. For plastics, such as acrylic or PVC, the blade height should also be slightly higher than the material’s thickness to avoid melting or charring. Always refer to the manufacturer’s recommendations and perform test cuts to ensure the best results.
3. Can I use the same blade height for all types of saw cuts?
Ideally, the blade height should be adjusted based on the type of cut you’re making. For ripping, where you’re cutting along the length of the wood grain, the blade should be set just high enough to clear the material. This reduces the chance of kickback and ensures a safe and smooth cut. For cross cuts, where you’re cutting across the grain, it’s advisable to raise the blade slightly higher to minimize tear-out and achieve clean edges.
Additionally, for different types of joinery cuts like dadoes or rabbets, the blade height needs to be adjusted accordingly. Always refer to the instructions provided with your saw and take into account the material being cut to determine the appropriate blade height for each type of saw cut.
4. How can I ensure the proper blade height for safety?
To ensure safety when setting the blade height of your table saw, there are a few key steps you should follow. Firstly, always make sure the saw is powered off and unplugged before attempting to adjust the blade height. Secondly, refer to the manufacturer’s instructions or the user manual for specific safety guidelines and recommendations.
When adjusting the blade height, do so gradually and make small incremental changes until you achieve the desired height. Keep in mind that the blade should never be set too high, as this increases the risk of kickback and can lead to accidents. Lastly, perform test cuts on scrap or waste pieces of the same material you’ll be cutting to ensure proper height and to verify the safety of the set-up.
5. What are the potential risks of setting the blade height too low or too high?
Setting the blade height too low can cause binding, which can result in kickback, where the material being cut is thrown back towards the operator. This can be extremely dangerous and may cause serious injury. Additionally, a blade set too low can lead to poor quality cuts, including burning or charring the material, as the blade is not able to effectively remove the wood fibers.
On the other hand, if the blade is set too high, it can create a higher risk of kickback as well as increase the likelihood of the blade deflecting or wandering during the cut. This can lead to inaccurate cuts and a lack of control over the material being cut. It’s important to strike a balance and set the blade height at an optimal level for both safety and cutting performance.
Summary
So, when it comes to setting the table saw blade height, there are a few key points to remember. First, the blade should extend about 1/8 inch above the material being cut. This helps to minimize kickback and ensures a cleaner cut. Second, always make sure to power off the saw and unplug it before making any adjustments. Safety should always come first! Lastly, take your time and double-check your measurements before starting to cut. Precision is important for both the quality of the cut and your safety. Happy woodworking!