
Are you wondering how high to raise your table saw blade? You’ve come to the right place! Whether you’re a woodworking enthusiast or a DIYer, understanding the correct blade height is essential for achieving accurate and safe cuts. In this article, we’ll dive into the ins and outs of setting the right table saw blade height, so you can confidently tackle your woodworking projects with ease. Let’s get started!
When it comes to adjusting the height of your table saw blade, there are a few factors to consider. The type of cut you’re making and the thickness of the material both play a crucial role in determining the blade height. By finding the balance between the height and the material thickness, you’ll achieve clean, precise cuts while minimizing the risk of kickback or other potential safety hazards.
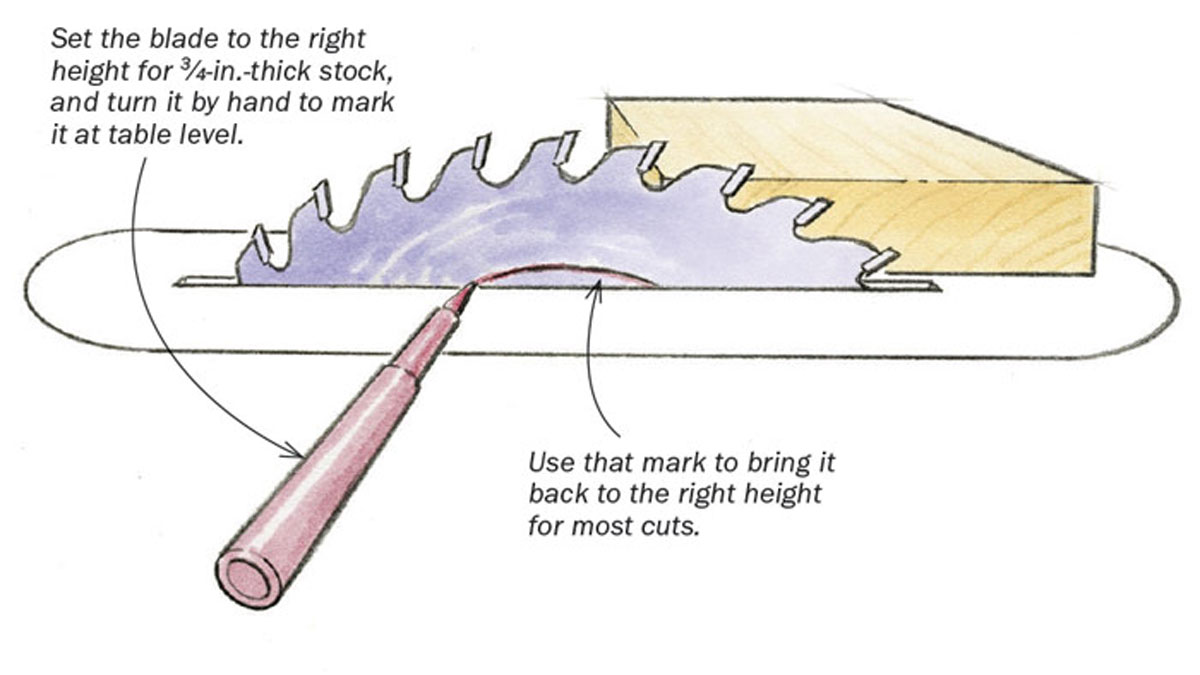
Now, you might be wondering, how do I determine the appropriate height for my table saw blade? It’s simple! As a general rule of thumb, the blade should be set just high enough to clear the material you’re cutting. This means that when the teeth of the blade extend above the surface of the material, it should only be by about 1/8 to 1/4 of an inch. This ensures that the blade can effectively cut through the material without causing any unnecessary friction or binding. So, be sure to adjust the blade height accordingly before powering up your table saw.
In summary, knowing the correct height to raise your table saw blade is crucial for achieving the best results in your woodworking projects. By considering the type of cut and material thickness, you can set the blade height to avoid any safety risks and achieve precise, clean cuts. In the next section, we’ll explore step-by-step instructions on how to adjust your table saw blade height. Let’s dive in!
1. Safety first: Ensure the saw is unplugged and the blade is at its lowest position.
2. Loosen the blade height lock: Rotate the lock counterclockwise to release the blade.
3. Determine the desired height: Consider the thickness of your material and adjust accordingly.
4. Adjust the blade height: Turn the elevation wheel clockwise to raise the blade or counterclockwise to lower it.
5. Test and fine-tune: Make test cuts and adjust as needed until you achieve the desired height.
How High to Raise Table Saw Blade: A Comprehensive Guide
Table saws are essential tools for woodworking projects, and understanding how to properly set the blade height is crucial for achieving accurate and safe cuts. In this comprehensive guide, we will explore the factors to consider when determining the ideal height to raise your table saw blade. From understanding different types of cuts to ensuring safety precautions, we will provide you with the knowledge and insights to make the most of your table saw.
The Basics of Table Saw Blade Height
When it comes to table saws, the height of the blade plays a significant role in achieving precise cuts. The general rule of thumb is that the blade height should be set just higher than the thickness of the material you are cutting. For most applications, this ensures that the blade effectively cuts through the material without causing excessive tear-out or kickback.
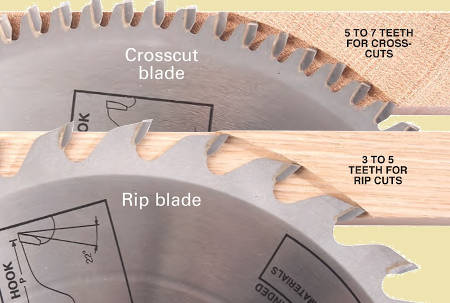
However, it’s essential to consider the type of cut you want to achieve. For rip cuts, where you are cutting along the length of the material, a higher blade height is typically preferred. This allows for efficient chip removal and reduces the risk of burning the wood. On the other hand, for crosscuts, where you are cutting across the width of the material, a lower blade height is often recommended to minimize tear-out.
When adjusting the blade height, it’s crucial to refer to the manufacturer’s instructions for your specific table saw model. Different saws may have varying mechanisms for adjusting the blade height, such as a hand crank or a height adjustment wheel. Familiarize yourself with your table saw’s features and ensure that all adjustments are done with the saw turned off and unplugged for safety reasons.
Safety Precautions When Adjusting the Blade Height
Working with a table saw requires strict adherence to safety guidelines. Here are essential safety precautions to follow when adjusting the blade height:
- Always wear appropriate personal protective equipment (PPE), including safety glasses, hearing protection, and snug-fitting clothing.
- Ensure that the table saw is turned off and unplugged before making any adjustments to the blade height.
- Avoid reaching over the blade or placing your hands near the blade while adjusting the height. Use tools or accessories provided by the manufacturer to make the adjustments safely.
- Double-check that the blade is secure and properly aligned after adjusting the height. Loose or misaligned blades can be dangerous to operate.
- Keep your work area clean and free of debris to prevent accidents and interference with the blade height adjustment process.
By following these safety precautions, you can minimize the risk of accidents and ensure a safe working environment when adjusting the blade height on your table saw.
Determining the Ideal Blade Height for Different Materials
The ideal blade height may vary depending on the material you are working with. Here’s a breakdown of recommended blade heights for common woodworking materials:
| Material | Blade Height |
|---|---|
| Hardwoods (e.g., oak, maple) | Slightly higher than material thickness |
| Softwoods (e.g., pine, cedar) | Slightly higher than material thickness |
| Plywood and MDF | Slightly higher than material thickness |
| Laminates and Veneers | Slightly higher than material thickness |
Remember, these recommendations serve as general guidelines, and it’s important to consider the specific characteristics of the material you are working with. Adjustments may be necessary based on factors such as the moisture content, density, and hardness of the wood.
Tips for Achieving Accurate and Clean Cuts
Aside from adjusting the blade height correctly, there are additional tips that can help you achieve precise and clean cuts on your table saw:
- Ensure that the saw blade is sharp and properly aligned. Dull or misaligned blades can result in poor cuts and increase the risk of accidents.
- Use a push stick or push block to guide the material through the saw, keeping your hands at a safe distance from the blade.
- Maintain a steady and consistent feed rate to prevent burning or uneven cuts.
- Consider using a zero-clearance insert or a splitter to reduce the risk of tear-out and kickback.
- Regularly clean and lubricate your table saw to ensure smooth operation and prevent debris buildup.
By following these tips and practicing proper technique, you can maximize the performance of your table saw and achieve high-quality cuts consistently.
Top Table Saw Blade Height Adjustment Techniques
When it comes to adjusting the height of your table saw blade, there are several techniques that can help you achieve the desired results. In this section, we will explore three popular methods used by woodworking professionals.
Method 1: Using a Height Gauge
A height gauge is a precision tool specifically designed for accurately measuring and setting the height of a table saw blade. Here’s how you can use a height gauge to adjust the blade height:
- Start by turning off and unplugging the table saw for safety.
- Place the height gauge on the table saw’s top surface, ensuring that it rests securely without any wobbling.
- Slide the gauge’s blade height indicator against the side of the saw blade.
- Rotate the blade height adjustment wheel or crank to raise or lower the blade, aligning it with the desired height on the height gauge.
- Double-check the blade height alignment by sliding the gauge along the side of the blade to confirm that it remains consistent.
Using a height gauge provides precise and repeatable results, making it a popular choice among professionals who require accurate cuts on a regular basis.
Method 2: Using a Combination Square
A combination square is a versatile measuring tool that can also be utilized for adjusting the height of a table saw blade. Here’s how you can use a combination square to set the blade height:
- Turn off and unplug the table saw to ensure safety.
- Place the combination square’s ruler against the saw blade, aligning it with the desired height.
- Secure the ruler in position using a clamp or by holding it firmly against the blade.
- Rotate the blade height adjustment wheel or crank to raise or lower the blade until it aligns with the ruler’s edge at the desired height.
- Verify the blade height by sliding the combination square along the side of the blade, ensuring that it maintains consistent alignment.
By using a combination square, you can achieve accurate blade height adjustments without requiring specialized tools.
Method 3: Using a Stacked Set of Test Cuts
This method involves making a series of test cuts and adjusting the blade height based on the results obtained. Here’s how you can use this technique:
- Start by cutting a small piece of scrap wood using the current blade height setting.
- Inspect the quality of the cut, looking for signs of burning or tear-out.
- If the cut is not satisfactory, adjust the blade height slightly and make another test cut.
- Continue adjusting the blade height and making test cuts until you achieve the desired cut quality.
This method allows you to fine-tune the blade height based on the actual cutting performance, making it particularly useful when working with different materials or complex projects that require precise cuts.
Fine-Tuning Blade Height for Different Cuts and Materials
While the general rule of thumb suggests raising the blade height slightly above the material thickness, there are specific scenarios where fine-tuning the blade height becomes essential.
Blade Height for Dado Cuts
When making dado cuts, which involve cutting a channel or groove in the wood, it’s important to adjust the blade height accurately. Here’s how to determine the ideal blade height for dado cuts:
1) Measure the thickness of the material you are working with.
2) Divide the material thickness by 2 to obtain the desired depth of the dado cut.
3) The blade height should be set slightly higher than the desired depth of the dado cut to account for any variations in material thickness or any unwanted tear-out.
Blade Height for Rabbet Cuts
Rabbet cuts involve cutting a groove along the edge or face of a workpiece. To determine the ideal blade height for rabbet cuts:
1) Measure the desired depth of the rabbet cut.
2) Lower the blade height to match the desired depth of the rabbet cut, ensuring that it is slightly higher than the thickness of the workpiece.
3) Make a small test cut to verify the depth and adjust accordingly if necessary.
Blade Height for Bevel Cuts
Bevel cuts are angled cuts made across the width or length of a workpiece. To set the blade height for bevel cuts:
1) Determine the desired angle for the bevel cut.
2) Adjust the blade height based on the thickness of the material you are cutting and the desired angle.
3) Use a protractor or bevel gauge to measure the angle of the blade and ensure that it matches the desired cut.
By fine-tuning the blade height for specific cuts and materials, you can achieve exceptional precision in your woodworking projects.
Common Mistakes to Avoid when Adjusting Blade Height
Although adjusting the blade height on a table saw may seem straightforward, it’s crucial to be aware of common mistakes that can compromise your safety and the quality of your cuts. Here are a few mistakes to avoid:
Failure to Secure the Blade
Before making any adjustments to the blade height, ensure that the saw is turned off and unplugged. Failing to secure the blade can result in unexpected movement or accidental engagement, leading to severe injuries.
Ignoring Safety Precautions
Working with power tools, including table saws, requires strict adherence to safety guidelines. Always wear appropriate protective equipment, maintain a clean work area, and avoid reaching over or placing your hands near the blade while adjusting the height.
Incorrect Blade Height for the Material
Setting the blade height too low or too high for the material can result in poor cuts, tear-out, or even damage to the workpiece. Refer to the recommended guidelines provided by manufacturers and consider the specific characteristics of the material you are working with.
Neglecting Blade Maintenance
A dull or improperly aligned blade can significantly impact the quality of your cuts. Regularly inspect and maintain your table saw blade, ensuring that it remains sharp and free from debris or buildup.
Conclusion
When it comes to achieving accurate and clean cuts with your table saw, understanding how high to raise the blade is essential. By considering factors such as the type of cut, material thickness, and maintaining safety precautions, you can optimize the performance of your table saw and achieve exceptional results in your woodworking projects. Remember to always follow the manufacturer’s instructions, wear appropriate protective equipment, and practice safe operating procedures. With the proper knowledge and techniques, you’ll be able to confidently set the blade height on your table saw and tackle any woodworking task with precision and confidence.
Key Takeaways: How High to Raise Table Saw Blade?
- Set the table saw blade height just above the material being cut to reduce kickback and ensure smooth cuts.
- Start with a lower blade height and gradually increase it until it reaches the desired cutting depth.
- Always refer to the saw’s user manual for specific instructions on blade height adjustments.
- Consider the type of material, the desired cut, and safety precautions when determining the blade height.
- Regularly inspect the saw blade for any damage or dullness and replace it if necessary for accurate and safe cuts.
## Frequently Asked Questions
Welcome to our FAQ section on how to properly raise the blade on a table saw! Here, we will address common inquiries related to adjusting the height of your table saw blade to ensure safe and accurate woodworking.
1. Why is it important to raise the table saw blade to the correct height?
Raising the table saw blade to the correct height is crucial for a few reasons. Firstly, setting the blade at the proper height ensures accurate cuts that align with your desired measurements. Secondly, a blade set too low can cause unnecessary friction, leading to burning or scorching of the wood. Conversely, a blade set too high can result in splintered edges or even dangerous kickback. By correctly adjusting the blade height, you maximize precision and minimize the risk of accidents.
2. How do I determine the right height to set the table saw blade?
There are general guidelines to follow when determining the appropriate height for your table saw blade. For most standard cuts, the blade should be set so that it extends approximately 1/8 inch above the material being cut. This allows for clean and smooth cuts without causing excessive wear on the blade or introducing unnecessary safety risks. However, depending on the specific type of cut you are making, such as dadoes or rabbets, you may need to adjust the blade height accordingly. Refer to your table saw’s manual for more detailed instructions and recommendations specific to your saw model.
3. What safety precautions should I take before raising the table saw blade height?
Before raising the table saw blade height, it is essential to prioritize safety precautions. Start by ensuring that the table saw is powered off and unplugged. Familiarize yourself with the specific safety features and guidelines provided by the manufacturer for your table saw model. It is recommended to wear safety goggles, ear protection, and appropriate clothing that fully covers your arms and legs. Clear the area around the table saw of any obstructions and ensure proper lighting for optimal visibility. By taking these precautions, you can minimize the risk of accidents or injuries while working with your table saw.
4. Can I raise the table saw blade height while the saw is running?
No, you should never attempt to raise the table saw blade height while the saw is running. This is extremely unsafe and can lead to serious accidents or injuries. Always make sure the table saw is completely powered off and unplugged before adjusting the blade height. Take the time to double-check that the blade is stationary and not in motion. Only when the saw is in a fully powered off state should you proceed with adjusting the blade height.
5. Are there any maintenance tips for the table saw blade?
To keep your table saw blade in good condition, regular maintenance is necessary. Start by regularly cleaning the blade with a specialized blade cleaner or mild detergent to remove any built-up residue or pitch. Avoid using abrasive materials or harsh chemicals that could damage the blade. Inspect the blade regularly, checking for any signs of damage or dullness. If the blade becomes dull, consider sharpening it or replacing it with a new one. Additionally, store the blade properly when not in use, ensuring it remains protected and free from moisture or corrosion. By maintaining your table saw blade, you can prolong its lifespan and ensure optimal performance.
Summary
To wrap it up, when it comes to raising the table saw blade, there are a few key points to keep in mind. Firstly, consider the type of cut you want to make, whether it’s a through cut or a dado cut. Secondly, take into account the height of the material you’re working with, as the blade should protrude slightly above it. Lastly, prioritize safety by avoiding raising the blade too high, as this can increase the risk of kickback or other accidents. With these considerations, you’ll be able to set the table saw blade at the right height for your specific woodworking needs. So go ahead, make your cuts, and happy woodworking!