Are you curious about how the garnet paper is held on an orbital sander? Well, you’ve come to the right place! In this article, we’ll dive into the fascinating world of orbital sanders and reveal the secret behind keeping that garnet paper securely in place. Get ready to explore the ins and outs of this essential tool!
Picture this: you have a project that requires sanding, and you reach for your trusty orbital sander. But have you ever wondered how that sandpaper stays put while the sander does its magic? Let’s unravel the mystery together and discover the genius mechanism that keeps the garnet paper firmly attached to the sander.
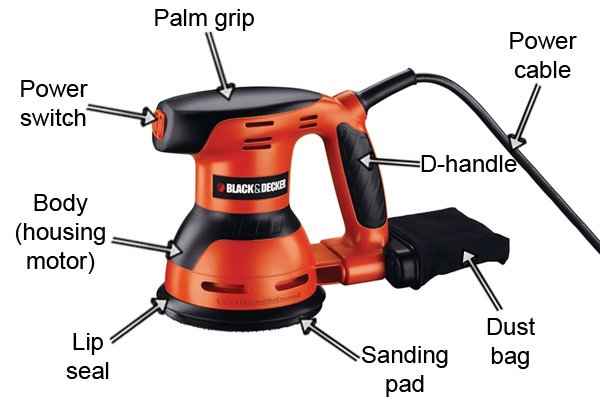
Ready for the big reveal? Drum roll, please! The secret lies in the clever design of the orbital sander’s sanding pad. This pad is specifically engineered to hold the garnet paper in place, ensuring a smooth and reliable sanding experience. So, let’s take a closer look at how this ingenious setup works and why it’s crucial for effective sanding.
Orbital sanders use a hook and loop system to hold garnet paper securely in place. The sander’s pad is covered with a looped material, while the back of the garnet paper has a hook-like material. When pressed together, they create a strong bond that keeps the paper in place during sanding. This ensures smooth and efficient sanding for your projects.

How is Garnet Paper Held on an Orbital Sander? A Detailed Guide
Are you familiar with using an orbital sander for your woodworking projects? If so, you may have wondered how the garnet paper is held securely in place. In this article, we will explore the mechanics of an orbital sander, the role of garnet paper, and the methods used to hold it in position. Whether you are a seasoned woodworker or just starting out, understanding how the garnet paper is held on an orbital sander is crucial for achieving smooth and precise finishes on your projects. Let’s dive in!
The Mechanics of an Orbital Sander
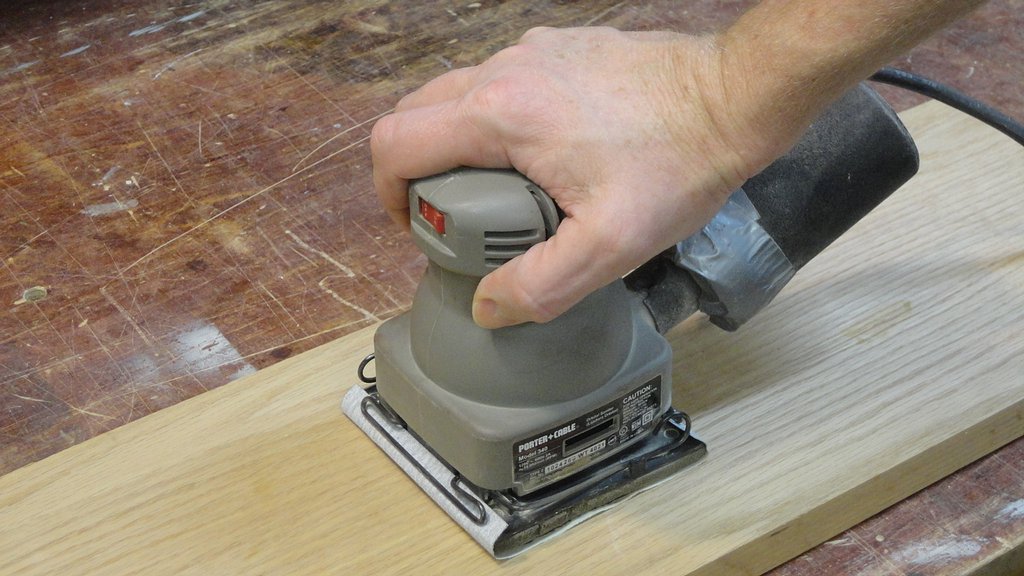
Before we delve into how the garnet paper is held on an orbital sander, let’s first understand the mechanics of this versatile power tool. An orbital sander is a handheld device used for sanding and smoothing various surfaces, particularly wood. It consists of a motor that drives a sanding pad in an elliptical or circular pattern. This motion allows for more efficient sanding, as it prevents the sander from leaving swirl marks or scratches on the surface.
The sanding pad of an orbital sander typically has a hook-and-loop system, commonly known as Velcro, to attach sandpaper. This system ensures a secure and firm grip on the garnet paper during operation. Now, let’s explore how the garnet paper is attached to the sanding pad.
Using Adhesive Backing
One common method of attaching garnet paper to an orbital sander is through adhesive backing. The back of the garnet paper is coated with a layer of adhesive, similar to double-sided tape. To attach the paper, you simply peel off the protective layer and press it firmly onto the sanding pad. The adhesive backing then holds the garnet paper securely in place while the sander is in use.
This method offers easy and quick paper changes, as the adhesive backing allows for effortless removal and replacement of the garnet paper. However, it is important to ensure that the adhesive backing is free from any dust or debris, as this can affect its adhesion. Regularly cleaning the sanding pad and replacing worn-out garnet paper will help maintain optimal performance.
Additionally, it is worth noting that some orbital sanders come with pre-punched holes in the sanding pad. These holes align with corresponding holes in the garnet paper, allowing for effective dust extraction during sanding. This feature not only improves visibility but also prolongs the lifespan of the garnet paper.
Using a Clamping System
Another method used to hold garnet paper on an orbital sander is a clamping system. This system utilizes metal clamps or clips that securely fasten the sandpaper onto the sanding pad. To attach the garnet paper, you position it over the pad, aligning the holes if present, and tighten the clamps until the paper is held taut.
The clamping system provides a strong grip and ensures that the garnet paper stays in place throughout the sanding process. Some orbital sanders have an integrated clamping mechanism, where you can slide the clips into designated slots on the sanding pad. Others may require separate clamps or clips that can be tightened manually.
When using this method, it is important to check the tightness of the clamps periodically. Vibrations during sanding can cause the garnet paper to loosen over time. By ensuring that the clamps are securely tightened, you can prevent the paper from slipping or shifting during operation.
Tips for Using Garnet Paper on an Orbital Sander
Now that you understand how garnet paper is held on an orbital sander, let’s explore some tips for using it effectively:
Choose the Right Grit:
Garnet paper comes in various grit levels, ranging from coarse to fine. The grit level determines the aggressiveness of the sanding and the smoothness of the finish. When starting a project, begin with a coarser grit to remove any imperfections or old finishes. Gradually progress to finer grits for a smoother surface that is ready for staining or painting.
Use Proper Technique:
When using an orbital sander, it is important to move the tool in a steady and even motion. Avoid pressing down too hard or staying in one spot for too long, as this can result in uneven sanding or damage to the surface. Keep the sander moving constantly to achieve consistent and uniform results.
Regularly Clean and Inspect:
After each sanding session, clean the sanding pad thoroughly to remove any debris or residue. This will help maintain the effectiveness of the garnet paper and prevent clogging. Additionally, inspect the paper for signs of wear or tear. Replace it immediately if it becomes damaged or loses its effectiveness.
Wear Protective Gear:
Sanding creates dust particles that can irritate your skin, eyes, and respiratory system. Always wear protective gear, including safety glasses, a dust mask, and gloves, to safeguard yourself from potential hazards. Remember to work in a well-ventilated area or use a dust extraction system to minimize dust buildup.
Store Garnet Paper Properly:
To prolong the lifespan of your garnet paper, store it in a cool, dry place away from direct sunlight and moisture. Keeping it in its original packaging or a labeled container will help protect it from damage and maintain its quality.
Achieve Smoother Finishes with the Right Technique
Whether you prefer using adhesive-backed garnet paper or a clamping system on your orbital sander, the key to achieving smoother finishes lies in using the right technique. Proper sanding techniques, combined with the appropriate paper grit and regular maintenance, will help you achieve professional-looking results on all your woodworking projects. So, next time you reach for your orbital sander, remember the importance of how the garnet paper is held for optimal sanding performance. Happy sanding!
Key Takeaways: How is the garnet paper held on an orbital sander?
- Garnet paper is secured onto an orbital sander using a hook-and-loop system.
- The orbital sander has a Velcro-like backing pad, which is attached to the sanding tool.
- Garnet paper has a corresponding hook material on its back, allowing it to stick firmly to the backing pad.
- This secure attachment ensures that the garnet paper stays in place while sanding.
- When the paper wears out, it can be easily removed and replaced with a new one.
Frequently Asked Questions
When it comes to using an orbital sander and holding garnet paper in place, you may have a few questions. Here are some commonly asked questions and their answers:
1. How does the garnet paper stay in place on an orbital sander?
The garnet paper on an orbital sander is held in place by a hook-and-loop system. The sander’s pad has small hooks that grip onto the loops on the back of the garnet paper. This allows the paper to stay firmly attached to the pad while the sander is in use.
This hook-and-loop system is also commonly referred to as a “Velcro” system, as it operates similarly to how Velcro fasteners work. The strong grip of the hooks and loops ensures that the garnet paper doesn’t slip or come loose during sanding.
2. Can I use any type of garnet paper with an orbital sander?
Orbital sanders are generally compatible with various types of garnet paper, but it’s essential to choose the right grit and size for your specific project. Garnet paper comes in different grits, which determine the coarseness of the sanding surface.
For rough sanding or removing material, you’ll want to use a lower grit (e.g., 40 or 60). For a smoother finish or finer sanding, higher grits (e.g., 120 or 220) are more suitable. Additionally, ensure that the size of the garnet paper matches the size of your orbital sander’s pad for optimal performance.
3. How do I change the garnet paper on my orbital sander?
To change the garnet paper on your orbital sander, follow these steps:
1. Switch off and unplug the orbital sander for safety.
2. Locate the release mechanism or lever on the sander’s pad.
3. Press or slide the release mechanism to disengage the current garnet paper.
4. Remove the old garnet paper from the pad.
5. Align the new garnet paper with the pad, ensuring the holes match if there are any.
6. Press the new garnet paper firmly onto the pad, aligning it with the hook-and-loop system.
7. Securely attach the garnet paper by pressing and smoothing it onto the pad.
8. Plug in and turn on the orbital sander, and you’re ready to go!
4. How long does garnet paper typically last on an orbital sander?
The lifespan of garnet paper on an orbital sander depends on various factors, such as the intensity and duration of use, the type of material being sanded, and the grit of the paper. Generally, garnet paper can last for several sanding sessions before it needs to be replaced.
However, it’s important to regularly inspect the condition of the paper and replace it if it becomes worn, torn, or clogged with debris. Using worn-out garnet paper can lead to less effective sanding results and could potentially damage the surface being worked on.
5. Are there any maintenance tips for ensuring the longevity of garnet paper on an orbital sander?
To prolong the life of your garnet paper on an orbital sander, you can follow these maintenance tips:
1. Keep the sander clean: Regularly remove dust and debris from the sander’s pad and hook-and-loop system to prevent clogging and ensure a strong grip.
2. Avoid excessive pressure: Applying excessive pressure can cause the garnet paper to wear out faster. Let the orbital sander’s weight and motion do the work for you.
3. Use the appropriate sanding technique: Learn and apply proper sanding techniques to avoid unnecessary wear and tear on the garnet paper.
4. Store the sander and garnet paper properly: When not in use, store the sander and garnet paper in a clean and dry area to prevent damage.
5. Replace worn-out paper promptly: As mentioned earlier, replace garnet paper as soon as it shows signs of wear and tear or becomes less effective in sanding.
Orbital Sander Basics | Beginner Tool
Summary
So, to summarize, the garnet paper is held on an orbital sander using a hook-and-loop system. This system consists of a Velcro-like backing on the sandpaper and a matching pad on the sander. They stick together when pressed, but can be easily removed or replaced.
The key point is that the garnet paper stays in place while you sand, ensuring a smooth and efficient sanding process. This makes it easier for you to complete your woodworking projects or other DIY tasks. So remember, when using an orbital sander, the hook-and-loop system keeps the garnet paper securely attached!