
How long do you clamp wood glue? When it comes to woodworking projects, using wood glue is a common practice. But have you ever wondered how long you need to keep the pieces clamped together? Well, you’re in luck! In this article, we’ll explore the optimal clamping time for wood glue and why it’s important for a successful bond. So, let’s dive in and discover the perfect timing for your woodworking projects! Grab your safety goggles and prepare to join me on a glue-clamping adventure.
Wood glue is a magical substance that transforms separate pieces of wood into a solid and durable structure. But here’s the catch: wood glue needs some time to work its magic. While some beginner woodworkers may rush to remove their clamps, seasoned enthusiasts understand the importance of patience in woodworking. By carefully following the recommended clamping time, you ensure a strong and lasting bond that will stand the test of time.
So, how long should you keep those clamps on? Well, it depends on the type of wood, the glue you’re using, and the environmental conditions. Don’t worry, though! In the next few paragraphs, I’ll guide you through the factors that affect clamping time, making it easier for you to create masterpieces with wood glue. Are you excited? I can feel your passion for woodworking radiating through the screen! Let’s get started on our clamping journey together.
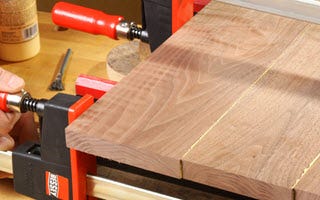
When using wood glue, it’s important to clamp the pieces together to ensure a strong bond. The length of time you should clamp wood glue depends on the type of glue and the project you’re working on. As a general guideline, leave the clamps on for at least 30 minutes to an hour. However, it’s always a good idea to consult the instructions on the glue bottle for specific drying times. Remember, patience is key to achieving a sturdy result!
How Long Do You Clamp Wood Glue? The Ultimate Guide
Wood glue is an essential adhesive for any woodworking project, but knowing how long to clamp the glued joints can be a crucial factor in achieving strong and lasting bonds. In this comprehensive guide, we will explore the recommended clamping times for various types of wood glue and delve into the factors that can affect the drying and curing process. Whether you are a beginner or an experienced woodworker, this article will provide you with the knowledge and techniques to optimize your clamping time and ensure successful glue-ups.
Factors Affecting Clamping Time
When it comes to clamping wood glue, several factors can influence the recommended duration. Understanding these factors will not only help you determine the appropriate clamping time but also ensure the best results for your woodworking projects. Let’s take a closer look at some of the key factors:
Wood Glue Type
The type of wood glue you are using plays a significant role in determining the clamping time. Different types of wood glue, such as PVA (polyvinyl acetate), epoxy, and polyurethane, have varying drying and curing times. It is crucial to read the manufacturer’s instructions for the specific glue you are using and follow their recommendations for clamping duration.
For example, PVA glues typically require 30 minutes to an hour of clamping time, while epoxy glues may require several hours or even overnight. Polyurethane glues often have longer clamping times, ranging from one to four hours. Understanding the characteristics and behavior of each type of glue will ensure optimal bonding and prevent issues such as joint failure.
It’s important to note that the clamping time provided by the manufacturer is an approximation and can vary based on other factors, as discussed below.
Wood Moisture Content
The moisture content of the wood being glued can affect the clamping time. Wood with high moisture content takes longer to dry, which can extend the clamping time. Moisture can slow down the curing process of the glue, potentially leading to weaker joints or even glue failure. It is essential to work with properly seasoned wood with an appropriate moisture content.
Most woodworking experts recommend a moisture content between 6% and 8% for indoor projects. Using a moisture meter will help you determine the moisture content accurately. If the wood is too moist, allowing it to dry in a controlled environment before gluing is advisable.
On the other hand, if the wood is too dry, it may absorb the glue excessively, resulting in a weak bond. In such cases, moistening the wood slightly before gluing can help achieve a better bond and prevent premature drying of the glue.
Temperature and Humidity
Temperature and humidity are critical environmental factors that can affect the drying and curing time of wood glue. High temperatures and low humidity levels can accelerate the drying process, reducing the clamping time required. Conversely, colder temperatures and high humidity can slow down the drying and curing process, extending the clamping time.
It is essential to work in a well-ventilated area with a stable temperature and humidity level. Some wood glues may have specific temperature and humidity recommendations for optimal performance. Following these guidelines will ensure that the glue cures evenly and achieves maximum strength.
Remember to consider the room temperature and humidity during the gluing process as well. If winter weather or dry air conditioning is affecting your workspace, using climate control devices or a humidifier can help maintain the ideal conditions for glue drying.
Joint Design and Pressure
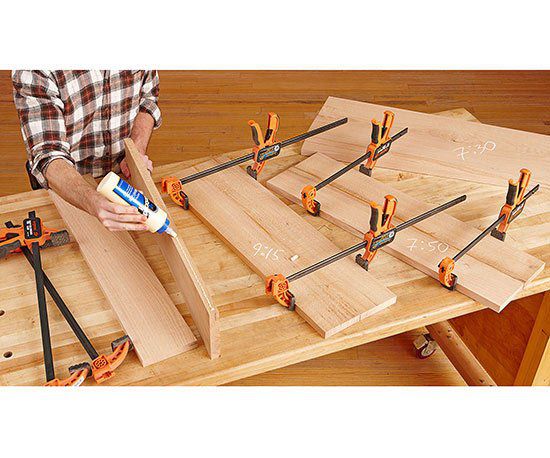
The design of the joint and the amount of pressure applied during clamping also impact the clamping time. It is crucial to ensure that the joint surfaces are clean, properly prepared, and have a snug fit before applying the glue. A tight fit helps maximize the contact between the mating surfaces, allowing for better glue distribution and stronger bonding.
Applying even pressure across the joint is essential to avoid misalignment or gaps, which can weaken the bond. Using clamps or other clamping mechanisms to exert uniform pressure will aid in creating tight and secure joints. The recommended pressure for clamping can vary depending on the type of wood glue and the thickness of the materials being glued. Consult the manufacturer’s instructions for the specific glue you are using to determine the appropriate pressure.
Remember, excessive pressure can squeeze out too much glue, resulting in weak joints, while insufficient pressure can lead to insufficient contact and compromised bonding strength. Finding the right balance is key to achieving successful glue-ups.
Application and Open Assembly Time
The application and open assembly time refer to the period during which the glue can be applied to the joint surfaces and the assembly can be completed before clamping. Different types of wood glue have varying open assembly times, which can range from a few minutes to several hours.
It is crucial to work efficiently during the open assembly time to ensure proper glue coverage on the joint surfaces and to assemble the project accurately. Rushing or taking too long before clamping can lead to glue drying on the surface, preventing proper adhesion. Carefully follow the manufacturer’s recommendations for the specific glue you are using to optimize the open assembly time and minimize the risk of glue failure.
Additionally, applying the glue evenly and avoiding excessive quantities will help avoid excess squeeze-out and minimize cleanup after clamping.
Cleanup and Removing Clamps
Once the recommended clamping time has elapsed, you can remove the clamps and begin cleanup. However, the glue may still be in the drying or curing phase and can take additional time to reach full strength. Refer to the manufacturer’s instructions for the specific glue being used to determine the recommended curing time.
After removing the clamps, it is essential to remove any excess glue that may have squeezed out during the clamping process. Scraping or sanding off the excess glue will ensure a cleaner and more professional finish. Keep in mind that hardened glue is significantly more challenging to remove, so it’s best to clean up any squeeze-out before it fully dries.
Allow the glued project to cure fully before subjecting it to stress or load-bearing activities. This will ensure that the glue has reached maximum strength and durability, providing a long-lasting bond.
Tips for Successful Clamping
Now that you understand the factors affecting clamping time, here are some valuable tips to help you achieve successful glue-ups:
1. Prepare the Surfaces Thoroughly:
Ensure that the joint surfaces are clean, free from dust and debris, and properly prepared. Smooth and flat surfaces allow for better glue distribution and stronger bonds.
2. Test the Fit:
Perform a dry fit to ensure that the parts fit together snugly before applying the glue. Make any necessary adjustments to achieve a tight fit.
3. Apply the Glue Evenly:
Apply a thin and even layer of glue on both joint surfaces using a brush, roller, or spreader. Avoid applying excess glue, as it can result in squeeze-out and weaken the joint.
4. Use Appropriate Clamping Mechanisms:
Select the right type and size of clamps or other clamping mechanisms based on the project requirements. Use sufficient clamping pressure to ensure a tight and secure bond without damaging the wood.
5. Remove Excess Glue:
Wipe off any excess glue that squeezes out during clamping using a damp cloth or sponge. This will prevent hardened glue from spoiling the appearance of the project.
6. Allow Sufficient Curing Time:
Follow the manufacturer’s instructions regarding the recommended curing time for the specific glue being used. Avoid putting stress on the glued joint until it has fully cured.
7. Practice Patience:
Wood glue requires time to dry and cure properly. Rushing the process can lead to weak joints and compromised project integrity. Be patient and allow the necessary clamping and curing time for optimal results.
Commonly Asked Questions about Wood Glue Clamping
Can I Use Too Many Clamps?
While it may seem logical to use as many clamps as possible to ensure a tight bond, excessive clamping pressure can actually be detrimental. Over-clamping can squeeze out too much glue and starve the joint, resulting in a weak bond. It is important to find the right balance and apply enough pressure to achieve a secure joint without excess glue squeeze-out.
What Happens If I Remove the Clamps Too Soon?
If you remove the clamps too soon, the glue may not have fully dried or cured, resulting in a weaker bond. Premature removal of clamps can also cause misalignments or gaps in the joint, compromising the integrity of the project. It is crucial to follow the recommended clamping time and allow the glue to cure fully before handling or stressing the glued joint.
Can I Speed Up the Clamping Time?
While it is tempting to speed up the clamping time, it is essential to allow the glue to dry and cure properly for maximum strength and durability. Rushing the clamping time can compromise the effectiveness of the glue and result in weaker joints. Following the manufacturer’s recommendations and creating the ideal environmental conditions, such as optimal temperature and humidity, will ensure the best results.
What If I Don’t Have Clamps?
If you don’t have clamps, there are alternative methods for clamping wood glue. You can use heavy objects, such as books or weights, to exert pressure on the joint while the glue dries. Alternatively, you can use woodworking techniques like dowels, biscuits, or mortise and tenon joints to achieve a secure and tight fit without relying solely on clamps.
Conclusion
Understanding how long to clamp wood glue is crucial for achieving strong and lasting bonds in woodworking projects. Factors such as the type of glue, wood moisture content, temperature, and joint design all play a role in determining the appropriate clamping time. By following the manufacturer’s recommendations, preparing the surfaces thoroughly, applying the glue evenly, and allowing sufficient curing time, you can ensure successful glue-ups and create durable and beautiful woodwork.
Key Takeaways: How Long Do You Clamp Wood Glue?
- Clamping wood glue helps create a strong bond between wood pieces.
- In general, it is recommended to keep the clamps on for at least 30 minutes to 1 hour.
- However, the exact time can vary depending on factors like temperature, humidity, and the type of wood glue used.
- Follow the manufacturer’s instructions for the specific wood glue you are using.
- Always allow the wood glue to fully cure before removing the clamps for best results.
Frequently Asked Questions
When working with wood glue, it’s important to understand the proper clamping time to ensure a strong bond. Below, we’ve answered some common questions related to this topic.
1. How long should you clamp wood glue?
The recommended clamping time for wood glue depends on the specific glue you’re using. In general, most wood glues require clamping for at least 30 minutes to an hour. However, it’s best to consult the instructions provided by the manufacturer of your wood glue for the exact clamping time. Following the manufacturer’s guidelines will help you achieve the best results and ensure a strong bond between the wood pieces.
While waiting for the glue to dry, it’s essential to apply consistent pressure with your clamps to ensure even distribution and a tight bond. After the recommended clamping time, it’s a good practice to leave the project undisturbed for several hours or overnight for the glue to fully cure.
2. Can you clamp wood glue for too long?
While it’s important to clamp wood glue for the recommended amount of time, it’s equally important not to clamp it for too long. If you exceed the recommended clamping time suggested by the glue manufacturer, it can cause the glue to dry unevenly or form a weak bond. In some cases, excessive clamping time can even lead to the glue failing to bond properly.
It’s crucial to follow the instructions provided by the manufacturer to avoid any complications. If you’re unsure or can’t find the specific instructions, you can reach out to the glue manufacturer for guidance on the appropriate clamping time for their specific product.
3. What happens if you don’t clamp wood glue?
Clamping is a crucial step when using wood glue because it helps exert pressure to hold the wood pieces firmly together while the glue dries. If you don’t clamp the pieces, there’s a higher chance of the glue not creating a strong bond. Without applying enough pressure, gaps or weak points may occur, reducing the overall strength and integrity of the joint.
While some types of wood glue may dry with a tacky or non-visible bond, applying clamping pressure still provides the best chance for a tight and long-lasting bond. To ensure the strongest and most secure joint, always follow the recommended clamping techniques provided by the glue manufacturer.
4. Can I remove the clamps before the wood glue is fully dry?
Removing the clamps too early can compromise the bond and potentially cause the joint to fail. It’s important to let the wood glue fully dry and cure before removing the clamps. Follow the recommended drying time provided by the glue manufacturer. Typically, this can range from several hours to overnight, depending on the type of wood glue and other factors like temperature and humidity.
Waiting for the glue to completely dry and cure ensures that the joint has reached its maximum strength. Prematurely removing the clamps may result in weak bonds that are prone to breaking or coming apart when subject to stress or weight.
5. Can I use other methods besides clamping for wood glue?
While clamping is the most commonly used method to apply pressure when working with wood glue, there are alternative methods you can explore. Some options include using heavy objects such as weights or applying pressure using straps or bands. These methods can be effective in certain situations where clamps may be difficult to use or unavailable.
However, it’s important to note that clamping generally provides the most reliable and consistent pressure to ensure a secure bond. If you choose to use alternative methods, make sure to distribute pressure evenly across the glued joint and follow the manufacturer’s guidelines for the specific glue you are using.
How long does wood glue take to cure.?!?!
Summary
So, remember, when using wood glue, it’s important to clamp the pieces together firmly. This helps the glue bond properly and creates a strong joint. The general rule is to leave the clamps on for about 30 minutes to an hour, but remember to read the instructions on your specific glue bottle for the best results.
Also, keep in mind that different factors like temperature and humidity can affect drying time. So, be patient and let the glue fully cure before removing the clamps and using your project. Happy woodworking!