Imagine you have a chisel in your hand, ready to tackle your next woodworking project. But wait, before you can dive in and start creating, you need to sharpen that chisel. Ah, the age-old question: how long does it take to sharpen a chisel? Well, my young friend, let’s explore this together and find out the answer!
Now, sharpening a chisel isn’t just a simple task of waving a wand and presto, your chisel is sharp as can be. It takes a bit of time, effort, and patience to bring that chisel blade back to its optimal condition. But fear not, the journey to a sharp chisel is an adventure in itself!
In this article, we’ll delve into the art of chisel sharpening, exploring techniques, tools, and tips to help you along the way. So grab your hammer and let’s embark on this sharpening expedition!
A properly sharpened chisel is essential for woodworking projects. While the exact time it takes to sharpen a chisel can vary depending on the condition and size of the blade, there are a few general steps you can follow:
- Clean the chisel and remove any rust or debris.
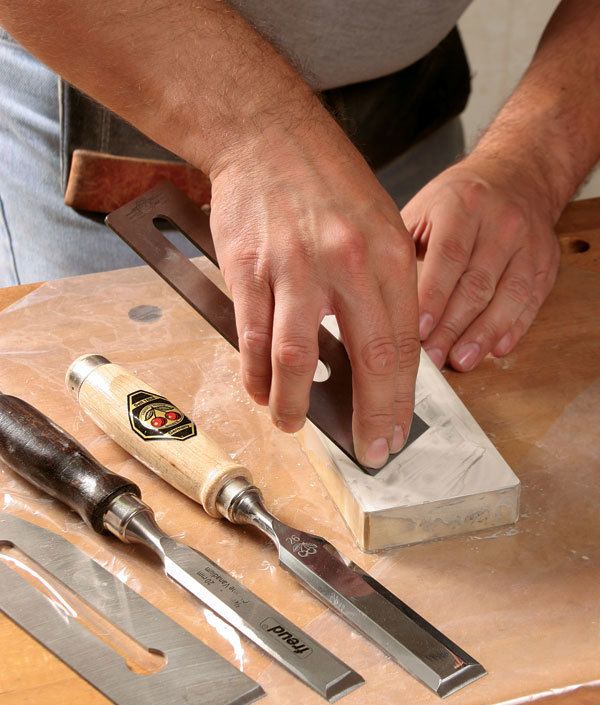
- Use a sharpening stone or honing guide to sharpen the blade.
- Start with a coarse grit and gradually move to finer grits.
- Keep the blade at the correct bevel angle.
- Finish with a strop or polishing compound for a razor-sharp edge.
Remember, practice makes perfect, so don’t rush the process. Take your time to sharpen the chisel properly, and you’ll achieve excellent results in your woodworking projects!
How Long Does It Take to Sharpen a Chisel?
Sharpening a chisel is an essential skill for any woodworker or carpenter. The time it takes to sharpen a chisel can vary depending on various factors, including the condition of the chisel, the sharpening method used, and the experience of the individual. In this article, we will explore the different factors that affect the time it takes to sharpen a chisel and provide valuable tips to help you sharpen your chisel efficiently.
The Condition of the Chisel
The condition of the chisel plays a significant role in determining the time it takes to sharpen it. If the chisel is in good condition and only requires a minor touch-up, it can take as little as 10 minutes to sharpen. On the other hand, if the chisel is severely dull or damaged, it may take considerably longer to restore its sharpness. In such cases, you might need to spend up to an hour or more to properly sharpen the chisel.
Before you begin sharpening, inspect the chisel for any nicks or chips in the blade. If you notice any significant damage, it’s crucial to address it before proceeding with the sharpening process. Fixing the damage may require more time and effort, such as using a grinder or a honing guide to reshape the blade.
The Sharpening Method
The sharpening method you choose can also impact the time it takes to sharpen a chisel. There are various methods available, including sharpening by hand with sharpening stones, using a honing guide, or utilizing a sharpening jig with power tools. Each method has its advantages and disadvantages in terms of speed and effectiveness.
Sharpening a chisel by hand with sharpening stones is the most traditional and time-consuming method. It requires patience and skill to achieve the desired sharpness. Depending on your proficiency, it can take anywhere from 20 minutes to an hour to sharpen a chisel using this method.
Using a honing guide can speed up the sharpening process, as it helps maintain a consistent angle while sharpening. With a honing guide, you can expect to sharpen a chisel in approximately 15-30 minutes, depending on the complexity of the blade and your sharpening skills.
If you prefer a faster approach, using a sharpening jig with power tools can be a viable option. This method involves using a bench grinder or a belt sander to remove material from the chisel’s blade quickly. With this method, you can sharpen a chisel in as little as five minutes, but it requires caution and experience to prevent overheating the blade.
Factors Affecting Sharpening Time
In addition to the condition of the chisel and the sharpening method used, several other factors can affect the time it takes to sharpen a chisel. These factors include:
1. Experience: The more experienced you are at sharpening chisels, the quicker you’ll become. With practice, you’ll develop efficient techniques that can significantly reduce sharpening time.
2. Honing frequency: Regular maintenance and honing of your chisels can prevent them from becoming excessively dull. By honing them frequently, you’ll spend less time sharpening during each session.
3. Quality of sharpening tools: Investing in high-quality sharpening stones, honing guides, or power tools can make the sharpening process more efficient. Sharp and well-maintained tools will require less time and effort to achieve a sharp edge.
4. Personal preferences: Some individuals prefer a razor-sharp edge, which might require extra time and effort. Others may be content with a moderately sharp edge, allowing for quicker sharpening.
In conclusion, the time it takes to sharpen a chisel can vary depending on the condition of the chisel, the chosen sharpening method, and individual factors. While there is no definitive answer to how long it will take, with practice and the right techniques, you can become quicker and more efficient at sharpening your chisels. Regular maintenance, the use of high-quality tools, and finding the right balance between sharpness and speed will ultimately determine the time it takes for you to sharpen a chisel.
Key Takeaways:
- Sharpening a chisel can take anywhere from a few minutes to several hours, depending on the condition and type of chisel.
- Using a sharpening stone or a honing guide can help you achieve a sharp edge on your chisel.
- Regular maintenance and proper storage can prolong the time between sharpenings.
- Practice and experience can greatly reduce the time it takes to sharpen a chisel effectively.
- Take breaks and avoid rushing to ensure a precise and safe sharpening process.
Frequently Asked Questions
Looking to sharpen your chisel? Here are some common questions and answers to guide you:
How long does it take to sharpen a chisel?
The time it takes to sharpen a chisel depends on several factors, including the condition of the chisel and your sharpening method. On average, sharpening a chisel can take anywhere from 10 minutes to half an hour. If your chisel is in good condition and you are experienced in sharpening, it may take less time. However, if your chisel is dull or damaged, it may require more effort and time to restore its sharpness.
Keep in mind that rushing the sharpening process can lead to a subpar result, so take your time and ensure each step is performed correctly. Additionally, the time it takes to sharpen a chisel can vary depending on your skill level. With practice, you’ll likely become more efficient and quicker at the task.
What tools do I need to sharpen a chisel?
To sharpen a chisel, you’ll need a few essential tools. These include a sharpening stone or abrasive paper, honing guide or jig, and a strop or leather. A sharpening stone or abrasive paper helps remove the dull edge and reshape the bevel. The honing guide or jig is used to maintain the correct sharpening angle. Finally, a strop or leather is used to polish and refine the chisel’s edge.
Depending on your preference, you may also use a sharpening guide or jig that helps maintain consistent angles during sharpening. Additionally, a magnifying glass or loupe can be helpful for inspecting the chisel’s edge and monitoring progress. Remember to always follow safety guidelines and use appropriate protective gear when sharpening your chisel.
Can I use power tools to sharpen a chisel?
Yes, you can use power tools to sharpen a chisel. Power tools such as bench grinders or belt sanders can be efficient for removing material quickly. However, they require skill and caution. Care must be taken to avoid overheating the chisel, which can damage the steel’s temper. Additionally, power tools can rapidly remove material, so it’s important to be mindful of the amount you’re removing and maintain control over the sharpening process.
Using power tools also comes with the risk of removing too much material or altering the shape of the chisel’s bevel. It is recommended to practice on scrap or less valuable chisels before attempting to sharpen your high-quality or cherished chisels using power tools.
How often should I sharpen my chisel?
The frequency of sharpening your chisel depends on how often you use it and the type of work you do. If you frequently use the chisel for demanding tasks or encounter materials that dull the edge quickly, you may need to sharpen it more often. As a general guideline, it is advisable to sharpen your chisel when you notice a decrease in its cutting performance or when you see visible nicks and chips on the cutting edge.
Regular maintenance and honing can help prolong the time between sharpenings. It is good practice to give your chisel a quick touch-up honing before each use to maintain the sharpness. Remember that a well-maintained, sharp chisel is more efficient, produces better results, and can reduce the risk of accidents caused by dull tools.
What techniques can I use to sharpen a chisel?
There are various techniques you can use to sharpen a chisel, depending on your preference and the tools available. One common method is using a sharpening stone or abrasive paper. Start by flattening the back of the chisel, then focus on shaping the bevel and creating a sharp cutting edge using a series of grits.
Another technique is using a honing guide or jig, which helps maintain consistent angles during sharpening. This method is especially useful for beginners who want to ensure accurate results. Additionally, some woodworkers prefer using a sharpening system that utilizes abrasive belts or wheels, which can provide efficient and precise sharpening.
Whichever technique you choose, it’s important to follow proper sharpening guidelines, maintain the correct bevel angle, and regularly check your progress to achieve a sharp and reliable chisel edge. Practice and experimentation will help you find the method that works best for you.

Summary
Sharpening a chisel takes some time and patience, but it’s worth the effort. Here’s what you need to know:
First, you’ll need to gather the right tools, like a sharpening stone and honing guide. Then, follow these steps: 1) Secure the chisel in the honing guide, 2) Position the guide on the stone, 3) Start with the coarsest grit and work your way to finer grits, 4) Maintain a consistent angle and apply even pressure, 5) Keep checking the sharpness until you’re satisfied. Remember, practice makes perfect, so be patient and keep trying!