
When it comes to woodworking, understanding how long to clamp wood glue is crucial for strong and secure joints. You might be wondering, “How long should you clamp wood glue?” Well, wonder no more! In this article, we’ll explore the ins and outs of clamping wood glue, so you can achieve the best results for your projects.
So, why is clamping time important? The correct amount of time allows the glue to cure properly, ensuring a bond that can withstand the test of time. Whether you’re working on a small craft project or constructing a piece of furniture, the clamping time plays a vital role in the overall strength and durability of your woodworking joints.
But here’s the thing: there is no one-size-fits-all answer to how long you should clamp wood glue. Factors like the type of glue, wood species, and environmental conditions all come into play. Don’t worry, though! In the following paragraphs, we’ll dive deeper into each of these factors to help you determine the ideal clamping time for your woodworking projects. So, let’s get started and make your glue joints rock-solid!
Note: Throughout this article, we’ll use the term “clamping time” to refer to the duration for which you need to keep the pieces clamped together after applying wood glue. Now, let’s dig into the details and discover the secrets of successful woodworking joints.
How Long Should You Clamp Wood Glue? A Comprehensive Guide to Achieving Strong and Durable Bonding
Woodworking projects often require the use of wood glue to create strong and lasting joints. However, one crucial aspect that can determine the success of your glue-up is the amount of time you should keep the clamps on. Clamping wood glue for the right duration ensures proper bonding and creates a sturdy connection between the pieces of wood. In this article, we will dive deep into the world of wood glue clamping and explore the factors that influence the duration, tips for achieving optimal results, and the benefits of a well-clamped glue joint.
The Importance of Clamping Time
The duration you should keep clamps on when working with wood glue primarily depends on the type of glue you are using. Different wood glues have varying curing times, which dictate how long you should maintain the clamping pressure. Let’s take a closer look at some common types of wood glues and their corresponding recommended clamping times.
PVA (Polyvinyl Acetate) Glue
PVA glue is one of the most commonly used wood adhesives due to its versatility, affordable price, and ease of use. Standard PVA glue typically requires a minimum clamping time of 30 minutes to an hour. However, it is advisable to keep the clamps on for a longer duration, usually around 24 hours, to ensure a strong bond and allow the glue to cure fully. This extended clamping time enables the glue to penetrate the wood fibers and create a solid bond.
For larger or more complex glue-ups, such as laminating multiple pieces of wood or joining end-grain, you may need to extend the clamping time even further. It is recommended to refer to the instructions provided by the manufacturer of the specific PVA glue you are using for more precise clamping guidelines.
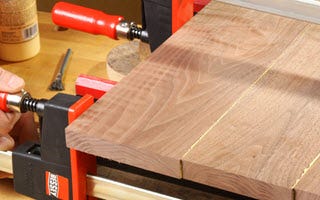
When using PVA glue, it is essential to ensure adequate pressure is applied by the clamps to ensure proper bond formation. Insufficient or uneven clamping pressure can lead to weak glue joints and potential project failure. A clamp with a large surface area and even pressure distribution can help achieve optimal results.
Polyurethane Glue
Polyurethane glue is known for its excellent bonding strength, resistance to moisture, and ability to bond different materials together. The clamping time for polyurethane glue typically ranges from 1 to 4 hours. However, for complete curing and maximum bond strength, it is recommended to keep the clamps on for at least 24 hours. Similar to PVA glue, the specific polyurethane glue you are using may have different curing time requirements, so refer to the manufacturer’s instructions for precise clamping guidelines.
While polyurethane glue does expand during the curing process, it is important not to apply excessive pressure with the clamps, as it can squeeze out excess glue and weaken the bond. Use only enough pressure to ensure the joint remains tightly closed without causing excessive glue squeeze-out.
Epoxy Adhesive
Epoxy adhesives are known for their exceptional bonding strength, resistance to moisture and chemicals, and ability to fill gaps. The clamping time for epoxy adhesives can vary significantly, ranging from as little as 5 minutes to several hours, depending on the specific product and application. It is crucial to read and follow the manufacturer’s instructions to determine the appropriate clamping time for the particular epoxy adhesive you are using.
For simple wood-to-wood joints, a typical clamping time of around 30 minutes to 1 hour is often sufficient. However, structural or load-bearing applications may require longer clamping times to ensure a durable bond. Epoxy adhesives require precision and accurate mixing ratios, so be sure to carefully follow the manufacturer’s instructions for optimal results.
Cyanoacrylate (Superglue) Adhesive
Cyanoacrylate adhesive, commonly known as superglue, is a fast-setting adhesive that forms an instant bond. Due to its quick-curing nature, clamping is generally not necessary for most wood-to-wood applications. However, clamping can help ensure a tighter and more secure joint, especially for uneven or slippery surfaces. If you choose to clamp cyanoacrylate adhesive, it is recommended to keep the clamps on for a brief period, usually around 5-15 minutes, depending on the brand and specific product.
Remember to exercise caution when working with superglue and follow the safety guidelines provided by the manufacturer. Avoid contact with skin and eyes and work in a well-ventilated area.
Factors Affecting Clamping Time
Wood Species and Moisture Content
The type of wood you are working with can influence the clamping time. Dense hardwoods generally require longer clamping periods compared to softwoods. Additionally, the moisture content of the wood plays a significant role. Wood with high moisture content may take longer to reach full bonding strength, so it’s essential to ensure the wood is properly dried before applying the glue and clamping.
It is recommended to check the moisture content of the wood using a moisture meter and allow the wood to acclimate to the environment before gluing. This will help prevent issues such as wood movement and potential joint failure due to moisture-related factors.
Temperature and Humidity
The ambient temperature and humidity levels in your workspace can impact the curing time of wood glue. Generally, higher temperatures and lower humidity levels expedite the drying and curing process, while colder temperatures and higher humidity levels can prolong the clamping time.
It is important to work within the temperature and humidity range specified by the glue manufacturer, as deviations can affect the bonding strength and overall performance of the glue joint.
Glue Application Technique
The way you apply the glue can also affect the clamping time. It is crucial to apply a sufficient amount of glue to create a strong bond, but excess glue can lead to squeeze-out and messy joints. Applying an even layer of glue on both surfaces and using the appropriate adhesive coverage will help ensure proper bonding and reduce the need for extensive clamping time.
Additionally, using the correct adhesive technique for the type of joint you are creating, such as applying the glue on both mating surfaces or using biscuits or dowels for reinforcement, can enhance the strength of the joint and minimize the required clamping time.
Tips for Achieving Optimal Results
- Prepare the wood surfaces: Ensure the surfaces to be glued are clean, smooth, and free from any contaminants or oils that could hinder proper adhesion.
- Apply glue evenly: Use a brush or roller to apply an even layer of glue on both mating surfaces. Avoid excessive glue squeeze-out.
- Use proper clamping pressure: Apply sufficient pressure to ensure a tight joint without causing excessive glue squeeze-out.
- Allow ample curing time: Follow the manufacturer’s instructions regarding clamping time and allow the glue to cure fully before removing the clamps.
- Remove excess glue: After the clamping time has elapsed, carefully remove any glue squeeze-out using a chisel or scraper before it fully hardens.
The Benefits of a Well-Clamped Glue Joint
Properly clamping wood glue joints offers several advantages, including:
Strength and Stability
A well-clamped glue joint ensures a strong and stable connection between the wood pieces, enhancing the overall structural integrity of the project. It minimizes the risk of joint failure and helps the project withstand the test of time.
Tighter Fit
Clamping pressure helps close any gaps or irregularities between the mating surfaces, resulting in a tighter and more seamless fit. This improves the appearance of the joint and enhances the overall aesthetics of the finished piece.
Reduced Glue Squeeze-Out
Proper clamping pressure helps minimize excessive glue squeeze-out, reducing the cleanup required after the glue-up. This makes the assembly process more efficient and saves time and effort during the finishing stages of the project.
Improved Bonding Strength
By allowing the glue to cure for the recommended clamping time, you allow the adhesive to penetrate the wood fibers and create a strong bond. This results in a joint that can withstand external forces and stresses, increasing the overall durability of your woodworking projects.
Additional Considerations
Using Clamping Aids
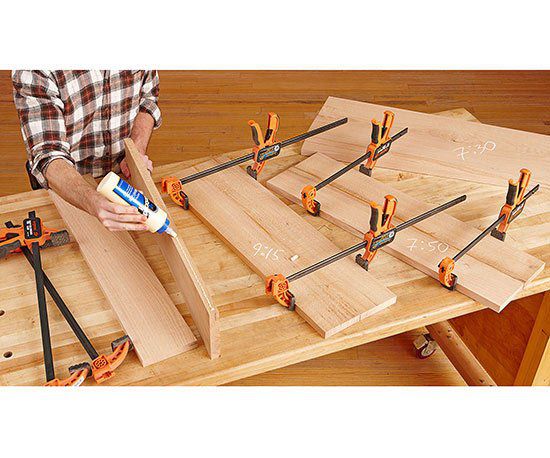
Utilizing clamping aids, such as cauls, can help distribute clamping pressure evenly along the joint, preventing any gaps and ensuring optimal bond formation. Cauls are typically wooden or metal blocks placed over the glue joint and clamped together with the main woodworking clamps. They provide additional support and help maintain a level and flat clamping surface.
Multiple Glue-Ups
If your project requires multiple glue-ups, ensure that the previous glue joints are fully cured and stable before applying additional glue and clamping. This will prevent any movement or shifting of the joint during subsequent glue-ups and ensure proper alignment and bonding.
Testing and Sample Joints
It is always a good practice to test glue-up techniques and joint configurations on sample pieces of wood before working on your final project. This allows you to assess the bond strength, evaluate the clamping time required, and make any necessary adjustments or refinements before tackling the actual project.
In conclusion, the duration you should keep wood glue clamped depends on the type of glue, wood species, and environmental conditions. Following the manufacturer’s instructions and allowing sufficient clamping time will ensure a strong and durable bond. By paying attention to the factors impacting clamping time and following best practices, you can achieve optimal results and create woodworking projects that stand the test of time.
Key Takeaways: How Long Should You Clamp Wood Glue?
- Apply firm pressure by clamping wood glue for at least 30 minutes.
- For maximum bond strength, let the clamps stay on for 1 to 2 hours.
- Follow the instructions on the wood glue bottle for specific time recommendations.
- Allow the glue to cure fully before removing the clamps, usually within 24 hours.
- Avoid excess glue squeeze-out by using the right amount and wiping away any excess.
Frequently Asked Questions
When it comes to using wood glue, proper clamping is crucial for a strong and reliable bond. Here are some common questions related to how long you should clamp wood glue, along with detailed answers:
1. How long should you leave the wood clamped after applying glue?
After applying wood glue, it is generally recommended to leave the wood clamped for at least 30 minutes to 1 hour per inch of thickness. This allows the glue to fully cure and form a strong bond between the wood surfaces. However, the exact clamping time may depend on factors such as the type of wood glue used and the environmental conditions.
Keep in mind that different wood glues have varying drying times, so it’s essential to read the instructions provided by the manufacturer. In some cases, the glue may need more extended clamping times or additional support to ensure a secure bond.
2. Can I remove the clamps before the glue is fully cured?
While it’s tempting to remove the clamps as soon as possible, it’s generally better to wait until the glue is fully cured. Removing the clamps too soon can compromise the strength of the bond and may result in a weakened joint. The curing time for wood glue can vary, but it typically takes around 24 hours.
This period allows the glue to dry and reach its maximum strength. If you remove the clamps prematurely, there is a higher likelihood of the wood pieces shifting, separating, or causing gaps in the joint. To ensure a solid and reliable bond, exercise patience and wait for the recommended curing time.
3. Is it necessary to apply constant pressure while clamping wood glue?
Applying constant pressure during the clamping process is crucial for achieving a strong bond with wood glue. The pressure helps squeeze out any excess glue, creating a thin film between the wood surfaces, which enhances the bonding efficiency. Additionally, it ensures that the wood pieces are held firmly together, minimizing the risk of misalignment or gaps.
For best results, use clamps to apply an even and steady pressure across the entire joint surface. This pressure should be maintained throughout the recommended clamping time specified by the wood glue manufacturer. After the curing period, you can remove the clamps and check the joint for a secure bond.
4. Can I accelerate the curing time of wood glue?
Accelerating the curing time of wood glue is possible, but it is not always recommended. Some wood glues, such as certain formulations of cyanoacrylate glue, offer faster drying times. However, these accelerated glues may sacrifice some bond strength compared to regular wood glues.
If you need a quicker curing time, consider using a wood glue specifically designed for rapid bonding. Keep in mind that these accelerated glues may have limitations and may not be suitable for every type of project. For critical applications or projects where maximum strength is required, it is advisable to stick to the recommended curing time of traditional wood glues.
5. What should I do if the joint doesn’t hold after releasing the clamps?
If the joint doesn’t hold after you release the clamps, it may indicate an insufficient bond. In such cases, it’s essential to evaluate the possible causes and take corrective measures. Here are some steps you can take:
First, make sure you have followed the proper clamping procedure and have applied adequate pressure. Check the wood surfaces for any remnants of old finish, dirt, or dust that may have prevented proper glue adhesion. It’s important to ensure the wood surfaces are clean, dry, and free from contaminants before applying the glue.
If the bond fails repeatedly, consider using a different type of wood glue that is better suited for your specific project and materials. You may also want to check if the wood surfaces have sufficient roughness or texture to enhance the bond. In certain cases, using mechanical fasteners or reinforcements in conjunction with the glue can provide added strength and durability to the joint.
Gluing Tips – Clamping Pressure
Summary
So, how long should you clamp wood glue? Well, it depends on a few things. If you’re using regular wood glue, you’ll want to clamp it for about 30 minutes to an hour. However, if you’re using a fast-drying glue, it may only need 15 to 30 minutes of clamping time. It’s also important to consider the temperature and humidity of your workspace, as they can affect drying time. Remember, patience is key when it comes to ensuring a strong bond.