
Are you wondering how long to clamp wood glue? Well, good news! In this article, we’ll delve into the nitty-gritty of clamping wood glue and give you all the information you need.
Now, I know what you’re thinking. “Why do I even need to clamp wood glue?” Let me tell you, my friend. Clamping ensures that the glued pieces are held tightly together, allowing the glue to dry and create a strong bond. It’s like giving your project a big, supportive hug!
But how long should you keep that clamp on? Ah, the million-dollar question. Don’t worry, we’ve got you covered. We’ll discuss different factors that affect drying times and give you some general guidelines to follow. So, grab a seat, and let’s dive into the world of wood glue clamping!
1. Apply the glue: Apply an even layer of wood glue to both surfaces you wish to join.
2. Align the pieces: Properly align the pieces, making sure they fit together snugly.
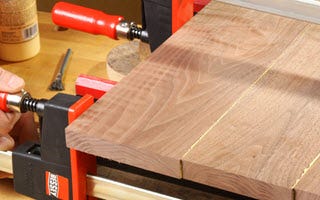
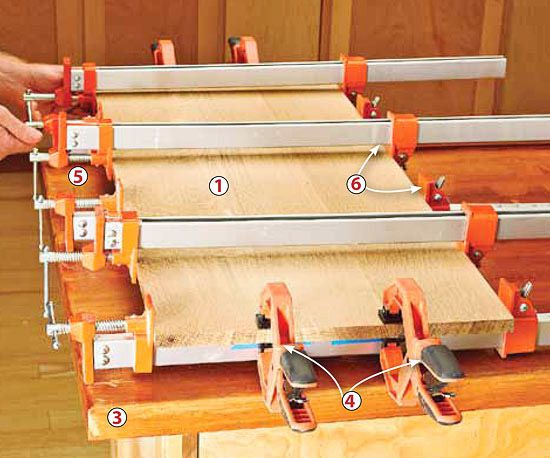
3. Clamp the wood: Use clamps to hold the pieces together tightly.
4. Check drying time: Consult the glue’s packaging for recommended drying time.
5. Release clamps: Once the recommended drying time has passed, carefully remove the clamps.
By following these steps, you’ll ensure that your wood glue sets properly and creates a strong bond.
How Long to Clamp Wood Glue: A Comprehensive Guide
When it comes to woodworking projects, using wood glue is an essential part of ensuring a strong and lasting bond. But how long should you clamp the wood after applying the glue? This question often arises, and it’s important to understand the proper technique for achieving optimal results. In this article, we will delve into the factors that influence the clamping time for wood glue and provide you with expert advice to guide you through your woodworking projects.
The Role of Wood Type in Clamping Time
The type of wood you are working with plays a significant role in determining the length of time the glue should be clamped. Hardwoods, such as oak or maple, require longer clamping times compared to softwoods like pine or cedar. This is because hardwoods have a more closed grain structure, which makes it harder for the glue to penetrate and bond effectively. Typically, for hardwoods, a clamping time of at least one hour is recommended to ensure a strong bond. Softwoods, on the other hand, can often be clamped for as little as 30 minutes.
Another important consideration is the moisture content of the wood. Green or freshly cut wood contains a higher moisture content, which can interfere with the glue’s ability to bond properly. It is essential to allow the wood to dry adequately or use kiln-dried lumber before applying wood glue to achieve the best results.
Temperature and Humidity: Factors to Consider
Wood glue requires a specific temperature range and humidity level to cure correctly. The ideal temperature for most wood glues falls between 70°F and 90°F (21°C and 32°C). When the temperature is too low, the glue will take longer to cure, which will extend the clamping time. On the other hand, extremely high temperatures can cause the glue to cure too quickly, reducing the bonding strength.
Humidity is another crucial factor to consider. High humidity levels can slow down the drying and curing process of wood glue, prolonging the clamping time. Conversely, low humidity can cause the glue to dry and cure too quickly, potentially compromising the bond strength. It is recommended to work in a controlled environment where the temperature and humidity levels are within the optimal range to achieve the best results.
Additional Factors That Impact Clamping Time
Apart from wood type, moisture content, temperature, and humidity, there are a few other factors to consider that can influence the clamping time for wood glue. The type of wood glue you are using is one such factor. Different wood glues have varying drying times and clamping requirements. Some glues are formulated for quick bonding, allowing for shorter clamping times, while others may require overnight clamping for maximum strength.
Another consideration is the size and type of the project. Larger and more complex projects may require longer clamping times to ensure that the glue has sufficient time to dry and bond properly. Additionally, projects with joints that are susceptible to movement or stress may also require longer clamping times to allow for adequate bonding and curing.
It is worth mentioning that following the manufacturer’s instructions for the specific wood glue you are using is crucial. Manufacturers often provide recommended clamping times based on their product’s formulation and intended use. Always refer to these guidelines to ensure the best outcome for your woodworking projects.
Tips for Achieving Optimal Bonding Strength
To achieve optimal bonding strength when using wood glue, it is essential to follow a few simple tips:
1. Ensure a clean surface: Before applying the glue, make sure the wood surfaces to be bonded are clean, dry, and free from dust or debris. This ensures maximum contact between the glue and the wood, improving the bond strength.
2. Apply an even coat of glue: Use a brush, roller, or spreader to apply an even layer of glue to both surfaces that are being joined. Too much glue can lead to excessive squeeze-out, while too little may result in a weak bond.
3. Use the right clamping pressure: Apply enough pressure to create a snug fit between the wood pieces without causing them to deform or bend. Too much pressure can cause glue starvation, weakening the bond.
4. Remove excess glue: After clamping, immediately wipe away any excess glue with a damp cloth. If left to dry, excess glue can interfere with staining or finishing the wood.
By following these tips and taking into account the factors that influence clamping time, you can ensure a strong and durable bond for your woodworking projects.
Understanding the Importance of Patience
When it comes to woodworking and using wood glue, patience is key. Rushing the clamping and drying process can lead to weak bonds that may fail over time. It is crucial to allow sufficient time for the glue to cure fully before subjecting the project to stress or movement. Remember, a strong and lasting bond requires precision and patience.
Common Mistakes to Avoid when Clamping Wood Glue
Best Practices for Clamping Wood Glue
Choosing the Right Wood Glue for your Project
Maximizing Bond Strength: Gluing Techniques
Common Wood Glue FAQs
Wood Glue vs. Other Adhesives: Pros and Cons
Conclusion
In conclusion, the clamping time for wood glue depends on several factors, including wood type, moisture content, temperature, humidity, glue type, and project size. It is important to consider these factors and follow the manufacturer’s instructions for the specific wood glue you are using to achieve optimal bonding strength. By applying an even coat of glue, using the right clamping pressure, and practicing patience, you can ensure a strong and lasting bond for your woodworking projects. Remember, woodworking is a craft that requires precision, attention to detail, and a passion for creating beautiful and functional pieces. Happy woodworking!
Key Takeaways: How Long to Clamp Wood Glue?
- Wood glue needs to be clamped for at least 30 minutes to 1 hour for a secure bond.
- Time can vary depending on the type of wood, climate, and the specific wood glue used.
- Follow the instructions on the wood glue bottle for recommended clamping time.
- Avoid excessive clamping pressure, as it can squeeze out too much glue and weaken the bond.
- Allow the glue to fully cure for 24 hours before subjecting it to any stress or load.
Frequently Asked Questions
Welcome to our FAQ section on wood glue clamping time! Here, we address common queries about how long you should clamp wood glue for optimal results. Read on to get all the answers you need!
1. Why is clamping wood glue necessary?
Clamping wood glue is essential because it helps create a strong bond between the pieces of wood you are joining. When you apply pressure through clamping, it ensures that the glue spreads evenly and firmly, resulting in a solid and durable connection.
Without clamping, the glue may not adhere properly, leading to weak joints that are prone to failure. So, don’t skip this crucial step when working with wood glue!
2. How long do I need to clamp wood glue?
The exact clamping time for wood glue can vary depending on the type of wood, glue, and project. As a general guideline, it is recommended to keep the wood pieces clamped together for at least 30 minutes to 1 hour.
However, it’s important to note that different wood glues have different curing times. Some fast-setting glues may require only 15-20 minutes of clamping, while others could take up to 24 hours to fully cure. Always refer to the manufacturer’s instructions for the specific wood glue you are using to determine the optimal clamping time.
3. Can I remove clamps before the wood glue is completely dry?
While the initial clamping time is important for creating a good bond, you typically don’t have to wait until the wood glue is completely dry before removing the clamps. Once the initial clamp time has elapsed, the glue would have formed a strong enough bond to hold the pieces together.
However, it’s still recommended to exercise caution when removing the clamps. If you’re unsure, it’s better to err on the side of caution and leave the clamps on for longer to ensure the glue has fully dried and cured.
4. Can I use too much clamping pressure when working with wood glue?
Excessive clamping pressure can be detrimental when working with wood glue. When you apply too much pressure, it can lead to the excess glue being squeezed out from the joint, resulting in a weak bond.
It’s important to find the right balance when clamping. Apply enough pressure to ensure good contact between the wood pieces, but not so much that it causes the glue to ooze out excessively. Tighten the clamps until you see a small amount of glue squeeze out, indicating that the joint is properly filled.
5. Are there any alternatives to clamping wood glue?
If you don’t have clamps or are unable to use them for any reason, there are alternative methods to apply pressure and achieve a strong bond with wood glue. One option is to use heavy objects, such as books or weights, to press the pieces together.
You can also utilize techniques like using straps or ropes to secure the wood pieces tightly. However, keep in mind that these alternatives may not provide the same level of even pressure as clamps, so the drying time and bond strength could be affected. Clamping is still the recommended method for achieving the best results.
Gluing Tips – Clamping Pressure
Summary
When using wood glue, it’s important to know how long to clamp the pieces together. Clamping for at least 30 minutes is generally recommended to ensure a strong bond. However, for the best results, leaving the clamped pieces overnight is even better. This allows the glue to fully dry and create a sturdy connection. Patience is key when working with wood glue!
Remember to always follow the instructions on the glue bottle to know the specific drying time. Additionally, keep in mind that different glues may require different clamping times. So, take your time, be patient, and give the glue enough time to set and dry properly. Happy woodworking!