Welcome, young DIY enthusiasts! Have you ever wondered how long you should keep wood glue clamped? Well, you’re in the right place! Wood glue is an essential tool for woodworking projects, but knowing how long to let it dry can be a bit of a mystery. But worry not, because in this article, we’ll unravel this secret for you!
Picture this: you’re excitedly working on a cool woodworking project, and you’ve just applied wood glue to join two pieces of wood together. Now, the big question arises—how long do you need to keep those pieces clamped together for the glue to set properly? Let’s find out!
Whether you’re a beginner or an experienced woodworker, understanding the drying time of wood glue is crucial for the success of your project. So, let’s dive in and explore the optimal duration to keep wood glue clamped, ensuring your creations are solid and sturdy!
How to Properly Clamp Wood Glue: A Step-by-Step Guide
1. Prepare your workspace by ensuring clean and dry surfaces.
2. Apply an even layer of wood glue to one of the surfaces.
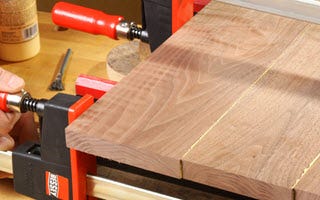
3. Align the two pieces of wood and apply pressure to ensure a tight bond.
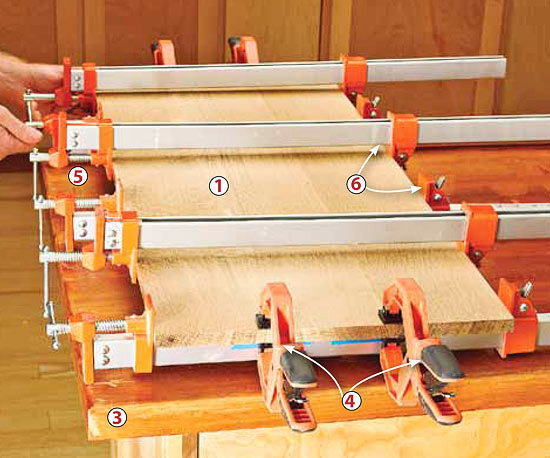
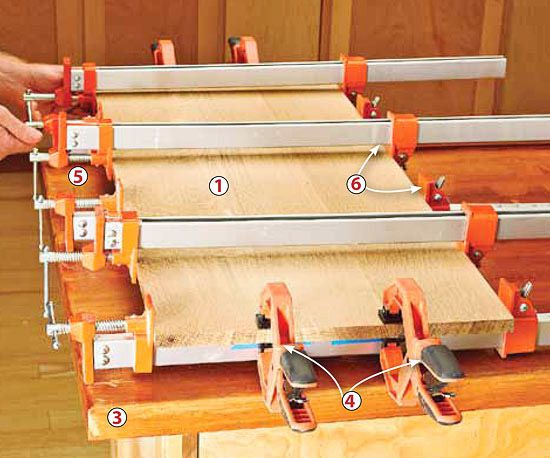
4. Use clamps to hold the pieces together.
5. Let the wood glue dry for at least 30 minutes to an hour.
6. After drying, remove the clamps and check the bond.
Remember, the duration may vary based on the type of glue and environmental conditions. Ensure the bond is strong before removing the clamps.
How Long to Keep Wood Glue Clamped: A Comprehensive Guide
Wood glue is an essential adhesive used in woodworking projects to bond pieces of wood together. However, many DIY enthusiasts and professionals alike often wonder how long they should keep the wood glue clamped for optimal results. In this article, we will explore the factors that determine the clamping time for wood glue, the different types of wood glue available, and provide you with practical tips to ensure a strong and durable bond. So grab your clamps and let’s dive in!
Factors Affecting Clamping Time
The duration for which wood glue should be clamped depends on several factors such as the type of wood being glued, temperature and humidity conditions, and the type of glue used. Wood species with large pores, such as oak or mahogany, may require longer clamping times compared to hardwoods with smaller pores like maple or cherry. Additionally, colder temperatures and high humidity can slow down the drying time of the glue, necessitating longer clamping periods. It is crucial to consider these variables to ensure a successful bonding process.
Wood Species
As mentioned earlier, the type of wood being glued plays a significant role in determining the clamping time. For open-pore woods like oak or mahogany, it is advisable to keep the clamps in place for 30 minutes to an hour. This extended clamping time allows the adhesive to penetrate the wood fibers fully. Conversely, hardwoods with smaller pores, like maple or cherry, typically require shorter clamping times ranging from 15 to 30 minutes.
Understanding the characteristics of the wood you are working with is essential in determining the optimal clamping time. Always refer to the glue manufacturer’s instructions for specific recommendations based on wood species.
Temperature and Humidity
Temperature and humidity greatly influence the wood glue’s drying time. High humidity levels can slow down the evaporation process, and colder temperatures can impede the glue’s ability to cure properly. Therefore, it is important to work in a well-ventilated area with a temperature range of 70 to 80 degrees Fahrenheit and a humidity level between 45% and 55% for optimal results.
If you are working in colder temperatures or high humidity conditions, it may be necessary to extend the clamping time. You can also consider using a faster-drying wood glue formulated specifically for these conditions to expedite the bonding process.
Type of Glue
Wood glues come in various types, each with its own recommended clamping time. The most common types of wood glue include PVA (polyvinyl acetate), epoxy, polyurethane, and hide glue.
PVA glue, also known as yellow glue, is widely used and typically requires clamping for 30 minutes to an hour. Epoxy glue, on the other hand, has a longer curing time and may necessitate clamping for several hours or overnight. Polyurethane glue, known for its exceptional bond strength, often requires at least an hour of clamping time. Hide glue, commonly used in traditional woodworking, has a longer curing time and may require clamping for several hours or even overnight.
Always read the manufacturer’s instructions to determine the specific clamping time for your chosen wood glue. It is important to follow these guidelines for the best results and to ensure a strong and durable bond between the wood pieces.
Tips for Successful Wood Glue Clamping
Now that we understand the factors influencing clamping time, let’s explore some valuable tips to ensure a successful wood glue bonding process:
Apply Adequate Glue
It is essential to apply a sufficient amount of glue to create a strong bond between the wood pieces. Too little glue can result in a weak and unreliable joint. Apply an even coat of glue to both surfaces, ensuring complete coverage.
A helpful tip is to spread the glue using a brush or a small roller, allowing for better control and reducing the risk of excess glue pooling in certain areas.
Use Even Pressure
When clamping the wood pieces together, apply even pressure across the entire surface. Uneven pressure can lead to an uneven bond and compromise the strength and stability of the joint. Use clamps that exert consistent pressure, and avoid over-tightening, as it can squeeze out excess glue and weaken the joint.
Allow Sufficient Drying Time
Patience is key when it comes to the drying time of wood glue. It is better to err on the side of caution and give the glue ample time to cure completely. Rushing the process can result in a weak bond that may fail under stress.
Consider using a timer or setting a reminder to ensure that you leave the clamps in place for the recommended duration. This will help you avoid the temptation to remove them prematurely, compromising the integrity of the joint.
Alternative Clamping Methods
While traditional clamps are the most commonly used method for keeping wood glue clamped, there are alternative methods available that can be equally effective:
Strap Clamps
Strap clamps are flexible straps with integrated tightening mechanisms. They can be wrapped around irregularly shaped objects or multiple pieces of wood, exerting pressure evenly along the length of the strap. Strap clamps are particularly useful in projects where traditional clamps may not be practical or suitable.
Pin Nailing
In some cases, pin nails or brad nails can be used in conjunction with wood glue to hold pieces together while the adhesive cures. These small nails provide temporary support, keeping the pieces aligned until the glue dries. However, they should not be relied upon solely for strength, as the primary bond should come from the glue itself.
Weighted Objects
For small projects or delicate pieces, weighted objects can be used to apply pressure and keep the wood glue clamped. Place heavy books, sandbags, or other weighted objects on top of the glued surfaces to ensure sufficient pressure for the bonding process.
In conclusion, the clamping time for wood glue depends on various factors such as wood species, temperature, humidity, and the type of glue used. Adhering to the recommended clamping times ensures a strong and durable bond. Remember to follow the manufacturer’s instructions for specific guidance and implement proper clamping techniques for successful woodworking projects. Now that you have a better understanding of how long to keep wood glue clamped, it’s time to tackle your next woodworking endeavor with confidence!
Key Takeaways: How Long to Keep Wood Glue Clamped?
– Some glue manufacturers suggest clamping time between 1 to 24 hours for optimal results.
– Follow the specific instructions provided by the manufacturer of the wood glue you are using.
– Applying consistent pressure while clamping helps promote a secure and even bond.
– Remove the clamps only when the glue has fully dried and cured, which can take up to 24 hours or more depending on the glue and environmental conditions.
Frequently Asked Questions
When it comes to woodworking, using wood glue is essential for strong and durable joints. But how long should you keep the wood glue clamped? Find the answers to your questions below.
Q: Why is clamping necessary when using wood glue?
A: Clamping is necessary when using wood glue because it ensures a strong bond between the two pieces of wood. When you apply pressure by clamping, it helps the adhesive penetrate the wood fibers, creating a stronger connection. Without clamping, the glue may not bond properly, resulting in weak joints that can fail over time.
Additionally, clamping prevents the pieces from shifting while the glue dries, ensuring that they maintain their desired position and alignment. This is particularly important for complex or intricate woodworking projects where precision is crucial.
Q: How long should you keep wood glue clamped?
A: The amount of time you should keep wood glue clamped depends on several factors. The specific wood glue you’re using, the type of wood you’re working with, and the environmental conditions can all affect the drying time. As a general rule, most wood glues require clamping for at least 30 minutes to 1 hour.
However, it’s important to consult the instructions provided by the manufacturer of the wood glue you’re using. They will usually provide specific guidelines on clamping time for optimal results. Keep in mind that some specialized glues may require longer clamping times or even overnight drying for maximum strength and durability.
Q: Can I remove the clamps before the wood glue is completely dry?
A: While it’s tempting to remove the clamps as soon as the recommended clamping time is up, it’s generally advisable to wait until the wood glue is completely dry. Even if the glue seems dry on the surface, the interior might still be wet. Removing the clamps too early can cause the bond to weaken or even break.
To be on the safe side, it’s best to wait until the glue is fully cured before removing the clamps. This can take anywhere from a few hours to overnight, depending on the specific wood glue and environmental conditions. Patience is key to ensure the best possible bond and strength of your woodworking project.
Q: Can I use fewer clamps if I don’t have enough?
A: While it’s always ideal to have enough clamps to evenly distribute pressure across the glued joint, sometimes you may not have enough clamps on hand. In such situations, you can still proceed with fewer clamps, but it’s important to make some adjustments.
First, try to position the available clamps strategically, placing them closer to the center of the joint to ensure even pressure distribution. You can also use alternative methods such as using wedges or applying slight pressure with heavy objects, like weights or books. Just ensure that whatever method you choose applies sufficient pressure to keep the joint tightly together during the drying process.
Q: Are there any alternatives to clamping wood glue?
A: While clamping is the most commonly used method to ensure a strong bond when using wood glue, there are alternative techniques you can explore if clamps are not available. One option is to use tape. By tightly wrapping tape around the glued joint, you can hold the pieces together until the glue sets.
Another alternative is to use specialized clamping tools such as strap clamps or band clamps. These tools utilize tension bands or straps to apply the necessary pressure for holding the pieces together. They can be particularly useful for larger or irregularly shaped projects where conventional clamps may not be effective.
However, it’s important to remember that these alternative methods may not provide the same level of pressure and stability as traditional clamping. It’s always recommended to use proper clamps whenever possible for the best results.
How long does wood glue take to cure.?!?!
Summary
Wood glue needs to be clamped for at least 30 minutes to ensure a strong bond. The longer you can keep it clamped, the better. Don’t rush the process!
Leaving the wood glue clamped overnight will give you the best results. This allows the glue to fully cure and create a sturdy joint. Patience is key when it comes to woodworking.