Have you ever wondered how much wood glue you should use for your projects? Well, you’re in the right place!
When it comes to using wood glue, getting the right amount is crucial.
In this article, we’ll explore the answer to the common question, “How much wood glue should I use?” So, let’s dive in and find out!
Using the right amount of wood glue is essential for a strong bond. To determine the quantity needed, consider the size of your project. As a general rule, apply a thin, even coat on both surfaces to be joined. Avoid excess glue, which can cause messy drips. Remember, less is often more when it comes to wood glue. Follow these steps:

How Much Wood Glue Should I Use?
Wood glue is an essential component in any woodworking project, providing the strong, durable bond necessary for success. However, determining the right amount of wood glue to use can be challenging, as using too little can result in weak joints, while using too much can lead to messy, excess glue seeping out. In this article, we will guide you through the process of determining how much wood glue you should use for different woodworking applications.
The Importance of Measuring the Right Amount of Wood Glue
Accurate measurement of wood glue is crucial for achieving strong and secure bonds. When applying too little glue, you risk weak joints that can fail over time. On the other hand, using too much glue can create messes, interfere with the aesthetics of your project, and result in wasted glue. Therefore, it is important to strike the right balance when measuring the amount of wood glue to use.
1. Determining the Amount of Glue for Edge Joints
For edge joints, which involve joining two pieces of wood along their long edges, it is generally recommended to apply a thin, even layer of glue. Use a brush or a small roller to spread the glue evenly on one of the edges, ensuring full coverage without excessive pooling. Press the two pieces together firmly and allow the glue to fully dry according to the manufacturer’s instructions. This method provides adequate bonding strength without leaving excess glue residue.
1.1. Benefits of Using the Right Amount of Glue for Edge Joints
Using the right amount of glue for edge joints offers several benefits. Firstly, it ensures a strong and secure bond, increasing the overall stability and durability of the joint. Secondly, it minimizes the risk of excess glue ruining the appearance of your project by seeping out of the joint. Additionally, using the right amount of glue promotes efficient glue usage, preventing wastage and saving you money in the long run.
2. Estimating the Amount of Glue for Butt Joints
Butt joints involve joining the end grain of one piece of wood to the face grain of another. These joints require a bit more glue due to the porous nature of the end grain. Apply a thin layer of glue to both surfaces, ensuring complete coverage. You can use a brush or a small squeeze bottle for the application. Assemble the joint, making sure the pieces are aligned correctly, and clamp them tightly until the glue dries.
2.1. Tips for Using the Right Amount of Glue for Butt Joints
When applying glue to butt joints, keep in mind the following tips to achieve optimal results. Firstly, apply slightly more glue to the end-grain surface to compensate for its absorbent nature. Secondly, avoid excessive glue that may cause squeeze-out and messiness. Lastly, use clamps to hold the joint firmly in place during the drying process, ensuring a strong and secure bond.
3. Using the Correct Amount of Glue for Miter Joints
Miter joints involve joining two pieces of wood at a 45-degree angle, creating clean and seamless corners often seen in picture frames or molding. The amount of glue needed for miter joints depends on the craftsmanship and precision of the joint. Apply a thin layer of glue to both surfaces, making sure to cover the entire mating area. Use clamps or band clamps to hold the joint together until the glue dries completely.
3.1. Common Mistakes and Tips When Applying Glue to Miter Joints
When working with miter joints, it is important to avoid common mistakes that can compromise the bond. One mistake to avoid is over-clamping the joint, which can squeeze out excess glue and weaken the bond. Additionally, ensure that the joint is perfectly aligned before applying the glue to prevent any gaps or misalignments in the final product.
Applying the Right Amount of Wood Glue: Dos and Don’ts
To summarize the importance of applying the right amount of wood glue, here are some key dos and don’ts to remember:
– Do measure and apply the appropriate amount of glue for each type of joint.
– Do spread the glue evenly to ensure complete coverage without excessive pooling.
– Do clamp the joint securely until the glue dries according to the manufacturer’s instructions.
– Don’t use too little glue, as it can lead to weak joints and failure over time.
– Don’t use too much glue, as it can create messy seepage and compromise the aesthetics of your project.
– Don’t rush the drying time. Allow the glue to fully dry to achieve the best bond strength.
Remember, achieving the right amount of glue for each woodworking joint requires practice and experience. With each project, you will gain a better understanding of the appropriate amounts needed for different joint types.
Key Takeaways: How Much Wood Glue Should I Use?
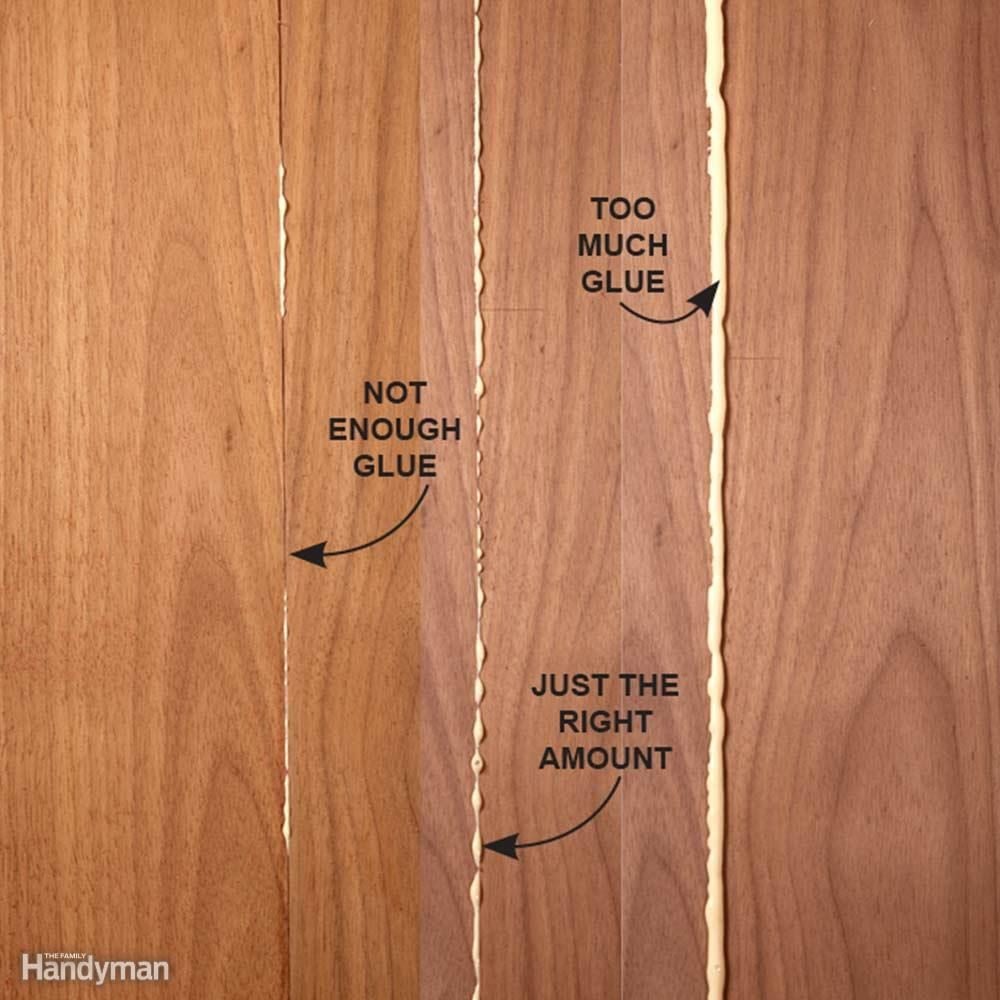
- Use enough wood glue to create a thin, even layer on the surfaces to be joined.
- A good rule of thumb is to apply a thin bead of glue along the entire length of each surface.
- Make sure not to apply too much glue as excessive squeeze-out can be messy and weaken the bond.
- If you’re unsure, start with a small amount of glue and gradually add more if needed.
- Always follow the specific instructions provided by the wood glue manufacturer for best results.
Frequently Asked Questions
Welcome to our FAQ section where we answer common questions about how to determine the right amount of wood glue to use for your projects!
How important is it to use the right amount of wood glue?
Using the right amount of wood glue is crucial for the success and durability of your woodworking projects. Using too little glue can result in weak or incomplete bonds, causing your project to fall apart. Conversely, using too much glue can lead to messy and excessive squeeze-out, which can be difficult to clean up and may affect the final appearance of your project.
Using the right amount of wood glue ensures that you achieve optimal bonding strength, without excess mess. It is important to follow the manufacturer’s guidelines and recommendations for the specific wood glue you are using to ensure the best results.
How can I determine the right amount of wood glue to use?
The amount of wood glue you should use depends on various factors, including the size and type of the wood pieces you are bonding, as well as the specific wood glue you are using. As a general guideline, applying a thin and even layer of glue to the surface of the wood is usually sufficient. You want enough glue to create a strong bond, but not so much that there is excessive squeeze-out.
If you are uncertain about the amount of glue needed, it is always a good idea to start with a small amount and gradually increase if needed. Remember, it is easier to add more glue if necessary than to remove excess glue.
What should I do if I applied too little wood glue?
If you realize that you have applied too little wood glue, it is best to stop and add more glue before proceeding. Applying more glue at this stage ensures that you achieve a strong bond between the wood pieces. Make sure to spread the additional glue evenly to cover the surface area where the original glue was applied.
Be sure to clean off any excess glue squeeze-out before it dries to avoid any potential issues down the line. It is also a good practice to clamp the wood pieces together to ensure proper contact and bonding while the glue sets.
What if I have excessive glue squeeze-out?
If you have excessive glue squeeze-out, do not panic! Allow the glue to partially dry and then carefully scrape off the excess using a chisel or a putty knife. Be cautious not to damage the wood surface as you remove the excess glue.
After removing the excess glue, you can use a damp cloth or sponge to gently clean the wood surface. Make sure to remove any residual glue while being careful not to smear it onto other areas of the project. Once the glue has fully dried, you can sand the surface to achieve a smooth and clean finish.
Are there any general tips for applying wood glue?
Absolutely! Here are a few tips to keep in mind when applying wood glue:
1. Ensure the surfaces you are bonding are clean, dry, and free from any dust or debris to maximize the bond strength.
2. Apply a thin and even layer of glue to the surface of the wood. Using too much glue can lead to excessive squeeze-out.
3. Consider using clamps to hold the wood pieces together while the glue dries. This ensures consistent pressure and proper bonding.
4. Follow the recommended clamping time specified by the wood glue manufacturer to ensure that the bond sets properly.
By following these tips and guidelines, you can achieve strong and durable bonds with your woodworking projects.
What You Need to Know About Glue | WOODWORKING BASICS
Summary
Using the right amount of wood glue is important for a strong bond. If you use too little, the joint may not hold properly. Using too much can create a messy and wasteful situation. It’s best to follow the instructions on the wood glue packaging for the recommended amount.
Remember to apply an even layer of glue on both surfaces you’re joining and press them together firmly. Give it enough time to dry and set before putting any stress on the joint. If you’re unsure, start with a little glue and add more if necessary. Trust your instincts and practice to find the right amount of wood glue for your project.