
Are you curious about how to use a hand planer? Well, you’re in the right place! Hand planers are fantastic tools for shaping and smoothing wood, and learning how to use them can open up a whole world of possibilities for your DIY projects. In this guide, we’ll walk you through the basics of using a hand planer, from selecting the right one to mastering the technique. So, grab your safety goggles and let’s get started!
Now, you might be wondering why you would need a hand planer when there are power tools available. Well, hand planers offer a level of control and precision that power tools simply can’t match. Plus, there’s something satisfying about the rhythmic sound of the blade as it shaves off thin layers of wood. Whether you’re leveling a door, chamfering an edge, or creating a beautiful, smooth surface, a hand planer is a versatile tool that every aspiring woodworker should have in their toolbox.
Before diving into the nitty-gritty of using a hand planer, it’s essential to understand its components. A hand planer consists of a rectangular body, a cutting blade, and an adjustable depth control knob. By adjusting the depth knob, you can control how much material the planer removes with each pass. Additionally, many hand planers have a front knob or handle that allows you to guide the tool smoothly along the surface of the wood. Now that you’re familiar with the basics, it’s time to roll up your sleeves and start planing!
So, get ready to unleash your inner carpenter as we explore the wonderful world of hand planers. Whether you’re a beginner or a seasoned DIY enthusiast, we’ll equip you with the knowledge and skills you need to confidently use a hand planer and achieve professional-looking results. Let’s embark on this woodworking journey together!
- Begin by securing the wood you want to plane firmly.
- Adjust the blade depth based on the desired shaving thickness.
- Hold the planer with both hands and apply gentle pressure as you push it forward.
- Move the planer in long, even strokes along the wood grain.
- Repeat the process until you achieve the desired smoothness.
Grab your hand planer and get ready to transform your woodworking projects with precision!
How to Use a Hand Planer: A Comprehensive Guide
Hand planers are versatile tools that can be used for a variety of woodworking tasks, from smoothing rough surfaces to chamfering edges. In this article, we will provide you with a step-by-step guide on how to use a hand planer effectively. Whether you are a beginner or an experienced woodworker, these tips and techniques will help you achieve the best results with your hand planer.
The Anatomy of a Hand Planer: Understanding the Basics
Before we dive into the details of using a hand planer, let’s take a moment to understand the different parts of this versatile tool. A hand planer typically consists of the following components:
1. Blade: The blade, also known as the iron, is the heart of the hand planer. It is a sharp, metal cutting edge that cuts into the wood to remove material.
2. Sole: The sole is the flat, smooth surface on the bottom of the hand planer. It rests on the wood and provides stability while planing.
3. Handle: The handle is the part of the hand planer that you grip while using the tool. It allows you to control the direction and pressure as you move the hand planer along the wood.
4. Depth Adjustment Knob: The depth adjustment knob allows you to control the depth of the cut. By adjusting this knob, you can set the hand planer to remove more or less material from the wood.
Now that we have a basic understanding of the hand planer, let’s explore how to use it effectively.
1. Preparing the Wood: Ensuring a Smooth Surface
Before using a hand planer, it is important to prepare the wood surface. Start by ensuring that the wood is clean and free from any dirt or debris. Next, inspect the wood for any nails, screws, or other metal objects that may damage the blade of the hand planer. Use a metal detector or visual inspection to identify and remove these objects.
Once the wood is clean and free from metal objects, use a straightedge or ruler to check for any high spots or irregularities on the surface. Mark these areas with a pencil so that you can focus on them during planing. Additionally, if the wood is too rough, you may want to start with a rough grit sandpaper to remove any major imperfections before using the hand planer.
1.1 Using a Bench Plane for Rough Stock Removal
If the wood is uneven and requires significant material removal, a bench plane can be used before the hand planer. A bench plane is designed for heavy-duty tasks and can remove large amounts of material quickly. To use a bench plane, hold it firmly by the handle and apply pressure as you push it forward along the wood. Gradually increase the depth of the cut until the surface is relatively smooth and even. Once the surface is prepared with a bench plane, you can move on to using the hand planer for finer finish work.
2. Setting Up the Hand Planer: Adjusting the Depth of Cut and Blade Sharpness
Before you start planing, it is crucial to set up your hand planer correctly. Begin by adjusting the depth of cut according to the desired thickness of material removal. The depth adjustment knob, located on the side of the hand planer, allows you to control the depth of the cut. Start with a shallow cut and gradually increase the depth as needed.
In addition to adjusting the depth, it is essential to ensure that the blade of the hand planer is sharp. A dull blade will result in poor performance and can damage the wood surface. To sharpen the blade, use a honing guide and a sharpening stone or sandpaper to achieve a sharp edge. You can also consider using a honing guide for more consistent results.
2.1 Types of Blades for Different Woodworking Tasks
There are different types of blades available for hand planers, each suited for specific woodworking tasks. For general-purpose planing, a standard straight blade is ideal. However, for tasks like chamfering or smoothing curved surfaces, a specially shaped blade, such as a bullnose or compass plane blade, may be more suitable.
3. Using the Hand Planer: Techniques for a Smooth Finish
Now that you have prepared the wood and set up your hand planer, it’s time to start planing. Here are some techniques to ensure a smooth and even finish:
1. Start with the end grain: When planing a board, always begin with the end grain. This allows you to prevent tear-out and achieve a clean surface. With a firm grip on the hand planer, place it at the end of the board and slowly push it forward, maintaining consistent pressure.
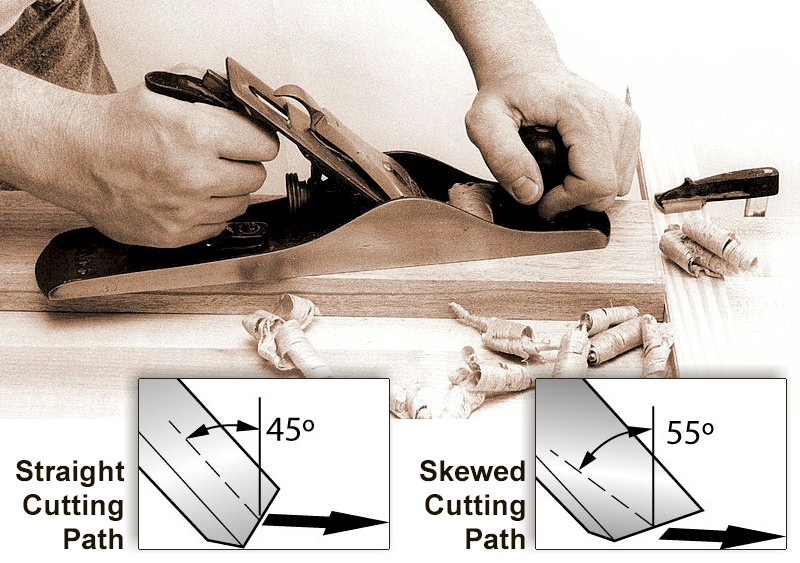
2. Follow the grain: While planing, always follow the direction of the wood grain. This helps prevent tear-out and ensures a smooth finish. If the wood grain changes direction, adjust your hand planer accordingly to maintain a consistent cutting angle.
3. Use even pressure: Apply even pressure on the hand planer to achieve an even cut. Avoid pushing too hard, as it can result in uneven planing or cause the hand planer to dig into the wood.
4. Smooth overlapping strokes: When planing a larger surface, use overlapping strokes to ensure consistent material removal. This technique helps avoid unevenness and creates a smooth and level surface.
5. Check your progress frequently: Periodically stop planing and inspect the surface. Look for any high spots or irregularities and focus on these areas during subsequent passes.
By following these techniques and practicing regularly, you will develop the skills needed to achieve a professional-level finish with your hand planer.
4. Maintaining and Storing Your Hand Planer: Ensuring Longevity
Proper maintenance and storage of your hand planer are essential to ensure its longevity and performance. After each use, clean the hand planer thoroughly to remove any wood chips or debris. Use a bristle brush or compressed air to clear the blade and sole. Inspect the blade for any signs of damage or dullness and sharpen or replace it if necessary.
When storing your hand planer, keep it in a dry and clean area to prevent rust or other damage. Consider storing it in a protective case or wrap it in a cloth to avoid any accidental bumps or scratches. Regularly oil the moving parts and mechanisms to keep them lubricated and prevent rust.
In conclusion, knowing how to use a hand planer effectively is crucial for achieving the best results in your woodworking projects. By understanding the anatomy of a hand planer, preparing the wood surface, setting up the hand planer correctly, using proper techniques, and maintaining the tool, you can master the art of hand planing and create professional-level finishes. So, grab your hand planer, follow these steps, and embark on your woodworking journey with confidence.
Key Takeaways: How to Use a Hand Planer
- Start by securing the workpiece firmly on a workbench or a stable surface.
- Hold the hand planer with both hands and guide it along the wood grain to avoid tear-outs.
- Make shallow passes with the planer, gradually increasing the depth to achieve the desired results.
- Check the depth of cut regularly to prevent removing too much material at once.
- Always wear safety goggles and follow proper hand tool safety guidelines while using a hand planer.
Frequently Asked Questions
Welcome to our Frequently Asked Questions section on how to use a hand planer. Whether you’re a beginner or a seasoned woodworker, these questions will provide you with valuable insights on using a hand planer effectively. Read on to discover the answers to commonly asked questions about this versatile tool.
1. What safety precautions should I take when using a hand planer?
Using a hand planer involves sharp blades and potentially hazardous situations. To ensure your safety, always wear protective gear such as goggles, gloves, and ear protection. Make sure your work area is well-lit and free of clutter.
Additionally, it’s crucial to maintain a firm grip on the tool and use proper technique. Keep your hands away from the cutting area, and avoid applying excessive force that could result in kickback. By following these precautions, you can safely operate a hand planer and prevent accidents.
2. How do I adjust the cutting depth on a hand planer?
Adjusting the cutting depth on a hand planer is essential for achieving the desired results. Most hand planers have a depth adjustment knob or lever located near the front or back of the tool. By turning the knob or sliding the lever, you can increase or decrease the cutting depth.
Start with a shallow cutting depth and gradually increase it until you achieve the desired smoothness or thickness. Remember to take light passes and check your progress frequently. Practice and experimentation will help you master the art of adjusting the cutting depth for different woodworking projects.
3. How should I position the hand planer for optimal results?
Positioning the hand planer correctly is crucial for achieving optimal results. Start by holding the hand planer with both hands, placing one hand on the front handle and the other on the rear handle. This grip provides stability and control during operation.
When planing, position the front shoe of the hand planer slightly above the surface of the wood. Tilt the planer slightly so that the blade makes contact with the wood at a slight angle. This helps to prevent tear-out and produces smoother cuts. With practice, you’ll develop a feel for the ideal positioning that yields the best results.
4. How can I prevent tear-out when using a hand planer?
Tear-out, which refers to the splintering or chipping of wood fibers, can be an issue when using a hand planer. To prevent tear-out, it’s important to consider the direction of the wood grain. Always plane in the direction of the grain, moving the hand planer in long, smooth strokes.
Take light passes instead of removing a lot of material in a single pass. This allows the blade to slice through the wood fibers cleanly, minimizing tear-out. Sharp blades also play a significant role, so make sure to maintain and sharpen your hand planer blades regularly. By following these steps, you can minimize tear-out and achieve smoother finishes.
5. What maintenance is required for a hand planer?
To keep your hand planer in optimal condition, regular maintenance is essential. After each use, remove any wood shavings or debris from the tool. Clean the blade carefully, making sure there are no wood particles left that could affect its performance.
Inspect the blade and other parts for signs of wear or damage. If the blade is dull or damaged, it may need sharpening or replacement. Lubricate any moving parts according to the manufacturer’s recommendations. Proper maintenance and care will prolong the lifespan of your hand planer and ensure its consistent performance.
:max_bytes(150000):strip_icc()/HandPlaner-5b691bf646e0fb004fd8a9cb.jpg)
Summary
So, here’s a quick recap on using a hand planer. First, make sure you have the right type of planer for your project. Hold it firmly, but not too tightly, and move it in the direction of the wood grain. Take shallow passes to avoid removing too much material at once. Keep the blade sharp and clean for smooth and precise cuts. Don’t forget to wear safety goggles and take breaks to avoid fatigue. By following these steps, you’ll be able to use a hand planer effectively and achieve great results in your woodworking projects.