
If you’ve ever wondered how to use wood carving tools, you’ve come to the right place! Wood carving is a fascinating craft that allows you to unleash your creativity and turn a simple block of wood into a beautiful piece of art. In this guide, we’ll explore the basics of using wood carving tools, from selecting the right tools to mastering essential techniques. So grab your carving tools and let’s get started!
Carving tools come in various shapes and sizes, each designed for specific purposes. From chisels and gouges to knives and mallets, understanding the different tools and their uses is essential. Whether you’re a beginner or an experienced woodworker, learning how to choose the right tool for the task at hand is crucial for achieving the best results. So let’s dive into the fascinating world of wood carving tools together!
Once you’ve mastered the art of selecting the right tools, it’s time to delve into the techniques. Wood carving involves removing layers of wood to create intricate designs and shapes. From basic chip carving to more complex relief carving, there are various techniques to explore. By learning and practicing these techniques, you’ll enhance your skills and create stunning wood carvings that showcase your talent. So let’s roll up our sleeves and embark on this wood carving journey!
- Familiarize yourself with different types of wood carving tools, such as gouges and chisels.
- Select the right wood for your project, considering its hardness and grain.
Mastering the art of wood carving takes time and practice. Remember to always prioritize safety and enjoy the creative process!
How to Use Wood Carving Tools: A Comprehensive Guide
Welcome to our comprehensive guide on how to use wood carving tools! Whether you’re a beginner or a seasoned woodworker, mastering the art of wood carving requires the right tools and techniques. In this guide, we’ll walk you through the essential steps and share tips to help you get started, improve your skills, and create stunning woodcarvings. So let’s dive in and unleash your creativity in the world of wood carving!
1. Understanding Different Wood Carving Tools
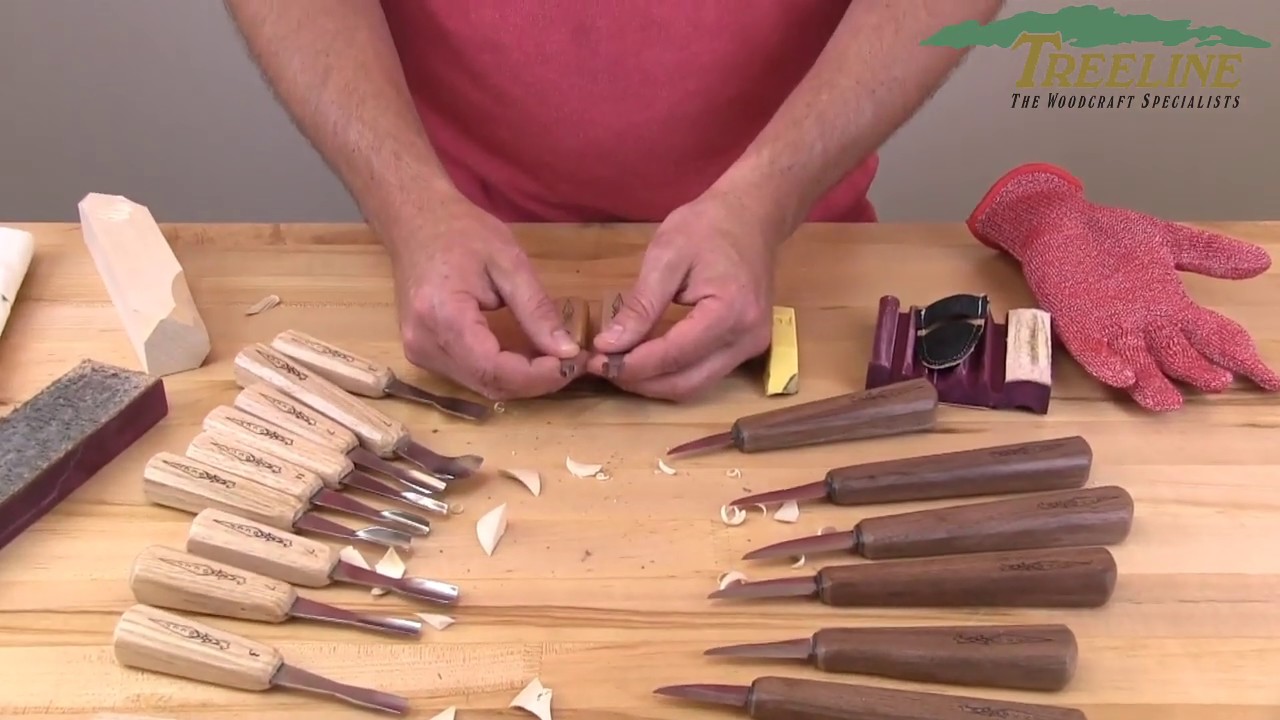
Before you begin carving, it’s crucial to understand the different types of wood carving tools available. The most common tools include carving knives, chisels, gouges, and v-tools. Each tool has its own purpose and features specific shapes and cutting edges designed for different carving techniques. Carving knives are versatile and ideal for intricate details, whereas chisels are great for removing larger sections of wood. Gouges create curved cuts, while v-tools are perfect for creating decorative lines and textures.
When choosing wood carving tools, consider the quality of the blades, the ergonomics of the handles, and the suitability for your specific projects. Investing in high-quality tools will not only enhance your carving experience but also improve the quality of your finished pieces.
Tips:
– Begin with a basic set of tools and gradually expand your collection as you gain more experience.
– Research different brands and read reviews to find reliable and durable tools.
– Take the time to properly sharpen and maintain your tools for optimal performance and longevity.
2. Preparing Your Wood and Workstation
Now that you have your wood carving tools ready, it’s crucial to prepare your workspace and your wood before diving into the carving process. Start by selecting the right type of wood for your project. Different woods have different characteristics, such as hardness and grain pattern, which can affect the carving process. Softwoods like pine are great for beginners due to their ease of carving, while hardwoods like oak or walnut offer more durability and intricate details.
Before carving, make sure your workbench or workspace is clean, organized, and well-lit. This will reduce distractions and create a safe environment for carving. Secure your wood firmly in place using clamps or a vise to prevent any movement during carving.
Tips:
– Use a wood carving mallet or a wooden mallet with your carving tools for added control and force.
– Wear protective gear such as safety glasses and gloves to prevent accidents and injuries.
– Use a dust mask or respirator to protect yourself from wood dust, which can be harmful when inhaled.
3. Mastering Wood Carving Techniques
Wood carving is both an art form and a craft that requires practice and patience. To create stunning woodcarvings, it’s essential to learn and master various carving techniques. Here are a few fundamental techniques to get you started:
– Chip carving: This technique involves making precise angled cuts to create intricate designs and patterns.
– Relief carving: With relief carving, you carve away the background, leaving the subject raised above the wood’s surface.
– Whittling: Whittling is the art of creating shapes by removing thin slices of wood using a carving knife. It’s perfect for creating small figurines and decorative pieces.
– Hollowing: Hollowing involves carving out the inside of a piece of wood to create objects like bowls or cups.
It’s important to practice these techniques on scrap wood before working on your actual project. This will help you develop your skills, improve your control, and gain a better understanding of how the tools interact with the wood.
4. Finishing and Protecting Your Woodcarvings
Once you’ve completed your wood carving, it’s time to give it a smooth and polished finish. Begin by sanding the carved surface using different grits of sandpaper. Start with coarse grit for removing any rough edges or tool marks and gradually move to finer grits for a smooth surface.
After sanding, apply a suitable finish to enhance the appearance and protect your wood carving. Common finishes include oils, varnishes, and waxes. These finishes not only bring out the natural beauty of the wood but also provide a protective layer against moisture and wear.
Before applying any finish, ensure that the wood is free from dust and debris. Apply the finish using a brush or a cloth, following the manufacturer’s instructions. Allow the finish to dry completely before handling or displaying your wood carving.
5. Safety Tips and Best Practices
Wood carving can be an enjoyable and rewarding hobby, but it’s essential to prioritize safety. Here are some important safety tips and best practices to keep in mind:
– Always carve away from your body to avoid accidents and potential injuries.
– Keep your fingers clear of the blade and use carving gloves or thumb guards for added protection.
– Take breaks and stretch your muscles to prevent strain or repetitive motion injuries.
– Store your carving tools in a secure and organized manner to avoid damage and accidents.
Remember, mastering wood carving takes time and practice. Be patient with yourself, embrace mistakes as learning opportunities, and let your creativity guide you. Happy carving!
Recommended Wood Carving Tools for Beginners
If you’re new to wood carving and looking to invest in the right tools, here are some recommendations to get you started:
Tips for Choosing the Right Wood for Your Carving Projects
Selecting the right type of wood is crucial to the success of your wood carving projects. Here are some tips to help you choose the perfect wood for your needs:
Common Mistakes to Avoid in Wood Carving
Even experienced wood carvers make mistakes. Here are some common mistakes to avoid in order to achieve better results:
Key Takeaways: How to Use Wood Carving Tools
- Start by choosing the right wood carving tools for your project.
- Ensure your tools are sharp and well-maintained for better control.
- Hold the carving tool firmly but comfortably in your hand.
- Practice different techniques, such as cuts and strokes, on scrap wood.
- Always carve away from your body to avoid accidents.
Frequently Asked Questions
Welcome to our Frequently Asked Questions section, where we will address some common queries related to using wood carving tools. Whether you’re a beginner or an experienced woodworker, we’ve got you covered! Read on to find answers to your questions and gain valuable insights into the world of wood carving.
1. What are the essential wood carving tools I need to get started?
When starting out with wood carving, there are a few basic tools that every woodworker should have. These include a carving knife, a gouge, a chisel, and a mallet. The carving knife is perfect for intricate details, while the gouge and chisel allow you to remove larger portions of wood. The mallet is used to gently tap the tools into the wood for precise cuts and carvings.
It’s essential to invest in high-quality tools that suit your carving needs and skill level. With the right tools, you’ll be able to start your wood carving journey on the right foot and create beautiful pieces of art.
2. How should I maintain and care for my wood carving tools?
Proper maintenance is crucial to keep your wood carving tools in excellent condition. After each use, it’s essential to clean your tools thoroughly to remove any wood particles or debris. You can use a soft cloth or brush to clean the blades and handles.
To prevent rusting, it’s recommended to apply a thin layer of oil on the metal parts of your tools before storing them. Be sure to store your tools in a cool, dry place to avoid moisture damage. Regular sharpening is also necessary to keep your tools sharp and ready to use. Consider investing in a sharpening stone or honing guide to maintain the sharpness of your carving tools.
3. What safety precautions should I take when using wood carving tools?
Safety should always be your top priority when working with wood carving tools. It’s crucial to wear protective gear, including safety glasses, a dust mask, and gloves, to prevent accidents and protect yourself from harmful wood dust and debris.
When using sharp tools, make sure to keep your fingers and hands away from the cutting edge. Always carve away from your body and maintain a steady grip on the tool. It’s also a good idea to work in a well-ventilated area to minimize exposure to wood dust.
4. Can you provide some tips for beginners who want to improve their wood carving skills?
For beginners looking to enhance their wood carving skills, practice is key! Start with simple projects and gradually move on to more complex designs as you gain confidence and experience. Don’t be afraid to make mistakes and learn from them.
Additionally, studying the work of experienced wood carvers can be incredibly helpful. Watch tutorial videos, read books, and join online carving communities to learn new techniques and get inspiration for your projects. The more you engage with the wood carving community, the more knowledge and skills you’ll acquire!
5. How can I avoid splintering or chipping the wood while carving?
To avoid splintering or chipping the wood, it’s essential to choose the right type of wood for your project. Softer woods, such as basswood or tupelo, are more forgiving and less prone to splintering. Additionally, using sharp tools and maintaining a proper technique can help minimize the risk of splintering.
Another tip is to carve in the direction of the wood grain. Going against the grain can increase the chances of chipping, so follow the natural lines of the wood to achieve clean and smooth cuts. Taking your time and using a controlled, steady hand while carving will also help prevent any unwanted damage to the wood.

Summary
Carving wood can be a fun and creative activity for anyone interested in art. To get started, you’ll need the right tools, such as chisels and gouges.
Remember to:
– Choose the right wood for your project
– Use proper safety precautions
– Start with simple designs before moving on to more complex ones
Once you have your tools and safety gear ready, you can begin carving by following these steps:
– Sketch your design onto the wood
– Cut away excess wood with a larger chisel
– Use smaller tools for finer details
– Sand and finish your carving for a polished look
Practice and patience will help improve your skills over time. So start carving and unleash your creativity!