
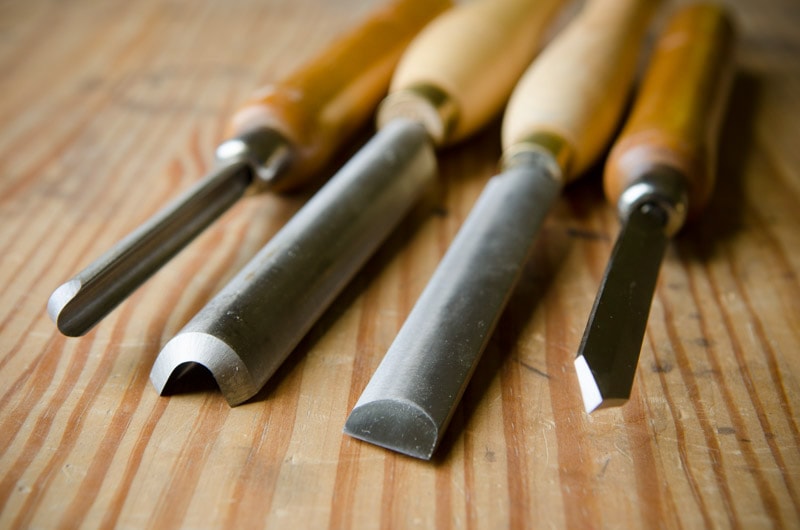
If you’re stepping into the world of woodturning, you might be wondering, “What chisels do I need for woodturning?” Well, you’ve come to the right place! In this guide, we’ll break down everything you need to know about the essential chisels for this craft.
Woodturning is a captivating art form that allows you to transform a piece of wood into beautiful and functional objects like bowls, vases, and even furniture components. But to bring your visions to life, you’ll need the right set of chisels specifically designed for woodturning.
So, whether you’re a beginner eager to learn or an experienced woodturner looking to upgrade your tools, let’s dive in and discover the must-have chisels for woodturning!
To start woodturning, you’ll need a set of chisels tailored for the craft. Here are the essential chisels every woodturner should have:
– Spindle Gouge: Perfect for shaping spindles and beads.
– Bowl Gouge: Ideal for hollowing out bowls and shaping the insides.
– Roughing Gouge: Used for rough shaping and removing excess wood.
– Skew Chisel: Great for creating smooth finishes and intricate details.
– Parting Tool: Used for making deep cuts and separating wood pieces.
Invest in quality chisels to enhance your woodturning experience and bring your creations to life.

What Chisels Do I Need for Woodturning?
Woodturning is a popular form of woodworking that involves creating symmetrical shapes by spinning a piece of wood on a lathe and using various tools to shape and sculpt it. Chisels are an essential tool for woodturners as they allow for precise cutting, shaping, and detailing of the wood. However, with so many types and sizes of chisels available, it can be overwhelming to figure out which ones you need for your woodturning projects. In this article, we will explore the different types of chisels used in woodturning and their specific purposes, helping you determine the essential chisels you need in your toolkit.
1. Roughing Gouge: Essential for Turning Initial Shapes
The roughing gouge is one of the most important chisels in a woodturner’s arsenal. This robust and versatile chisel is used for turning rough forms out of square or rectangular stock. Its thick profile and deep flute allow for quick and efficient removal of excess material, making it ideal for creating cylindrical and conical shapes. The roughing gouge is typically used at the beginning stages of a woodturning project to shape the initial profile of the piece.
To use the roughing gouge, position the tool rest close to the wood blank, ensuring it is at the same height as the center of the piece. With a firm grip, bring the chisel into contact with the spinning wood, orienting the flute at a slight angle in the direction of the cut. Use steady, controlled movements, applying even pressure as you move along the length of the blank. Take care not to let the chisel dig too deeply into the wood, as this can cause catches or tear-outs. Continue shaping the piece until you achieve the desired profile.
Types of Roughing Gouges:
There are two common types of roughing gouges: traditional and bowl gouge.
Traditional roughing gouges have a long and straight profile, making them well-suited for turning spindles and other long, thin shapes. The length of the handle allows for a comfortable grip and leverage, providing control and stability during the turning process.
Bowl gouges, on the other hand, have a shorter and thicker profile, with a deep flute that offers more rigidity and strength. They are specifically designed for turning bowls, plates, and other curved shapes. The shorter length allows for better maneuverability when working on a concave surface.
Both types of roughing gouges are essential tools in woodturning, and having both in your collection will ensure you have the right tool for various woodturning projects.
2. Spindle Gouge: Ideal for Detailing and Finishing
Once you’ve shaped the rough form of your woodturning project, the next step is to refine and smooth the surface, adding details and finalizing the design. This is where the spindle gouge comes into play. The spindle gouge is a versatile chisel with a shallow flute and a pointed tip, making it perfect for detailing and creating intricate designs on the wood.
With the spindle gouge, woodturners can create coves, beads, and other decorative elements on spindles, pens, and other small turned objects. The pointed tip allows for precise cutting and shaping, while the shallow flute helps to control the depth of the hole. This chisel is also used for undercutting and making concave cuts, as well as forming the profiles of decorative beads.
To use the spindle gouge, position the tool rest close to the workpiece, just below the centerline of the spinning wood. Place the bevel of the chisel against the wood and gently roll it until the edge makes contact. Apply light pressure while moving the chisel along the surface, allowing the bevel to guide the cut. Adjust the angle of the chisel to achieve different profiles or shapes. Take your time and make small, controlled cuts to avoid tear-outs or accidents.
Types of Spindle Gouges:
Spindle gouges come in various sizes, ranging from small to large, and different flute shapes. The sizes refer to the width of the tool’s shaft. Smaller spindle gouges are ideal for fine detail work, while larger ones are more suited for bulk material removal and shaping.
The flute shape can also vary, with some spindle gouges having a U shape, while others have a V shape. The choice of flute shape depends on personal preference and the type of detail work you plan to do. Experiment with different flute shapes to determine which one feels most comfortable and provides the best results for your projects.
3. Skew Chisel: The Master of Precision Cutting
The skew chisel is known as the “go-to” tool for achieving clean and precise cuts in woodturning. This versatile chisel has a long, flat profile with beveled edges on both sides, allowing for effortless beading, planing, and roughing cuts. The skew chisel is primarily used to create clean, smooth surfaces, chamfers, and decorative beads on spindles, turning projects, and bowls.
The key to using the skew chisel effectively is understanding its cutting technique. Unlike other chisels that are presented to the wood at a 90-degree angle, the skew chisel is presented at an angle between 45 and 70 degrees, depending on the desired cut. The bevel of the chisel is placed against the spinning wood, and by gently pressing the flat surface against the wood, one can produce precise, smooth cuts.
Types of Skew Chisels:
Skew chisels come in different sizes and shapes. The two common variations are the rectangular skew chisel and the round skew chisel.
The rectangular skew chisel has a flat, straight edge on one side and a beveled edge on the other side, forming a 90-degree angle. This type of skew chisel is versatile and suitable for both shaping and smoothing cuts.
The round skew chisel, as the name suggests, has a rounded profile instead of a flat one. This shape allows for more delicate and controlled cuts, making it perfect for fine detail work and turning delicate spindles.
It’s essential to experiment with both types of skew chisels to determine which one suits your preferences and the type of woodturning projects you frequently undertake.
4. Parting Tool: Perfect for Cutting Off and Separating
The parting tool, also known as a parting tool chisel or cutoff tool, is specifically designed to cut off and separate a turned workpiece from the waste material or to create grooves, beads, and decorative accents. This chisel consists of a long, slender blade with a flat cutting edge.
The parting tool is primarily used at the final stages of a woodturning project when the woodturner needs to create a clean separation point between the project and the waste material. It is also used for creating decorative grooves, adding visual interest to the turned piece. The parting tool provides excellent control and stability, allowing for precise and accurate cuts.
To use the parting tool, position the tool rest close to the workpiece, ensuring it is level with the center of the spinning wood. Place the cutting edge of the chisel against the wood, aligning it perpendicular to the surface. Apply gentle pressure and slowly move the chisel into the wood to begin the cut. Take it slow to avoid any catches or accidents, adjusting the speed and depth of the cut as needed.
Types of Parting Tools:
Parting tools come in different sizes and designs, depending on the specific application and personal preference. Some parting tools have a straight blade, while others have a slightly curved or tapered shape. The choice of parting tool depends on the type of cuts you want to make and the level of detail you wish to achieve. Experiment with different parting tools to find the one that works best for your woodturning projects.
5. Bowl Gouge: Shaping the Inner Curves
Woodturning bowls requires a different set of tools compared to turning spindles or pens. One of the essential tools for bowl turning is the bowl gouge. These chisels are specifically designed for hollowing out the inner curves of bowls, plates, and other concave shapes.
A bowl gouge has a deep flute and a profile with a significant bend towards the end, allowing for effective material removal and excellent control when shaping the inside of the bowl. The long handle provides leverage, while the swept-back cutting edge reduces the chances of catches and tear-outs.
To use the bowl gouge, position the tool rest at the center of the bowl or plate, keeping it slightly below the centerline to ensure a safe cutting position. Begin by gently presenting the bevel of the gouge on the spinning wood, just above the centerline, with the flute pointing towards the wood. Once the bevel is in contact, slowly raise the handle to engage the cutting edge and start removing material from the center of the bowl. Use a series of light cuts along the contour, maintaining a smooth transition from the inner curve towards the rim.
Types of Bowl Gouges:
Bowl gouges come in different sizes and sweeps. The size refers to the width of the tool’s shaft, with larger gouges suitable for removing bulk material and shaping deep bowls, while smaller gouges are ideal for delicate profiling and final detailing.
The sweep, also known as the grind, refers to the curvature of the flute. Bowl gouges can have different sweep angles, such as 40 degrees, 45 degrees, or even 55 degrees. The choice of sweep depends on personal preference and the specific type of bowl or concave shape you are turning.
6. Scraper: Smoothing and Finishing Touches
After roughing, shaping, and detailing the woodturning project, it’s time to achieve a smooth and refined surface. This is where a scraper comes into play. A scraper is a flat chisel with a burr on the cutting edge, which acts as a cutting mechanism. Unlike other chisels that cut with a bevel, the scraper is used with the burr rubbing against the wood to scrape away fine shavings.
The scraper is primarily used for smoothing the wood surface, eliminating tool marks, and refining the shape and contours. It can also be used to create decorative patterns and add texture to the surface of the turned piece. The scraper is an excellent tool for the final stages of woodturning, providing a clean and polished finish.
To use the scraper, position the tool rest close to the workpiece, slightly above the centerline of the spinning wood. Angle the scraper with the burr rubbing against the wood surface, and gently move it across the desired area, allowing the burr to cut away thin shavings. Maintain steady pressure and avoid excessive scraping, as it can lead to tear-outs or damage to the wood. Use light and controlled movements to achieve a smooth surface.
Types of Scrapers:
There are various types of scrapers available for woodturning, each with a different shape and purpose. Some common types include bowl scrapers, square-end scrapers, and round-nosed scrapers.
Bowl scrapers are specifically designed for hollowing out the interior of bowls, providing a smooth and consistent finish. They have a curved profile that matches the shape of the bowl and allow for precise scraping of the concave surface.
Square-end scrapers have a straight, flat edge and are versatile tools used for scraping flat or convex surfaces. They are commonly used for smoothing spindle projects, such as table legs and candlesticks, where a clean, flat surface is desired.
Round-nosed scrapers have a rounded tip and are ideal for creating delicate profiles and shaping curves. They are often used in intricate detailing and shaping work, allowing for precise and controlled cuts.
Having a variety of scrapers in your toolkit will enable you to choose the right one for different woodturning projects and achieve the desired surface finish.
7. Hollowing Tool: Crafting Deep Hollow Forms
For woodturners who specialize in creating hollow forms, such as vases, bowls, and even lamps, a hollowing tool is an essential chisel to have. Hollowing tools are specifically designed to reach deep inside a workpiece and remove material to create the desired interior shape. These tools are characterized by their long handles and narrow profiles, allowing woodturners to access confined spaces and work with precision.
Hollowing tools come in various designs, such as straight, bent, or hook-ended. Each design has its advantages and is suitable for different types of hollow forms. The choice of hollowing tool largely depends on personal preference and the specific project at hand.
To use a hollowing tool, position the tool rest close to the workpiece, ensuring it is at the same height as the centerline of the spinning wood. Engage the tool by gently bringing the cutting edge in contact with the wood, allowing the bevel to guide the cut. Slowly move the tool along the interior of the workpiece, adjusting the angle and direction as needed to shape the hollow form. Take care to remove small amounts of material at a time to maintain control and prevent any accidents.
Types of Hollowing Tools:
Straight hollowing tools have a linear profile, allowing for straightforward cutting and shaping in long, narrow hollow forms. These tools are versatile and suitable for a wide range of hollowing projects.
Bent hollowing tools have a curved shaft that provides better control and access to tight spaces. The curved design allows the tool to reach deeper and make cuts in channels that are not easily accessible with straight tools.
Hook-ended hollowing tools have a hooked or angled tip that allows woodturners to cut and shape the interior of a hollow form without having to rotate the tool handle. This design eliminates the need to twist the wrist and provides more freedom in manipulating the cutting edge.
Having a selection of hollowing tools in your toolkit will ensure that you have the right tool for hollowing various types of forms and achieving the desired interior shapes. Experiment with different designs to find the ones that suit your preferences and the specific hollowing projects you undertake.
Additional Considerations for Woodturning Chisels
Choosing the Right Size and Material
When selecting woodturning chisels, consider the size and material of the chisel. The size of the chisel should be appropriate for the scale of your projects. Smaller chisels are suitable for intricate detailing, while larger chisels are better for bulk material removal and shaping.
The material of the chisel’s blade also plays a role in its performance. High-speed steel (HSS) blades are popular among woodturners due to their longevity and ability to hold an edge. They are suitable for most woodturning applications and provide excellent cutting performance. Alternatively, some woodturners prefer carbon steel blades for their sharpness and ease of sharpening.
Maintaining and Sharpening Chisels
Proper maintenance and sharpening of your woodturning chisels are crucial for achieving clean and precise cuts. Regularly inspect the cutting edges of your chisels for any signs of dullness or damage. Sharpening the chisels using the appropriate tools, such as sharpening stones or jigs, will ensure that they perform optimally.
It’s also essential to keep your chisels clean and free from any residue that may affect their performance. After each use, wipe down the chisel with a clean cloth and remove any debris or wood shavings. Apply a thin coat of protective oil to prevent rusting.
Safety Precautions
Woodturning involves using sharp tools and working with a spinning piece of wood. It’s crucial to prioritize safety and take certain precautions to prevent accidents and injuries.
Always wear appropriate personal protective equipment (PPE), including safety goggles or a face shield, ear protection, and a dust mask. Ensure that the lathe is properly set up and adjusted, with the tool rest and tailstock in the correct positions. Always turn the lathe off before making any adjustments or changing chisels.
Maintain a firm grip on the chisel and use controlled movements when cutting or shaping the wood. Avoid overextending your reach or standing directly in line with the spinning wood. And finally, always use the appropriate chisel for the specific task at hand. Using the wrong tool can lead to accidents and damage to the wood or the chisel itself.
By following these safety precautions and utilizing the right chisels for your woodturning projects, you will be able to navigate the art of woodturning with confidence and achieve beautiful, intricately crafted pieces.
Wrap-Up:
Choosing the right chisels for woodturning is essential to ensure the success and quality of your projects. The roughing gouge, spindle gouge, skew chisel, parting tool, bowl gouge, scraper, and hollowing tool are the main chisels you need to cover a wide range of woodturning techniques and designs.
Remember to carefully consider the size and material of the chisels, and always maintain and sharpen them for optimal performance. Prioritize safety by wearing appropriate protective gear and adopting safe working practices.
By having the right chisels and mastering their techniques, you can unlock a world of creativity and possibilities in your woodturning journey. Enjoy the process, experiment with different chisels, and continue honing your skills as you create stunning turned pieces of art.
Key Takeaways: What Chisels Do I Need for Woodturning?
- Woodturning requires different types of chisels for various tasks.
- Start with a bowl gouge, spindle gouge, and skew chisel for basic woodturning projects.
- A parting tool is essential for creating separation between different sections of your woodturning project.
- A scraper chisel is useful for smoothing and refining the surface of your woodturning piece.
- Consider adding specialty chisels like a hollowing tool or a detail gouge once you gain more experience.
Frequently Asked Questions
Are you new to woodturning and wondering what chisels you need for this craft? Look no further! We have compiled some common questions and answers to help you understand the types of chisels required for woodturning.
1. What are the essential chisels needed for woodturning?
For beginners, three essential chisels are recommended: a spindle roughing gouge, a skew chisel, and a spindle gouge. The spindle roughing gouge is used to shape wood, the skew chisel is great for smoothing and creating clean finishes, and the spindle gouge is perfect for making details and cuts on a spindle.
Addititionally, as you progress, you may also want to consider getting a parting tool, a bowl gouge, and a scraper. These additional chisels will allow you to explore more advanced techniques and tackle a wider variety of projects.
2. What factors should I consider when choosing woodturning chisels?
When selecting chisels for woodturning, three key factors to consider are the type of wood you’ll be working with, the desired outcome of your projects, and your experience level. Different woods require different chisels, as softer woods may require smaller tools while harder woods may need larger and more robust ones.
Additionally, consider the projects you plan to work on. If you’re interested in creating spindle-based pieces, you’ll need chisels specifically designed for that purpose. On the other hand, if you are more interested in creating bowls or hollow forms, you’ll require chisels with different profiles and cutting edges.
3. Should I invest in high-quality chisels or are budget options sufficient for beginners?
Investing in high-quality chisels is recommended, even for beginners. While budget options may seem attractive, they tend to have inferior steel quality, which can result in frequent sharpening and a shorter lifespan. High-quality chisels not only retain their sharpness for longer but also provide better control and precision, resulting in a more enjoyable woodturning experience.
Consider purchasing a set of mid-range to high-quality chisels to start with, as they strike the best balance between performance and cost. As you progress and gain more experience, you can gradually add more specialized and higher-end chisels to your collection.
4. How do I properly maintain and sharpen woodturning chisels?
To maintain your woodturning chisels, you should regularly sharpen them using either a sharpening stone or a sharpening system specifically designed for lathe tools. Follow the manufacturer’s instructions or seek guidance from experienced woodturners on the correct sharpening angles for different chisels.
It’s also important to keep your chisels clean and free from resin buildup, which can affect their performance. After each use, wipe them clean and inspect for any damage or dullness. Proper care and maintenance will extend the lifespan of your chisels and ensure optimal performance.
5. Can I use regular woodworking chisels for woodturning?
While regular woodworking chisels may share some similarities with woodturning chisels, it’s generally not recommended to use them interchangeably. Woodturning chisels are specifically designed for the unique demands of turning wood on a lathe, with different bevel angles, profiles, and handles to provide better control and precision.
Using regular woodworking chisels for woodturning may not only impact the quality of your work but can also pose safety risks due to their different designs. Invest in purpose-made woodturning chisels to ensure a smoother, safer, and more enjoyable woodturning experience.
Summary
If you want to start woodturning, having the right chisels is important. There are three main types of chisels you’ll need: spindle gouges, bowl gouges, and parting tools. Spindle gouges are great for detail work and shaping the wood, while bowl gouges are designed for hollowing out bowls and creating curves. Parting tools, on the other hand, are used for cutting and separating the wood.
When choosing chisels, consider their sizes and the materials they’re made of. Small chisels are good for delicate work, while larger ones are better for bigger projects. High-speed steel chisels are durable and great for beginners, while carbon steel chisels require more maintenance. Remember to keep your chisels sharp and always prioritize safety when woodturning. Now you’re all set to start your woodturning adventures!