
Have you ever wondered what you need to sharpen a chisel? Well, look no further! In this guide, we’ll explore the essential tools and steps to keep your chisel in top-notch condition. Whether you’re a woodworking enthusiast or just starting out, this information will help you maintain a sharp and effective chisel for all your projects.
First things first, let’s talk about the must-have tools for chisel sharpening. You’ll need a sharpening stone or a whetstone, which is a block of abrasive material used to sharpen the blade. Additionally, a honing guide can be handy to maintain the correct angle while sharpening. Don’t forget some lubricant, such as honing oil or water, to prevent overheating and ensure smoother sharpening.
Now, let’s dive into the process itself. Start by securing your chisel in the honing guide, setting the desired sharpening angle, and lubricating your sharpening stone. With gentle but firm pressure, glide the chisel back and forth across the stone, maintaining the angle and evenly sharpening the blade. Repeat this process on both sides of the chisel until you achieve a sharp edge.
With these basic tools and steps, you’ll be well-equipped to sharpen your chisel and achieve precise and clean cuts in your woodworking projects. So, let’s get sharpening and unleash your creativity in the world of woodworking!
– Bench grinder or sharpening stone for removing material
– Honing guide to maintain the correct angle
– Combination square to measure the angle
– Leather strop or honing compound for a polished edge
– Safety goggles and gloves for protection
By following these steps and using the right tools, you can ensure your chisel is sharp and ready for woodworking projects. Happy sharpening!
What Do I Need to Sharpen a Chisel?
Sharpening a chisel is an essential skill for any woodworker or DIY enthusiast. Having a sharp chisel allows for clean and precise cuts, making your work easier and more efficient. However, to achieve a sharp edge on your chisel, you need the right tools and techniques. In this article, we will outline the essential items you need to sharpen a chisel and provide step-by-step instructions on how to sharpen it effectively.
The Essential Tools for Sharpening a Chisel
Before you begin sharpening your chisel, it’s important to gather all the necessary tools. Here are the essential items you’ll need:
1. Bench Grinder or Honing Guide
A bench grinder or honing guide is used for the initial shaping and grinding of the chisel blade. A bench grinder is a power tool that spins a grinding wheel, while a honing guide allows for more precise control by guiding the chisel against a sharpening stone. Choose the tool that best suits your preference and level of experience.
2. Sharpening Stones
Sharpening stones are essential for achieving a sharp edge on your chisel. There are various types of sharpening stones available, including oil stones, water stones, and diamond stones. Oil stones require oil as a lubricant, while water stones need water to keep them clean and prevent clogging. Diamond stones are known for their durability and long-lasting performance. Whichever type you choose, it’s essential to have at least two grits of stones, typically a coarse grit (around 250-400) and a fine grit (around 1000-1200).
3. Honing Guide
A honing guide is a tool used to hold the chisel at a consistent angle while honing. It ensures that you maintain the correct bevel angle when sharpening. Look for a honing guide that is compatible with the width of your chisel and offers a wide range of angle adjustments.
4. Diamond Plate or Flattening Stone
A diamond plate or flattening stone is essential for keeping your sharpening stones flat and even. Over time, sharpening stones can develop uneven surfaces, affecting the accuracy of your sharpening. Use a diamond plate or flattening stone to remove any high spots and maintain a flat surface on your sharpening stones.
5. Leather Strop
A leather strop is used for the final polishing and honing of your chisel. It helps remove any remaining burrs and refines the edge for a razor-sharp finish. Apply a polishing compound or honing paste to the leather strop to enhance its effectiveness.
6. Safety Gear
When sharpening a chisel, it’s important to prioritize safety. Wear safety goggles or glasses to protect your eyes from flying debris. In addition, consider wearing gloves to protect your hands and a mask to avoid inhaling any potentially harmful dust particles.
Now that you have gathered all the necessary tools, let’s dive into the step-by-step process of sharpening a chisel.
Step-by-Step Guide: How to Sharpen a Chisel
Step 1: Prepare Your Workspace
Before you start sharpening, prepare your workspace by clearing any clutter and ensuring a stable work surface. Place a non-slip mat or a damp cloth under your sharpening stones to prevent them from sliding during the process.
Step 2: Shape the Bevel with a Bench Grinder or Honing Guide
If using a bench grinder, start by adjusting the tool rest to the desired bevel angle, typically between 25 to 30 degrees. Slowly grind the chisel against the spinning wheel, ensuring even pressure and consistent contact. Avoid applying excessive pressure, as it may overheat the blade and damage the temper. Continuously cool the chisel by dipping it in water or using a coolant to prevent overheating.
If using a honing guide, attach the chisel to the guide and adjust the angle to match your desired bevel. With the chisel securely held in the guide, move it back and forth across the sharpening stone, applying even pressure. Maintain a steady angle throughout the sharpening process.
Step 3: Sharpen the Cutting Edge
In this step, you’ll refine the cutting edge of the chisel using progressively finer grits of sharpening stones.
1. Begin with a coarse grit stone. Wet the stone if using a water stone or apply oil if using an oil stone. Place the chisel in the honing guide and hold it firmly. With consistent pressure and a back-and-forth motion, sharpen the chisel against the stone, applying even pressure along the entire edge. Repeat this process several times, always checking the progress and ensuring an even bevel.
2. Move on to a finer grit stone. Repeat the sharpening process as described above, but this time with a finer grit stone. The finer grit will further refine the edge, removing any scratches or roughness left by the coarse stone. As you progress to finer grits, it is essential to remove the burr on the opposite side created during sharpening. You can do this by gently rubbing the back of the chisel on a stone held flat on the work surface.
3. Continue the sharpening process with progressively finer grit stones until you achieve the desired sharpness. Remember to always maintain the correct bevel angle and apply even pressure throughout the process. Each time you switch to a finer grit stone, remove the burr on the opposite side.
4. After achieving the desired sharpness, move on to the leather strop. Apply a polishing compound or honing paste to the leather strop and firmly hold the chisel at the correct bevel angle. Strop the chisel back and forth on the leather, using light pressure. This step will remove any remaining burrs and refine the edge to a razor-sharp finish.
5. Test the sharpness by making a few test cuts on a scrap piece of wood. If the chisel easily cuts through the wood with clean shavings, congratulations, you have successfully sharpened your chisel!
Caring for Your Sharpened Chisel
Now that you have sharpened your chisel, it’s important to maintain its sharpness and prolong its lifespan. Here are some tips for caring for your sharpened chisel:
1. Clean the Chisel After Use
After using your chisel, it’s crucial to clean off any dust and debris. Use a brush or a cloth to remove any residues from the blade. Cleaning the chisel regularly will prevent the buildup of materials that can interfere with its sharpness.
2. Store the Chisel Properly
When not in use, store your chisel in a proper storage case or a chisel roll. This will protect the blade from potential damage and prevent accidents.
3. Avoid Excessive Force
When working with a chisel, avoid applying excessive force, as it can chip or damage the blade. Let the sharpness of the chisel do the work, and use controlled, precise movements.
4. Regularly Hone the Chisel
To maintain the sharpness of your chisel, regularly hone the cutting edge. Honing is a quick and easy process that helps refresh the sharpness without going through the entire sharpening process.
5. Sharpen as Needed
Pay attention to the performance of your chisel. If you notice that it’s becoming dull or the quality of your cuts is diminishing, it may be time for a sharpening session. Regularly assess the sharpness of your chisel and sharpen as needed to ensure optimal performance.
By following these guidelines and investing the time to sharpen your chisel properly, you’ll enjoy cleaner, more precise cuts and a more satisfying woodworking experience. Sharpening a chisel is a skill that once mastered, will greatly enhance your woodworking projects and allow you to achieve professional-level results.
## Key Takeaways: What do I need to sharpen a chisel?
Key Takeaways:
- To sharpen a chisel, you will need a sharpening stone or honing guide.
- A honing guide helps to maintain the correct angle during sharpening.
- You can also use sandpaper or diamond stones for sharpening.
- Sharpening oil or water is often used as a lubricant for the sharpening process.
- Don’t forget safety equipment like gloves and eye protection when sharpening a chisel.
Frequently Asked Questions
Curious about how to sharpen a chisel? Check out these commonly asked questions and find the answers you need.
Why is it important to sharpen a chisel?
Sharpening a chisel is essential for maintaining its functionality and prolonging its lifespan. A sharp chisel allows you to make precise cuts, reducing the risk of accidents and producing cleaner results. When a chisel is dull, it can be more challenging to control, increasing the chances of slips and mistakes. Regular sharpening ensures that your chisel performs optimally and makes your woodworking tasks more efficient.
What equipment do I need to sharpen a chisel?
To sharpen a chisel, you’ll need a few essential tools, including a sharpening stone or honing guide, a bench grinder (optional), a file, and a strop. The sharpening stone or honing guide is the main tool used to sharpen the cutting edge of the chisel. A bench grinder can be useful for initial edge repair, but it’s not mandatory. The file is used to remove any nicks or damage on the edge, and the strop is used for the final honing and polishing.
Additionally, you may need a guide or jig to maintain the correct angle while sharpening, especially if you’re new to sharpening chisels. These tools are readily available at hardware stores or online, making it easy to gather everything you need to sharpen your chisels effectively.
How often should I sharpen my chisels?
The frequency of sharpening depends on how frequently you use your chisels and the type of work you do. As a general guideline, it’s recommended to sharpen chisels every few weeks if you use them regularly. However, if you notice a significant decrease in performance, such as the chisel becoming difficult to control or producing rough cuts, it’s a clear indication that it’s time to sharpen them. Ultimately, it’s better to sharpen your chisels when necessary rather than waiting for them to become excessively dull.
Remember, it’s essential to clean and protect your chisels after each use to prevent premature dulling. Keeping them in a clean, dry place and protecting the cutting edge with a blade guard or cover will help maintain their sharpness for longer periods.
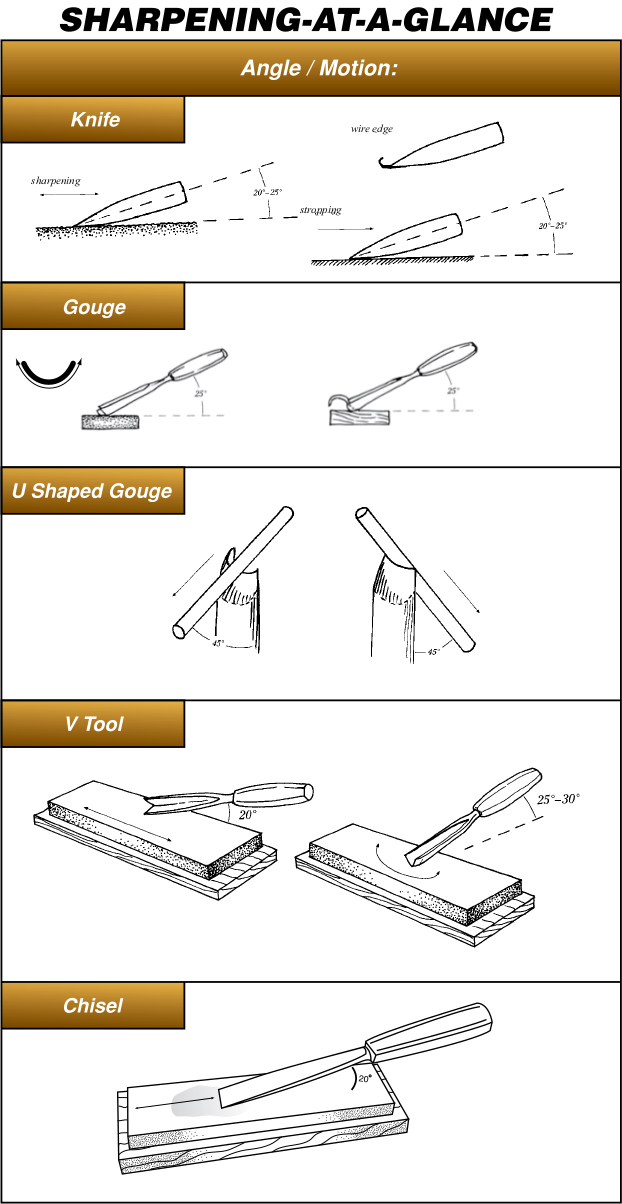
What is the correct angle for sharpening a chisel?
The correct sharpening angle for a chisel may vary depending on personal preference and the specific use of the chisel. However, a common angle range for chisels is between 25 and 30 degrees. For woodworking tasks that require more precision, a narrower angle (around 25 degrees) is recommended. On the other hand, a slightly wider angle (around 30 degrees) can provide more durability for heavy-duty tasks. It’s important to maintain a consistent angle throughout the sharpening process to ensure even and efficient sharpening.
Some chisels may come with a factory-ground angle, which can be used as a reference. However, it’s always a good idea to double-check and make adjustments based on personal preference and the desired outcome of your woodworking projects.
Are there any safety precautions to consider when sharpening a chisel?
Yes, safety should be a top priority when sharpening a chisel. Here are a few precautions to keep in mind:
First, ensure that the area where you’re sharpening is clean and well-lit, reducing the chances of accidents. Always wear safety goggles to protect your eyes from debris. When using a bench grinder, be cautious of the heat generated and avoid over-sharpening or over-heating the chisel. Use both hands to securely grip the chisel and maintain control throughout the sharpening process. Lastly, be mindful of the sharpness of the chisel’s edge and handle it with care, avoiding any accidental cuts.
Following these safety precautions will help ensure a safe and effective sharpening experience for your chisels.

Summary
To sharpen a chisel, you’ll need a few key tools: a sharpening stone, honing guide, and lubricant.
First, place the chisel securely in the honing guide and adjust the angle. Then, lubricate the stone and start sharpening by sliding the chisel smoothly across the surface. Repeat this process on both sides until the edge is sharp. Remember to clean and oil the chisel after sharpening.