If you’ve ever wondered “what do the numbers mean on Milwaukee tools?” You’re in the right place! Milwaukee tools are known for their exceptional quality and performance, but understanding the numbers on these tools can sometimes be a bit confusing. Don’t worry, though – I’m here to shed some light on this topic and make it easy for you to decipher the meanings behind those numbers.
When it comes to Milwaukee tools, the numbers typically refer to the different specifications and features of the tool. These numbers can indicate things like the voltage of a cordless tool, the maximum torque it can deliver, or even the type of tool it is. By understanding what these numbers mean, you’ll be able to make informed decisions when choosing the right Milwaukee tool for your needs.
So, whether you’re a DIY enthusiast or a professional tradesperson, join me as we dive into the world of Milwaukee tools and unravel the mysteries behind those numbers. Together, we’ll demystify the meanings behind the numbers on Milwaukee tools and equip you with the knowledge you need to make the most out of your tools. Let’s get started!

Understanding the Numbers on Milwaukee Tools: A Comprehensive Guide
Milwaukee Tools is a renowned brand in the power tool industry, known for its high-quality and innovative products. If you’ve ever come across a Milwaukee tool, you may have noticed a series of numbers imprinted on them. These numbers hold significant information about the tool, such as its specifications, functionality, and more. In this article, we will delve into what these numbers mean on Milwaukee tools and how they can help you make informed decisions when purchasing or using their products.
The Model Number: Decoding the Basics
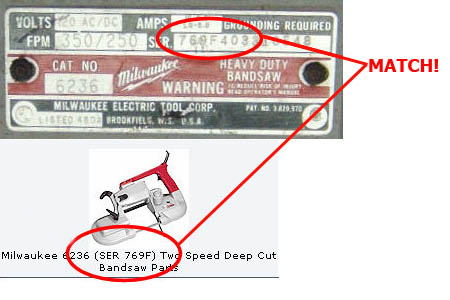
Every Milwaukee tool has a unique model number, typically consisting of a series of alphanumeric characters. The model number provides essential information about the tool, including its category, type, and variations. Let’s break it down:
1. Category: The first portion of the model number represents the tool’s category. For example, “M” stands for M12, Milwaukee’s line of 12-volt tools, while “M18” represents their 18-volt line.
2. Type: The following characters denote the specific type of tool. It could indicate whether it’s a drill, impact driver, saw, or any other power tool. For instance, “FUEL” highlights the tool’s brushless motor technology.
3. Variation: The last part of the model number differentiates between different variations or kits of the tool. This usually includes numbers or letters that identify the accessories, batteries, and other included components.
Voltage and Ampere Hours: Power and Runtime
One of the key aspects of Milwaukee tools is their voltage and ampere hours (Ah) rating. Let’s understand what these numbers indicate:
1. Voltage: Milwaukee tools are available in various voltage options, such as 12V, 18V, and 20V. The voltage rating represents the power output of the tool. Generally, higher voltage tools provide more power, making them suitable for heavy-duty tasks.
2. Ampere Hours: Ampere hours (Ah) refers to the amount of charge a battery can hold over time. A higher Ah rating signifies a longer runtime before the battery needs recharging. It is crucial to consider the Ah rating when choosing a Milwaukee tool, as it determines the tool’s usability and how long you can work continuously without interruption.
The voltage and Ah rating of a Milwaukee tool are critical when selecting a tool based on your specific needs and the requirements of the task at hand.
Max Torque and RPM: Performance Metrics
Milwaukee tools are known for their exceptional performance, and two key metrics that reflect this are maximum torque and revolutions per minute (RPM).
1. Max Torque: The max torque specification represents the tool’s rotational force or twisting power. It is typically measured in inch-pounds (in-lbs) or foot-pounds (ft-lbs). A higher max torque rating indicates that the tool can handle more demanding tasks and work with tougher materials.
2. RPM: The RPM rating signifies the tool’s rotational speed, generally measured in revolutions per minute. Higher RPMs indicate faster operation and are useful for tasks that require quick cutting or drilling.
Understanding the max torque and RPM ratings of a Milwaukee tool is crucial for selecting the right tool for your specific applications, ensuring optimal performance and efficiency.
Accessory Compatibility: Expand Your Tool’s Versatility
Milwaukee tools are designed with versatility in mind, and their compatibility with various accessories adds to their functionality. Understanding what the numbers mean in terms of accessory compatibility can help you make the most of your Milwaukee tools:
1. Shank Size: Tools like drills and impact drivers often have a shank size specification, indicating the diameter of the tool’s chuck or collet. This number is crucial when selecting accessories like drill bits or screwdriver bits, ensuring they fit properly in the tool.
2. Blade Length: For tools like reciprocating saws or jigsaws, you may come across numbers indicating the blade length. This measurement helps you choose the right length for your specific cutting requirements.
By understanding the compatibility specifications of Milwaukee tools, you can explore a wide range of accessories and enhance the versatility and functionality of your tools.
Battery Levels and LED Indicators: Power Management Made Easy
Milwaukee tools often come equipped with battery level indicators, typically in the form of LED lights. These indicators are designed to provide a quick and convenient way to monitor the remaining battery charge. Here’s what the LED indicators on Milwaukee tools signify:
1. Green Light: A solid green light usually indicates a fully charged or near-full battery. This means you can rely on your tool for uninterrupted usage.
2. Yellow Light: A steady or flashing yellow light suggests that the battery is partially charged. While you can still use the tool, it is advisable to keep an eye on the battery level and consider recharging soon.
3. Red Light: A solid or flashing red light indicates a low battery level. It is recommended to recharge the battery before further use or have a spare battery on hand to avoid interruptions during your tasks.
The LED battery level indicators on Milwaukee tools provide a convenient way to keep track of the tool’s power and ensure efficient power management.
Warranty: Protecting Your Investment
Milwaukee Tools are renowned for their durability, but it’s always reassuring to know that your investment is protected. The numbers on Milwaukee tools can often provide valuable information regarding warranty coverage:
1. Warranty Duration: Some Milwaukee tools have numbers indicating the duration of the warranty. This suggests the period during which you can avail of repair or replacement services for your tool if it encounters any manufacturing defects or faults.
2. Coverage Details: The numbers may also provide additional information about the specific components or parts covered under the warranty. It’s essential to thoroughly understand the warranty documentation provided by Milwaukee to ensure you know what is included and what isn’t.
Understanding the warranty details related to Milwaukee tools ensures that you have the necessary information to take advantage of the warranty if needed and safeguard your investment for the long term.
Choosing the Right Milwaukee Tool
Now that we’ve explored the meaning behind the numbers on Milwaukee tools, let’s take a step further and understand what factors to consider to choose the right tool for your specific needs:
1. Determine Your Usage:
Consider the tasks you generally perform and the type of tooling required. Assess whether you need a drill, impact driver, circular saw, or any other specific Milwaukee tool to cater to your needs.
2. Power Requirements:
Determine the power output you require based on the intensity of the tasks you’ll be performing. If you primarily handle heavy-duty applications, tools with higher voltage ratings and torque capabilities would be more suitable.
3. Battery Life:
Assess how long you typically work on your projects and select a tool with an appropriate Ah rating. A higher Ah rating will provide longer runtimes, reducing the need for frequent battery swaps or recharging.
4. Comfort and Ergonomics:
Consider the design and ergonomics of the tool. Look for features like rubberized grips, balanced weight distribution, and easy access to controls for enhanced comfort and reduced fatigue during prolonged use.
5. Budget:
Set a budget range and consider the options available within that range. Compare features, performance, and value for money before making a final decision.
6. Reputable Retailers:
Always purchase Milwaukee tools from authorized and reputable retailers to ensure authenticity and reliable after-sales support. This will also provide peace of mind regarding warranty coverage and genuine accessories.
7. Customer Reviews:
Research customer reviews and feedback about specific Milwaukee tools you’re interested in. It can provide valuable insights into real-world experiences and help you make an informed decision.
Choosing the right Milwaukee tool involves considering your specific needs, understanding the tool’s specifications, and making an informed decision based on performance, durability, and value for money. By understanding the numbers on Milwaukee tools, you can unlock their full potential and make the most of your investment.
Key Takeaways: What Do the Numbers Mean on Milwaukee Tools?
- The numbers on Milwaukee tools indicate the tool’s voltage or power output.
- Higher voltage numbers generally mean more power and performance.
- Lower voltage numbers are typically found on lighter-duty tools.
- Most Milwaukee tools have numbers ranging from 12V to 18V, with 18V being the most powerful.
- It’s important to choose a Milwaukee tool with a voltage that suits your specific needs.
Frequently Asked Questions
Here are some commonly asked questions about the numbers on Milwaukee tools.
1. How do I interpret the numbers on Milwaukee tools?
The numbers on Milwaukee tools typically refer to the tool’s model number or part number. They can provide information about the tool’s specifications, such as voltage, amperage, or size. For example, a number like “18V” indicates that the tool operates on an 18-volt battery. However, it’s important to note that the meaning of the numbers can vary depending on the specific tool and its purpose. To get a more comprehensive understanding of what the numbers mean on a particular Milwaukee tool, it’s best to consult the user manual or reach out to the manufacturer.
Overall, the numbers on Milwaukee tools serve as a code to convey important information about the tool’s capabilities and compatibility. By understanding and interpreting these numbers correctly, users can make informed decisions about which tool is suitable for their needs and requirements.
2. What do the numbers in the model name of a Milwaukee tool signify?
The numbers in the model name of a Milwaukee tool generally indicate the tool’s size, power, or other distinguishing features. For example, a model name like “M18 FUEL” denotes that it belongs to Milwaukee’s M18 line of tools, which is known for its 18-volt battery system and high-performance capabilities. The “FUEL” designation signifies that the tool utilizes Milwaukee’s advanced brushless motor technology. These numbers and designations are crucial for users to identify and differentiate between various Milwaukee tool models, ensuring they select the right tool for their specific tasks.
By paying attention to the numbers in the model name, users can determine which tools offer the features they need and better understand the capabilities and applications of each Milwaukee tool in order to make an informed purchasing decision.
3. Are the numbers on Milwaukee tools standardized across all products?
The numbers on Milwaukee tools are not standardized across all products. While there are some general conventions in place, such as using voltage ratings for battery-powered tools and part numbers to identify specific components, the meaning of the numbers can vary depending on the tool series or type. Milwaukee offers a wide range of tools for different applications, and each tool may have its own numbering system based on its specific features and specifications.
It’s crucial to refer to the user manual or product documentation provided by Milwaukee for a particular tool to understand the significance of the numbers used. This ensures accurate interpretation and utilization of the tool’s capabilities based on the specific numbers associated with that tool.
4. How can I find more detailed information about a specific Milwaukee tool’s numbers?
To find more detailed information about a specific Milwaukee tool’s numbers, you can refer to the product documentation or user manual that comes with the tool. These resources typically provide in-depth explanations of the meaning behind each number used and the corresponding specifications. Additionally, you can visit Milwaukee’s official website or contact their customer support for further assistance.
By gathering comprehensive information about the numbers on a Milwaukee tool, you can ensure that you use the tool correctly, optimize its performance, and make informed decisions when it comes to purchasing additional accessories or compatible tools.
5. Can the numbers on Milwaukee tools change from one model to another?
Yes, the numbers on Milwaukee tools can change from one model to another. Milwaukee continuously innovates and updates its tool lineup to meet evolving industry standards and customer demands. As new technologies and features are introduced, the numbering system for Milwaukee tools can change to reflect these advancements.
It’s important for users to stay updated with the latest information from Milwaukee regarding the numbers used on their tools. This can be achieved through regularly checking their website, subscribing to their newsletters, or connecting with them on social media platforms. By staying informed about the changes in tool numbering, users can make choices that align with the most current options available in Milwaukee’s tool catalog.
Summary
Understanding the numbers on Milwaukee tools can help you choose the right tool for your needs. The first number represents the voltage, indicating the power of the tool. Higher voltage means more power. The second number shows the capacity of the battery, with higher numbers meaning longer run time. The third number represents the tool’s performance, with higher numbers indicating better performance. It’s important to consider these numbers when selecting a Milwaukee tool to ensure it suits your requirements.
When it comes to Milwaukee battery packs, the numbers indicate the amp-hour rating. Higher numbers mean longer battery life. It’s crucial to match the battery pack to the tool’s voltage to ensure compatibility. Additionally, Milwaukee tools also have a color-coded system that categorizes their performance levels. Red is for everyday use, while black is for high-performance tools. By understanding these numbers and the color coding, you can make informed decisions and choose the right Milwaukee tool for your projects.