
Have you ever wondered how to raise and lower the blade on a table saw? Well, you’ve come to the right place! In this article, we’ll explore the essential tool used for this purpose and discuss how it works. So, get ready to dive into the world of table saws and discover the key to adjusting the blade height with ease!
When it comes to woodworking, a table saw is a must-have tool for cutting various materials. And one of the crucial features of a table saw is its ability to raise and lower the blade. But what exactly do you use to accomplish this task? Let’s find out!
To raise and lower the blade on a table saw, you’ll typically use a tool called a “crank handle.” This handy accessory is attached to the saw’s arbor and allows you to adjust the blade’s height effortlessly. Whether you need to make precise cuts or tackle different thicknesses of materials, the crank handle is your go-to tool. So, let’s explore how it works and how you can use it effectively!
Now that you know how essential the crank handle is for adjusting the blade height on a table saw, let’s delve deeper into its functionality and learn some tips and tricks. Get ready to elevate your woodworking skills and make your table saw work like a charm! So, let’s get started in the next section!
Everything You Need to Know About Raising and Lowering the Blade on a Table Saw
When it comes to using a table saw, one of the most fundamental functions is the ability to raise and lower the blade. This simple yet essential action allows you to adjust the cutting depth according to your specific project requirements. In this article, we will explore the various methods and tools used for raising and lowering the blade on a table saw, as well as provide tips and insights to ensure a safe and accurate cutting experience.
Methods for Raising and Lowering the Blade
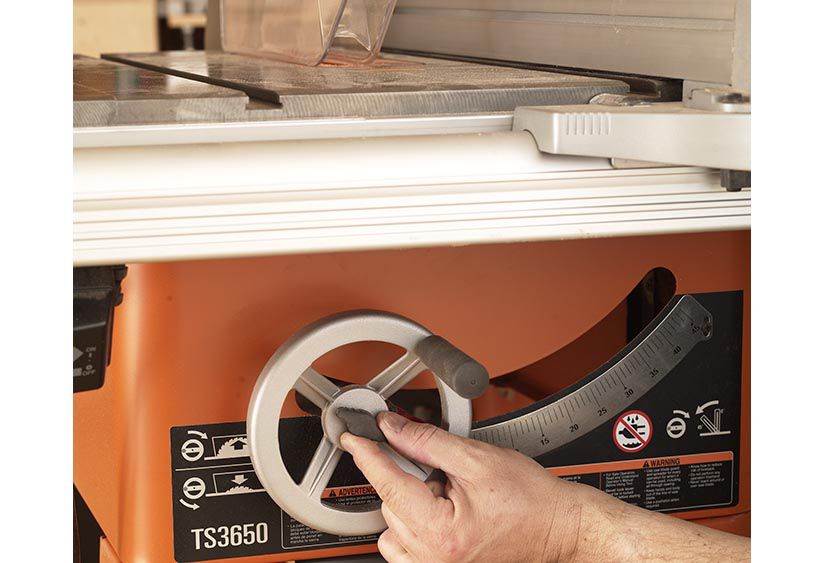
1. Handwheel or Crank
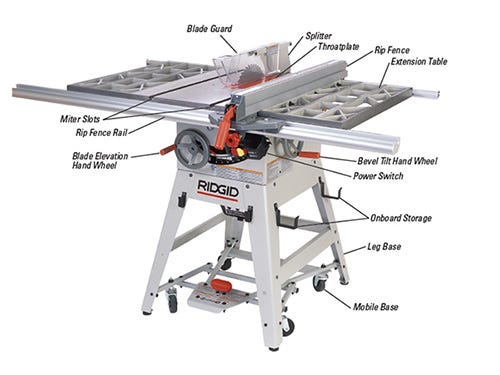
The most common method of adjusting the blade height on a table saw is by using a handwheel or crank located on the front or side of the saw. This wheel is connected to a threaded rod, which in turn raises or lowers the blade. By turning the handwheel clockwise, the blade moves up, increasing the cutting depth. Conversely, turning it counterclockwise lowers the blade, reducing the cutting depth. This method is typically smooth and precise, allowing for accurate adjustments.
To ensure safe operation, it is essential to keep your hands and fingers away from the spinning blade while using the handwheel or crank. Always wait for the blade to come to a complete stop before making any adjustments, and use a blade height gauge to ensure the desired depth is achieved.
2. Rack and Pinion System
Some table saws feature a rack and pinion system for raising and lowering the blade. This mechanism utilizes a gear system, where the pinion gear moves along a rack attached to the saw’s trunnions. By turning a handle or knob, the pinion gear engages with the rack, enabling smooth vertical movement of the blade. The rack and pinion system provides excellent precision and stability, making it a popular choice among woodworkers who require utmost accuracy in their cuts.
When using a table saw with a rack and pinion system, it is crucial to ensure the gears are properly lubricated and free from debris. Regular maintenance and cleaning will help maintain the smooth operation of the mechanism and prolong its lifespan.
3. Hydraulic Lift System
Hydraulic lift systems are commonly found in professional-grade table saws. These systems use hydraulic cylinders to control the movement of the blade. By activating a hydraulic pump, the fluid pressure is increased or decreased, thus raising or lowering the blade accordingly. Hydraulic lift systems are known for their effortless operation and precise control, making them ideal for heavy-duty cutting tasks and large-scale woodworking operations.
It is important to note that hydraulic lift systems require periodic maintenance and inspection to ensure proper functionality. Any signs of leaks, loss of pressure, or irregular movements should be addressed promptly to avoid any safety hazards and ensure accurate cutting.
Additional Considerations for Blade Adjustments
While the methods mentioned above cover the primary ways to raise and lower the blade on a table saw, there are a few additional factors to consider for optimal performance:
1. Blade Changing and Maintenance
Before attempting to adjust the blade height, it is crucial to ensure the saw is turned off and the power cord is unplugged. This eliminates the risk of accidental starts or injuries during the adjustment process. Additionally, regularly inspect the blade for any signs of wear or damage. A dull or damaged blade can negatively impact cutting performance and safety, so be sure to replace it as needed.
2. Adhering to Safety Precautions
When making any blade adjustments, always follow the manufacturer’s instructions and safety guidelines. Wear appropriate personal protective equipment (PPE), such as safety glasses and gloves, to minimize the risk of injury. Keep your workspace clean and organized, and never force the blade height adjustment if it feels stuck or difficult to move.
3. Fine-Tuning the Blade Height
Once you have set the desired cutting depth, double-check the blade height with a depth gauge or measurement tool. This will ensure accuracy and consistency throughout your woodworking project. Fine-tuning the blade height may be necessary as you progress through different cutting operations or when switching between materials of varying thicknesses.
In Conclusion
Raising and lowering the blade on a table saw is a fundamental skill every woodworker should master. By understanding the different methods and tools available, as well as practicing proper safety protocols, you can confidently tackle a wide range of woodworking projects. Remember to choose the method that best suits your needs, and always prioritize safety and precision when working with a table saw.
Key Takeaways: What do you use to raise and lower the blade on the table saw?
- The table saw uses a mechanism called a blade height adjustment to raise and lower the blade.
- For most table saws, there is a crank or a wheel located on the front or side of the saw that you turn to adjust the blade height.
- Some table saws may have a lever instead of a crank, which you can push or pull to raise and lower the blade.
- Always make sure to turn off the table saw and unplug it before adjusting the blade height for safety reasons.
- Consult the user manual or manufacturer’s instructions for the specific table saw model you are using to ensure proper operation.
Frequently Asked Questions:
What tool do you use to raise and lower the blade on the table saw?
Answer:
To raise and lower the blade on a table saw, you use a device called the blade elevation wheel. It is typically located on the front or side of the table saw near the blade. The blade elevation wheel allows you to adjust the height of the blade, making it higher or lower depending on your needs. By turning the wheel clockwise, you can raise the blade, and by turning it counterclockwise, you can lower the blade. It’s important to make small, incremental adjustments to ensure accuracy and safety when using the table saw.
Always remember to follow the manufacturer’s instructions and safety guidelines when operating the table saw and adjusting the blade. It’s crucial to have a firm grip on the blade elevation wheel and never force it if it feels stuck. Regularly inspect the blade elevation mechanism to ensure it is in good working condition and make any necessary adjustments or repairs before using the table saw.
Is it possible to raise and lower the table saw blade manually without using a tool?
Answer:
No, it is not possible to manually raise or lower the blade on a table saw without using the designated tool. The table saw is engineered with a blade elevation system that requires a specific mechanism to control the blade’s height. Attempting to adjust the blade manually can be dangerous and may result in injury or damage to the equipment.
To ensure safe operation and accurate adjustments, always use the blade elevation wheel or handle provided by the manufacturer. This tool is designed to work in conjunction with the table saw’s mechanism, offering precise control over the blade height. It’s important to familiarize yourself with your specific table saw model’s instructions and use the proper tool for adjusting the blade accordingly.
Can you adjust the blade height while the table saw is running?
Answer:
No, you should never try to adjust the blade height on a table saw while the machine is running. It is vital to prioritize safety and only make blade height adjustments when the table saw is turned off and the blade has come to a complete stop. Trying to adjust the blade while it is spinning can be extremely dangerous and can lead to severe injuries.
Always exercise caution and follow the necessary safety measures when using a table saw. Before making any adjustments to the blade height, ensure the machine is completely powered down and unplugged. Wait for the blade to stop spinning and then proceed to adjust the height using the appropriate method recommended by the manufacturer.
Are there any safety features to prevent accidental adjustments of the blade height?
Answer:
Yes, table saws often come with safety features to prevent accidental adjustments of the blade height. One common safety feature is a locking mechanism or a lockout switch that needs to be engaged or disengaged before making any changes to the blade height. This ensures that the blade remains secure in its position while you work, minimizing the risk of unintentional adjustments.
The lockout switch or locking mechanism may be located near the blade elevation wheel or handle, and it usually needs to be released before you can make any adjustments. This additional step provides an extra layer of safety, preventing any accidental movements of the blade height during operation. Always refer to your table saw’s user manual to understand and utilize these safety features properly.
What precautions should be taken when adjusting the blade height on a table saw?
Answer:
When adjusting the blade height on a table saw, it’s essential to take certain precautions to ensure your safety and the proper functioning of the machine. First and foremost, always make sure the power is turned off and the machine is unplugged before attempting any blade height adjustments. This prevents any accidental start-ups or potential injuries.
Additionally, thoroughly read and understand the manufacturer’s instructions for your specific table saw model. Familiarize yourself with the proper technique for adjusting the blade height and follow any safety guidelines provided. Maintain a secure grip on the blade elevation wheel or handle, making small, incremental adjustments as needed. Finally, regularly inspect the blade elevation mechanism for any wear or damage, and address any issues promptly before using the table saw.
Summary
To raise and lower the blade on a table saw, you can use a couple of different methods. The most common way is by using the height adjustment wheel or handle located on the front of the saw. Turning the wheel clockwise will raise the blade, while turning it counterclockwise will lower it. Another option is using a crank handle that is attached to the saw’s trunnion assembly.
Remember to always consult the table saw’s manual for specific instructions on how to adjust the blade height. Safety is important, so make sure the saw is turned off and unplugged before making any adjustments. And don’t forget to wear safety glasses and follow proper procedures to avoid accidents.