
What do you use to tighten the chuck on a drill press? It’s a question that every DIY enthusiast and aspiring handyman has probably pondered at some point. Well, fear not, because I’m here to give you the scoop on this essential tool. Whether you’re a seasoned pro or just starting out with your DIY projects, learning how to secure the chuck on a drill press is crucial for getting the job done right. So, let’s dive in and explore the answer to this pressing question!
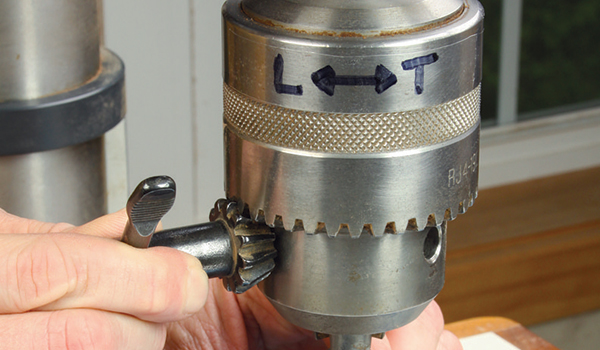
When it comes to tightening the chuck on a drill press, one handy tool that you’ll need is a chuck key. This nifty little gadget is specifically designed to lock the jaws of the chuck in place, ensuring a secure grip on your drill bit. It’s like a trusty sidekick for your drill press, always ready to help you tackle any drilling task with precision and ease. Just insert the chuck key into the holes on the chuck, give it a firm twist, and voila! Your chuck is tightened and ready to go.
Now, I know what you might be thinking – couldn’t I just use a regular wrench or pliers to tighten the chuck? Well, while those tools might work in a pinch, they can be a bit cumbersome and may not provide the same level of control and tightness as a chuck key. Plus, using the right tool for the job not only makes your life easier but also helps extend the lifespan of your drill press by preventing unnecessary wear and tear.
So, the next time you’re gearing up for a drilling project with your trusty drill press, make sure you have a chuck key on hand. It’s the ultimate tool for tightening the chuck and ensuring a secure grip on your drill bit. With the right gear in your arsenal, you’ll be ready to tackle any DIY project with confidence and precision. So, grab that chuck key and get ready to drill your way to success!
What Do You Use to Tighten the Chuck on a Drill Press?
If you’re using a drill press, you’ll know that it’s essential to have a secure and tight chuck. The chuck is the component that holds the drill bit in place and allows it to rotate. Without a properly tightened chuck, the drill bit may slip or wobble, leading to inaccurate drilling and potential safety hazards. In this article, we’ll explore the various tools and methods you can use to tighten the chuck on a drill press and ensure smooth and precise drilling operations.
The Chuck Key: Your Go-To Tool for Tightening the Chuck
The primary tool used to tighten the chuck on a drill press is the chuck key. The chuck key is a specialized wrench that is specifically designed to engage with the chuck’s teeth and securely tighten it. The chuck key typically has a T-shaped or L-shaped handle, with a corresponding head that fits into the chuck. To tighten the chuck using the chuck key, simply insert the head into the chuck, align the teeth with the corresponding openings, and turn the key clockwise to tighten the chuck.
It’s important to ensure that you have the correct chuck key for your drill press. Different drill presses may have different chuck sizes and designs, requiring specific chuck keys. Using the wrong chuck key can damage the chuck or lead to insecure tightening, compromising the stability of the drill bit.
In addition to the chuck key, some drill presses may have other mechanisms for tightening the chuck, such as a mechanical lever or a keyless chuck system. These mechanisms eliminate the need for a separate chuck key, providing convenience and ease of use. However, the principles of tightening the chuck remain the same – you’ll need to engage the mechanism or follow the manufacturer’s instructions to secure the chuck properly.
The Importance of Properly Tightening the Chuck
Tightening the chuck on a drill press is not just about convenience or ease of use – it’s a crucial safety measure. A loose or improperly tightened chuck can result in significant safety hazards. When the chuck is not securely tightened, the drill bit may slip or wobble during operation, compromising the accuracy and precision of your drilling. This can lead to damaged workpieces, project failure, and potential injuries.
Additionally, an insecure chuck can also cause excessive vibrations during drilling, leading to decreased drilling efficiency and performance. Vibrations can result in uneven holes, splintering of the material, and premature wear and tear on the drill bit. By properly tightening the chuck, you can minimize vibrations, ensure smooth drilling operations, and prolong the lifespan of your drill press and drill bits.
Always prioritize safety when using a drill press, and take the time to double-check the chuck’s tightness before every operation. It’s a small step that can make a big difference in the quality and safety of your drilling projects.
Additional Considerations for Chuck Tightening
While the chuck key is the primary tool for tightening the chuck, there are a few additional considerations to keep in mind:
1. Proper Technique:
When using the chuck key, make sure to grip the handle firmly and apply even pressure while turning. Avoid excessive force or over-tightening, as this can damage the chuck or the drill bit. Always follow the manufacturer’s recommendations for tightening torque.
2. Cleanliness and Maintenance:
Regularly clean the chuck and chuck key to remove any debris, dust, or grease that can interfere with the gripping and tightening action. Additionally, inspect the chuck jaws and key teeth for any signs of wear or damage. Replace any worn or damaged parts promptly to ensure optimal performance.
3. Keyless Chucks:
If your drill press has a keyless chuck system, follow the manufacturer’s instructions for tightening and releasing the chuck. Keyless chucks typically involve turning a central handle or using a mechanical lever to grip and secure the drill bit.
4. Chuck Replacement:
If you encounter difficulties in tightening the chuck or notice significant wear or damage, it may be time to replace the chuck. Consult your drill press manufacturer or a professional technician for guidance on proper chuck replacement and installation.
In Summary
Tightening the chuck on a drill press is a fundamental step in ensuring safe, accurate, and efficient drilling. By using the correct tools, following proper techniques, and prioritizing maintenance, you can maintain a secure chuck that allows for precise drilling operations. Remember to always prioritize safety and check the chuck’s tightness before each use. Whether you’re a DIY enthusiast or a professional woodworker, mastering the art of chuck tightening is essential for successful drilling projects.
Key Takeaways: What do you use to tighten the chuck on a drill press?
- Use a chuck key to tighten the chuck on a drill press.
- The chuck key is a small wrench-like tool that fits into the holes on the chuck.
- Insert the chuck key into the holes and turn it clockwise to tighten the chuck.
- Make sure to tighten the chuck securely to prevent the drill bit from slipping during drilling.
- Always remember to remove the chuck key before turning on the drill press to avoid accidents.
Frequently Asked Questions
Are you wondering how to tighten the chuck on a drill press? Here are some common questions related to this topic:
1. How do I tighten the chuck on a drill press?
To tighten the chuck on a drill press, you need to follow a simple process. First, make sure the drill press is turned off and unplugged for safety. Locate the chuck key, a small L-shaped tool that usually comes with the drill press. Insert the shorter end of the key into one of the holes on the side of the chuck. Use the longer end of the key as a handle to tighten the chuck by turning it clockwise. Keep turning until the chuck is securely tightened. Remember to remove the chuck key once you’re done.
It’s important to note that some drill presses have a keyless chuck, which means you don’t need a chuck key to tighten or loosen the chuck. Instead, you can simply twist the chuck by hand to secure or release the drill bit. If you have a keyless chuck, ensure it’s tightened firmly before use.
2. Can I use any type of key to tighten the chuck on a drill press?
No, you should always use the specific chuck key provided with your drill press. Each drill press is designed to work with a particular chuck key size and shape. Using the wrong key can damage the chuck or lead to slippage, posing a safety risk. If you’ve misplaced your chuck key, try to find a replacement that matches the original specifications. Bringing the drill press’s model number to a local hardware store can help you find the right chuck key for your machine.
If, for some reason, you cannot find a chuck key that matches your drill press, it’s advisable to contact the manufacturer or a professional technician for guidance. They can help you identify the best course of action for safely tightening the chuck without the original chuck key.
3. Why is it important to tighten the chuck securely on a drill press?
Tightening the chuck securely on a drill press is crucial for several reasons. Firstly, a loose chuck can result in the drill bit slipping or wobbling during operation, leading to inaccurate drilling or even causing injury. Secondly, a loose chuck can cause unnecessary wear and tear on the chuck itself, potentially resulting in damage and the need for costly repairs or replacements. Lastly, a securely tightened chuck ensures the drill bit stays in place and allows for efficient drilling, saving you time and effort.
Always make it a practice to double-check the tightness of the chuck before starting a drilling operation. If you notice any looseness or play in the chuck, stop using the drill press immediately and tighten it properly to ensure safe and accurate drilling.
4. Can I over-tighten the chuck on a drill press?
Yes, it is possible to over-tighten the chuck on a drill press, which can lead to issues. Over-tightening can strain and damage the chuck, making it difficult to loosen or even causing it to become permanently stuck. It’s essential to strike a balance when tightening the chuck – it should be secure enough to hold the drill bit firmly in place, but not excessively tight.
Using too much force or not stopping when the chuck feels firmly tightened can result in problems. If you find it challenging to loosen the chuck after tightening, it’s best to seek professional assistance to prevent further damage. Remember, always follow the manufacturer’s guidelines and recommendations for chuck tightening to avoid any potential issues.
5. How often should I check and tighten the chuck on a drill press?
Regularly inspecting the tightness of the chuck is a good practice to ensure safe and efficient drilling. How often you need to check and tighten the chuck depends on the frequency and intensity of your drilling tasks. If you use the drill press frequently or are working on projects that require heavy drilling, it’s recommended to check the chuck tightness before each use.
If you’re using the drill press less frequently or for lighter tasks, a periodic check every few uses or at least once a month should be sufficient. It’s always better to be cautious and proactive in tightening the chuck, as it ensures optimal performance and prevents any potential accidents or issues.

Summary
So, to tighten the chuck on a drill press, you need to follow these steps. First, make sure the drill press is turned off and unplugged. Then, use a chuck key to tighten the chuck by inserting it into the holes on the side of the chuck. Turn the key clockwise to tighten the chuck securely. Lastly, double-check that the chuck is tightened by giving it a gentle tug.
Remember to always prioritize safety and to ask for help from an adult if needed. With these simple steps, you’ll be able to properly secure the chuck on a drill press and start drilling with confidence!