Are you curious about what “resaw” means on a bandsaw? Well, you’ve come to the right place! In this article, we’ll dive into the fascinating world of woodworking and explore the definition of “resaw” in the context of a bandsaw. So, let’s get started and uncover the secrets of this term together!
When it comes to woodworking, bandsaws are incredibly versatile tools that can handle various tasks. But what does “resaw” mean on a bandsaw? Simply put, resawing is a technique used to cut a thick board into two thinner pieces. It allows you to maximize the use of wood, create uniform thickness, and unlock a world of possibilities for your woodworking projects. So, imagine the possibilities you can unlock by learning about this technique!
Now that you have a basic understanding of what “resaw” means on a bandsaw, get ready to delve deeper into the intricacies of this technique. From choosing the right blade to adjusting the saw’s settings, we’ll walk you through the step-by-step process of resawing like a pro. So, join us on this woodworking adventure and master the art of resawing on a bandsaw!

Demystifying the Meaning of “Resaw” on a Bandsaw: Everything You Need to Know
Understanding the Basics of Resawing
Resawing is a technique that utilizes a bandsaw to cut a thick board into two or more thinner pieces. It allows woodworkers to maximize the usability of a single piece of wood, making it a popular choice for creating veneers, bookmatching, or obtaining thinner stock for various projects. When resawing on a bandsaw, the goal is to cut the material parallel to the original face, resulting in smooth and uniform slices.
Before diving into the process of resawing, it’s important to note that not all bandsaws are capable of performing this task. Resawing requires a bandsaw with a robust motor, sharp and appropriately sized blades, and sufficient cutting height. Bandsaws designed specifically for resawing often have wider blades, ranging from 3/4-inch to 1 1/4-inch, which provide greater stability and accuracy during the process.
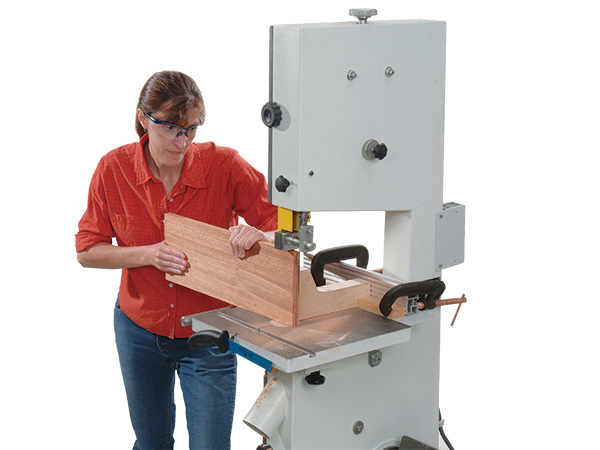
When resawing on a bandsaw, it’s crucial to follow proper safety protocols. This includes wearing safety goggles and hearing protection, ensuring the workpiece is secure with a suitable fence or jig, and maintaining a steady feed rate for optimal results. Now, let’s dive into the step-by-step process of resawing on a bandsaw.
Choosing the Right Blade for Resawing
Selecting the appropriate blade for resawing is vital to achieving clean and accurate cuts. Generally, blades with fewer teeth per inch (TPI) are preferred for resawing, as they can clear away material more efficiently. A blade with 3-6 TPI is a good starting point for most resawing applications.
Additionally, opting for a blade with a wider kerf can help reduce the chances of blade drift. Blade drift is when the blade veers off course during the cutting process, resulting in uneven slices. A wider blade distributes the cutting force more evenly, minimizing the likelihood of drift. Aim for a blade with a minimum of 1/2-inch width for optimal resawing performance.
Finally, ensure that the blade is properly tensioned and securely fitted on the bandsaw. A loose or improperly tensioned blade can lead to poor cutting performance and potential safety hazards. Consult the manufacturer’s guidelines for your specific bandsaw model to determine the appropriate blade tension.
The Step-by-Step Resawing Process
Now that we’ve covered the essentials, let’s walk through the step-by-step process of resawing on a bandsaw:
1. Prepare the Bandsaw and Workpiece
Before starting, ensure that the bandsaw is set up correctly and in good working order. Check the blade tension, tracking, and overall alignment. Once the bandsaw is ready, prepare the workpiece by ensuring it has a flat side and straight edges for better stability during the cutting process.
Remember to wear appropriate safety gear, such as goggles and a dust mask, to protect yourself from potential flying debris and fine wood dust.
2. Set up the Fence or Guide
Using a tall fence or a specialized resawing guide, position it parallel to the blade. This will help maintain a consistent cutting angle and prevent the workpiece from drifting off course. Ensure that the fence is securely locked in place to avoid accidental shifting during the cut.
If you don’t have a fence or guide specifically designed for resawing, you can utilize a featherboard or a custom-made jig to achieve similar results.
3. Adjust the Blade Height
Set the blade height to match the desired thickness of the resawn pieces. It’s best to start with a shallower cut and gradually increase the height until you achieve the desired result. Avoid setting the blade height too high, as it can cause unnecessary vibrations and decrease cutting accuracy.
Remember to adjust the blade tension if necessary to maintain optimal performance throughout the resawing process.
4. Begin Resawing
Position the workpiece against the fence, ensuring it is firmly and evenly supported. Slowly feed the wood into the blade, maintaining a steady and consistent rate of forward movement. Let the blade do the work, and avoid forcing the wood through the cut as it can cause blade deflection and result in a rough finish.
Take your time, and be patient throughout the process. Resawing requires precision and finesse to achieve the desired results.
5. Finishing Touches
Once the resawing cut is complete, assess the resulting slices for accuracy and smoothness. Depending on your project’s requirements, you may need to remove any visible blade marks or sand the surfaces for a refined finish.
Remember to wear appropriate protection while handling the resawn pieces, as they may have sharp edges or splinters.
Benefits of Resawing on a Bandsaw
Resawing on a bandsaw offers several advantages for woodworkers:
1. Maximizes Wood Utilization
Resawing allows you to convert thick, expensive lumber into multiple thinner pieces, maximizing the usable yield from a single board. This is particularly useful when creating intricate projects that require thin stock or veneers.
2. Veneering and Bookmatching Opportunities
By resawing, woodworkers can create their own veneers or bookmatched pieces from a single board, opening up possibilities for stunning visual effects in furniture making or other woodworking projects.
3. Cost-Efficient
By resawing their own wood, woodworkers can save money compared to purchasing pre-cut thinner stock. This is especially beneficial for those working on a budget or looking to make the most of their available resources.
4. Increased Design Flexibility
Resawing provides woodworkers with the ability to control the thickness of their stock, allowing for greater design flexibility. It enables the creation of custom-sized lumber for specific project requirements, giving artisans more control over the final result.
5. Eco-Friendly Practice
Resawing promotes sustainability by reducing waste. By utilizing the entire board and maximizing its potential, woodworkers can contribute to a more eco-friendly approach to woodworking.
Maintaining Your Bandsaw for Optimal Resawing Results
Regular Blade Maintenance
Keeping your bandsaw blade in top condition is crucial for achieving optimal resawing results. Regularly inspect the blade for sharpness and signs of wear. If you notice any dullness or damage, replace the blade promptly to maintain cutting efficiency. Additionally, ensure that the blade is correctly tensioned to avoid potential blade drift and poor cutting performance.
If you’re unfamiliar with blade maintenance, consult your bandsaw manufacturer’s guidelines or consider seeking guidance from experienced woodworkers or professionals.
Proper Dust Collection
Resawing generates a significant amount of fine wood dust, which can affect your visibility, breathing, and overall workshop environment. Implementing an effective dust collection system is essential for maintaining a clean and safe workspace. Ensure that your bandsaw is equipped with a dust port or attachment to connect to a dust collector, reducing the amount of airborne dust.
Regular Equipment Calibration
To achieve accurate resawing results, it’s crucial to regularly calibrate and fine-tune your bandsaw. This includes checking and adjusting the blade tracking, table alignment, and fence positioning. By maintaining proper calibration, you can ensure that your bandsaw is operating at its best, resulting in precise and uniform cuts during the resawing process.
Mastering Resawing Techniques for Fine Woodworking
Advanced Resawing Techniques
Once you’ve mastered the basics of resawing on a bandsaw, you can explore more advanced techniques to take your woodworking projects to the next level:
1. Bookmatching
Bookmatching involves resawing a board and then opening it like a book to reveal perfectly mirrored surfaces. This technique creates visually striking patterns and is often used in creating tabletops, drawer fronts, and decorative elements.
2. Compound Resawing
Compound resawing refers to cutting a board at an angle while simultaneously changing its thickness. This technique allows woodworkers to create complex bevels, angles, and curves in their project designs. It adds depth and visual interest to intricate woodworking pieces and requires precision and advanced bandsaw skills.
3. Riven Resawing
Riven resawing involves splitting logs or billets along their natural grain lines to create bookmatched pieces. This technique is commonly used in traditional rustic furniture making or in projects that aim to showcase the natural beauty of the wood grain.
Conclusion
Resawing on a bandsaw is a versatile technique that expands the possibilities of woodworking projects. By understanding the basics of resawing, choosing the right blade, and following proper techniques, woodworkers can unleash their creativity and maximize the usability of their materials. Regular maintenance and calibration of the bandsaw, along with exploring advanced techniques, further enhance the quality and precision of resawing results. So, why not seize the opportunity to unlock the abundance of design opportunities and cost savings that resawing on a bandsaw offers?
Key Takeaways: What Does Resaw Mean on a Bandsaw?
- Resawing on a bandsaw refers to cutting a thick piece of wood into thinner pieces by making a long, vertical cut.
- This technique is commonly used in woodworking to create veneers, lumber, or to salvage usable wood from larger pieces.
- It is important to choose the right blade and set up the bandsaw correctly for safe and efficient resawing.
- Resawing requires patience and practice to achieve desired results, ensuring a smooth and accurate cut.
- By resawing on a bandsaw, woodworkers can maximize the use of their materials and create unique projects with custom-sized pieces.
Frequently Asked Questions
Welcome to our FAQ section where we answer some common questions related to resawing on a bandsaw. Read on to learn more about this useful technique!
Q1. How does resawing on a bandsaw differ from other types of cutting?
Resawing on a bandsaw is a technique that involves cutting a thick piece of wood into thinner boards. Unlike other types of cutting, which primarily focus on crosscutting or ripping wood, resawing allows you to maximize the yield from a single workpiece.
By using a bandsaw’s unique blade design and fence system, you can create slices that are parallel to the wood’s original face, resulting in uniformly thick boards. This technique is particularly useful for creating veneers, bookmatched panels, or creating thinner boards for various woodworking projects.
Q2. What are the benefits of resawing on a bandsaw?
Resawing on a bandsaw offers several benefits for woodworkers. Firstly, it allows you to save money by maximizing the use of your lumber. By resawing thick boards into thinner ones, you can create more projects from a single piece of stock, reducing waste and cost.
Additionally, resawing gives you greater control over the thickness of your boards, allowing for more design possibilities and versatility in your woodworking projects. This technique also enables you to create your own unique lumber sizes, helping you achieve the desired dimensions that may not be readily available in stores.
Q3. What types of wood are suitable for resawing on a bandsaw?
Resawing can be done on a wide range of materials, including various types of wood. You can resaw both hardwoods and softwoods, depending on the specific project you’re working on. Hardwoods like oak, walnut, and maple are commonly used for furniture making, while softwoods like pine and cedar are popular choices for outdoor projects.
It’s important to keep in mind that the hardness and density of the wood can affect how smoothly the bandsaw cuts through it. Softer woods tend to be easier to resaw, while harder woods may require a more powerful bandsaw or a specialized blade to achieve optimal results.
Q4. What safety precautions should I take when resawing on a bandsaw?
When resawing on a bandsaw, it’s crucial to prioritize safety to prevent accidents and injuries. Here are a few safety precautions to keep in mind:
First, make sure to wear appropriate safety gear, including safety glasses, hearing protection, and a dust mask. Keep your fingers away from the blade, using push sticks or push blocks to guide the wood through the cut. It’s also important to adjust the bandsaw’s blade tension and tracking properly and to work at a slower feed rate to maintain control.
Q5. Are there any tips for achieving clean and accurate resaw cuts on a bandsaw?
To achieve clean and accurate resaw cuts on a bandsaw, there are a few key tips to follow:
First, make sure your bandsaw is properly set up, with a sharp blade and the appropriate blade tension. Use a rip fence or a resaw fence to guide the wood accurately. Taking your time and making slow, steady cuts will help maintain control and produce cleaner results. Finally, consider using a backing board or a sled for added support and stability, especially when resawing larger or more challenging pieces of wood.

Summary
So, what does “resaw” mean on a bandsaw? Basically, it’s a way to cut a thick piece of wood into thinner slices. By adjusting the blade and fence, you can create multiple thin boards from one large piece. This technique is great for making veneers or getting your desired thickness for a project.
Resawing can save you money by allowing you to get more out of your wood. It’s an important skill to have if you’re into woodworking. Just remember to use caution and take your time, as resawing can be a bit tricky. With practice, you’ll be a resawing pro in no time!