
Are you curious about what a rabbit is in carpentry? Well, you’re in the right place! If you’ve ever wondered about the different techniques and terms used in woodworking, then understanding what a rabbit is can open up a whole new world of possibilities. In this article, we’ll explore the definition and uses of a rabbit in carpentry, giving you a solid foundation to expand your woodworking skills. So let’s dive right in and uncover the secrets of this important woodworking technique!
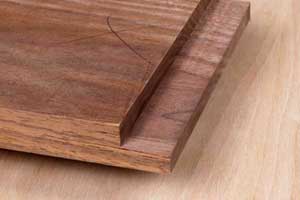
A rabbit, also known as a rebate or rabbet, is a groove or channel cut into the edge or face of a piece of wood. It is created by removing material to create a recess, leaving a stepped edge that can serve various purposes. Carpenters use rabbits for a wide range of applications, such as joining two pieces of wood together, creating a ledge for a door or window frame, or accommodating panels within a frame. This versatile technique allows for precise and secure connections, enhancing the overall strength and stability of woodworking projects.
Now that we have a basic understanding of what a rabbit is in carpentry, we can explore its practical applications in greater detail. Whether you’re a beginner or an experienced woodworker, knowing how to create a rabbit can significantly expand your project options. So, if you’re ready to take your woodworking skills to the next level, let’s dive deeper into the world of rabbits in carpentry and discover the endless possibilities they offer!
What is a Rabbit in Carpentry? A Guide to Understanding this Essential Carpentry Technique
Carrying out carpentry work requires a variety of techniques and skills, one of which is the rabbit. A rabbit, also known as a rabbet or rebate, is a groove or channel cut into a piece of wood to create a stronger joint or to accommodate another piece of wood or material. This technique is widely used in carpentry and woodworking to join pieces together, create overlapping joints, or make space for inserts such as glass or panels. In this article, we will explore the various aspects of a rabbit in carpentry and how it is used to enhance the structural integrity and functionality of woodworking projects.
1. The Basics of a Rabbit Joint
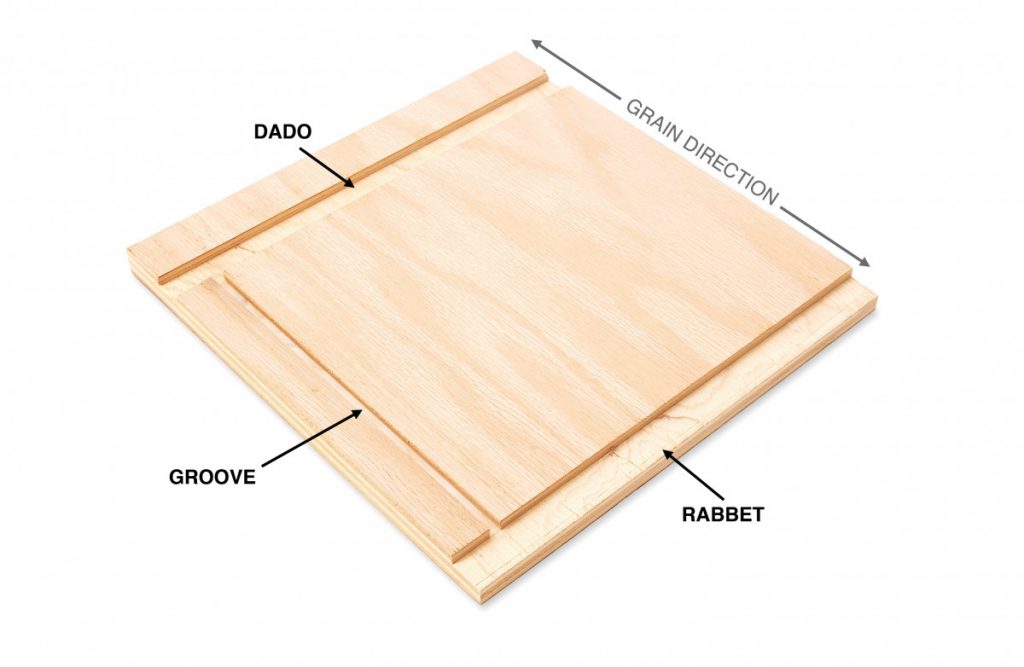
A rabbit joint is created by cutting a groove or channel along the edge or face of a piece of wood. This groove typically has a rectangular or square profile, depending on the desired application. The depth and width of the rabbit may vary depending on the specific requirements of the project.
Rabbit joints are often used to strengthen and align boards in woodworking. By creating a recessed channel, the joint provides a surface for the mating piece to fit snugly and securely. This helps to prevent movement or separation, resulting in a sturdier and more stable construction.
There are different types of rabbit joints, such as through rabbits, stopped rabbits, and double rabbits, each serving a specific purpose in carpentry. Through rabbits extend the entire length or width of a board, while stopped rabbits only extend partway. Double rabbits are two parallel grooves cut into adjacent pieces to accommodate an insert, such as a glass panel or a raised panel.
2. Advantages of Using a Rabbit Joint in Carpentry
The rabbit joint offers several advantages that make it a popular choice in carpentry projects. One of the main benefits is its ability to create a strong and seamless connection between two pieces of wood. The recessed groove provides additional surface area for gluing or nailing, resulting in a robust joint that can withstand heavy loads or stress.
Additionally, a rabbit joint can improve the aesthetic appeal of woodworking projects. By creating a flush surface between two pieces of wood, it eliminates visible gaps and creates a smooth transition. This makes it particularly suitable for constructing cabinets, drawers, and frame panels.
Another advantage is the ease of assembly. The precise and accurate fit provided by a rabbit joint simplifies the construction process, ensuring that pieces align correctly without the need for complex measuring or cutting techniques. This saves time and effort while maintaining structural integrity and precision in the final product.
3. Techniques and Tools for Creating a Rabbit Joint
To create a rabbit joint, several techniques and tools can be employed, depending on the desired groove size and the material being worked on. One common method is to use a router with a rabbiting bit, which allows for precise and controlled cutting. The router can be guided along a straight edge or used with a fence to ensure accurate and parallel cuts.
Another option is to use a table saw equipped with a dado blade. This setup can efficiently cut grooves of various sizes and depths. Care must be taken to set the blade height accurately and make multiple passes to achieve the desired width.
Hand tools such as chisels and planes can also be used to create a rabbit joint. This traditional method requires skill and precision to accurately shape the groove and ensure a tight fit. Careful marking and measuring are essential to maintain consistency and achieve proper alignment.
In summary, a rabbit joint is a versatile carpentry technique that plays a crucial role in joining and reinforcing woodwork pieces. Its ability to create a strong, seamless connection and enhance the aesthetics of a project makes it a valuable skill for any carpenter or woodworker. With the right tools and techniques, mastering the art of rabbiting opens up a world of possibilities for creating sturdy and visually appealing woodworking projects. `
`
How to Create a Rabbit Joint: Step-by-Step Guide
Creating a rabbit joint is an essential skill for carpenters and woodworkers. It allows for the secure joining of wood pieces and provides a clean and finished appearance. Whether you are working on a small DIY project or constructing a large piece of furniture, understanding how to create a rabbit joint is crucial. In this section, we will provide a step-by-step guide to help you master this technique.
1. Measure and Mark the Rabbit
Start by measuring the length or width of the piece of wood where the rabbit will be cut. Use a measuring tape or ruler to determine the dimensions, taking into account any specific requirements for the project. Once you have the measurements, mark them on the wood with a pencil or marking knife.
It is important to accurately mark the position and size of the rabbit to ensure a precise fit. Use a square or straight edge to draw straight lines along the edges or faces of the wood, indicating the boundaries of the rabbit.
2. Choose the Right Tools
The choice of tools will depend on the size and depth of the rabbit, as well as the type of wood being used. Common tools for creating a rabbit joint include routers with rabbiting bits, table saws with dado blades, and chisels.
For larger, deeper rabbits, a router with a rabbiting bit is highly recommended. This tool allows for precise and controlled cutting, ensuring a clean and accurate groove. Alternatively, a table saw with a dado blade can also be used to create rabbits of various sizes.
For smaller rabbits or hard-to-reach areas, chisels and planes are ideal. These hand tools require skill and precision but can deliver excellent results when used correctly.
3. Set Up and Secure the Workpiece
Before cutting the rabbit, ensure that the workpiece is securely held in place. This will help prevent any movement or accidents while using the tools.
If using a router or table saw, secure the wood to a workbench or table with clamps. Make sure it is held firmly in place, allowing for easy and controlled movement of the tool along the marked lines.
When using chisels or planes, place the wood on a non-slip surface or use a vice to hold it in place. This will provide stability and allow for precise cutting.
4. Cut the Rabbit
With the workpiece secured, it is time to cut the rabbit. Follow the marked lines carefully, making sure to stay within the boundaries. Take your time and use steady, controlled movements to ensure accuracy.
If using a router, guide the tool along the marked lines, keeping a firm grip and applying even pressure. Let the router bit do the cutting work, but maintain control to prevent any errors or mishaps.
When using a table saw, set the height and width of the dado blade according to the marked lines. Make multiple passes, gradually increasing the depth until the desired size is achieved.
For chisels and planes, carefully remove material along the marked lines, working slowly and methodically. Use a mallet or hammer to apply controlled force, creating a clean and precise groove.
5. Test the Fit and Make Adjustments
Once the rabbit has been created, test the fit by inserting the mating piece into the groove. It should fit snugly and securely, without any visible gaps or movement.
If the fit is too tight, carefully remove wood material from the sides of the rabbit until it fits correctly. Use a chisel or plane to shave off small amounts at a time, constantly checking the fit until it is perfect.
If the fit is too loose or there are gaps, consider using wood filler or shims to improve the connection. Apply the filler or insert the shims and sand them down to create a flush and seamless finish.
6. Glue, Nail, or Clamp the Joint
Once the fit is satisfactory, secure the joint using glue, nails, or clamps, depending on the project requirements. Apply a thin layer of wood glue to the mating surfaces, ensuring even coverage within the rabbit groove. Insert the mating piece into the rabbit and press firmly to create a strong bond.
If using nails, pre-drill pilot holes along the edges of the rabbit to prevent splitting. Insert the nails and hammer them in, making sure they are flush with the surface.
Clamps can be used to hold the joint in place while the glue dries. Apply enough pressure to ensure a tight fit, but be careful not to damage the wood or misalign the joint.
7. Finish and Sand the Joint
Once the joint is secured, remove any excess glue or protruding nails using a chisel or scraper. Use sandpaper or a sanding block to smooth out any rough edges or imperfections in the rabbit joint, creating a clean and professional finish.
Depending on the project, you may choose to apply a suitable finish or paint to the joint to enhance its appearance and protect the wood.
Remember to follow safety guidelines when using tools and always wear appropriate protective gear, such as safety goggles and gloves.
By following these step-by-step instructions, you can confidently create rabbit joints for a wide range of carpentry and woodworking projects. Mastering this technique will allow you to enhance the structural integrity and aesthetic appeal of your creations, resulting in stunning and long-lasting woodwork. `
`
The Versatility of Rabbit Joints: Applications in Carpentry
Rabbit joints are not only useful for joining pieces of wood, but they also have various applications in carpentry and woodworking. Understanding the versatility of rabbit joints allows carpenters to employ this technique in different projects to achieve desired outcomes. In this section, we will explore some common applications of rabbit joints in carpentry.
1. Cabinet Construction
Rabbit joints are commonly used in cabinet construction to create strong and seamless connections between the cabinet sides, top, and bottom panels. By cutting rabbits along the edges and faces of the wood, carpenters can create a durable and visually appealing cabinet structure.
The rabbit joint also facilitates the incorporation of back panels in cabinets. By cutting a groove along the inner edges, the back panel can be easily fitted and secured, adding stability and preventing warping.
2. Drawer Construction
When constructing drawers, rabbit joints are invaluable for joining the sides, front, back, and bottom panels. The rabbits cut along the edges or faces of the panels allow for precise alignment and secure assembly.
To create a robust drawer, the drawer front is typically equipped with a recessed portion to accommodate the sides and the bottom panel. This requires the use of double rabbits, which are two parallel grooves cut into adjacent pieces.
3. Frame Construction
Rabbit joints are frequently used in frame construction to join the rails and stiles of doors, windows, and picture frames. By cutting rabbits along the edges of the members, a solid and sturdy frame can be achieved.
The precise fit provided by the rabbit joint ensures that the frame members align correctly, resulting in a professional and aesthetically pleasing finish. This is particularly important for doors and windows, where the joint must be secure to withstand the stresses and movements associated with opening and closing.
4. Shelf Installation
Installing shelves in cabinets, bookcases, or closets often involves the use of rabbit joints. By cutting rabbits along the interior edges, the shelf panels can be easily inserted and secured, providing additional storage space.
The rabbit joint allows for a robust connection, ensuring that the shelves are sturdy and can support the weight of items placed on them. This technique is particularly useful in situations where adjustable shelves are required, as the rabbits enable easy repositioning of the shelves.
5. Panel Insertion
Rabbit joints are also commonly employed when inserting panels in various woodworking projects. Whether it’s glass, raised panels, or decorative inserts, rabbits provide a secure and elegant way to accommodate these additions.
For glass or other flat panels, the rabbits are typically cut along the inner edges of the frame or cabinet. This creates a recessed channel in which the panel can be fitted and held in place using glazing putty or other suitable methods.
For raised panels, rabbits are cut on the edges or faces of the frame members to create a groove that accommodates the panel. This provides a visually appealing and cohesive look, adding a touch of sophistication to woodworking projects.
In summary, rabbit joints have numerous applications in carpentry and woodworking. From cabinet and drawer construction to frame assembly and panel insertion, this versatile technique enhances structural integrity, provides seamless connections, and adds aesthetic appeal to various projects. By mastering the art of rabbiting, carpenters can expand their creative possibilities and create stunning and durable woodwork. `
`
Tips for Creating Perfect Rabbit Joints
Creating a perfect rabbit joint requires precision, patience, and attention to detail. While the technique may seem straightforward, there are certain tips and tricks that can help you achieve flawless results. In this section, we will share some valuable tips to help you create perfect rabbit joints.
1. Accuracy is Key
Accurate measurements and precise marking are essential for creating a perfect rabbit joint. Use a tape measure or ruler to ensure that measurements are precise, and mark the lines with a sharp pencil or marking knife. This will allow for clean and accurate cuts, ensuring a snug fit and seamless joint.
2. Choose the Right Tools and Blades
Selecting the right tools and blades for the job is crucial in achieving a perfect rabbit joint. Ensure that the router bit, table saw blade, or chisel is appropriate for the size and depth of the desired groove. Sharp blades and well-maintained tools will produce cleaner cuts and smoother surfaces, leading to a better overall result.
3. Take Your Time
Rushing through the process of creating a rabbit joint can lead to mistakes and imperfections. Take your time to carefully cut the groove, making sure to maintain control and follow the marked lines. Use steady and controlled movements to achieve accurate results. Patience and attention to detail will ultimately pay off in the form of a perfect and professional-looking joint.
4. Test the Fit
Before finalizing the joint, always test the fit of the mating pieces. Insert the second piece into the rabbit groove and ensure that it fits snugly, without any visible gaps or movement. This step allows you to make any necessary adjustments before permanently securing the joint.
5. Practice Proper Safety Measures
When working with tools and sharp blades, it is crucial to prioritize safety. Wear appropriate protective gear, such as safety goggles and gloves, to prevent injuries. Ensure that the workpiece is securely held in place, either with clamps or a vice, to avoid accidents and promote stability. Always follow safety guidelines and exercise caution throughout the process.
6. Test on Scrap Wood
If you are new to creating rabbit joints or working with specific tools, it is beneficial to practice on scrap wood before attempting the joint on your actual project. This will allow you to familiarize yourself with the tools and techniques, ensuring that you are comfortable and confident in creating the perfect rabbit joint.
7. Invest in Quality Materials
Using high-quality materials is essential for achieving a perfect rabbit joint. Select wood that is suitable for the specific project and that has been properly dried and prepared. Quality wood will be less prone to warping, splitting, or other issues that can compromise the joint. Additionally, using sharp and high-quality blades will result in cleaner cuts and smoother surfaces.
In conclusion, creating a perfect rabbit joint requires precision, patience, and adherence to best practices. By following these tips, you can enhance your skills and achieve flawless results in your carpentry and woodworking projects. Remember to prioritize accuracy, choose the right tools, take your time, and practice proper safety measures. With practice and attention to detail, you will be able to create perfect rabbit joints that not only possess structural integrity but also exude professional craftsmanship.
Key Takeaways: What Is a Rabbet in Carpentry?
- A rabbet, also known as a rebate, is a groove or channel cut into the edge or surface of a piece of wood in carpentry.
- It is typically used to create joints and connections between different pieces of wood in furniture making or construction projects.
- The depth and width of a rabbet can vary depending on the specific application and the thickness of the wood being used.
- Rabbets can be cut using hand tools such as chisels or with power tools like routers.
- By creating a rabbet, carpenters can ensure a strong and secure fit between wooden pieces, enhancing the overall stability and durability of the finished product.
Frequently Asked Questions
In carpentry, a rabbit refers to a type of joint commonly used to create a precise and snug fit between two pieces of wood.
1. How is a rabbit joint different from other types of joints in carpentry?
A rabbit joint differs from other joints in carpentry because it involves removing a portion of the wood from one piece, creating a groove or channel, which is then fitted with the corresponding protrusion on another piece. This creates a close-fitting, secure connection between the pieces.
This joint is often used to create strong joints in furniture construction, such as creating precise corner joints in cabinets or frames. It provides stability and strength to the overall structure.
2. What tools are commonly used to create a rabbit joint?
There are several tools commonly used to create a rabbit joint in carpentry. These tools include a rabbit plane, also known as a shoulder plane, which is specifically designed to cut and shape the grooves for the joint. A chisel may also be used to remove excess wood and refine the shape of the groove. Additionally, a marking gauge or ruler is essential for measuring the depth and width of the rabbit joint.
It’s important to have sharp and well-maintained tools to ensure clean and precise cuts while creating a rabbit joint. Proper technique and accuracy are crucial when using these tools to achieve a tight and secure fit.
3. Can a rabbit joint be used for both structural and decorative purposes?
Yes, a rabbit joint can be used for both structural and decorative purposes in carpentry. Structurally, it provides strength and stability to the overall construction by creating a secure connection between the pieces of wood. It is commonly used in furniture making, cabinetry, and other woodworking projects.
Decoratively, a rabbit joint can add visual interest and detail to the design of a piece. By creating exposed grooves or channels, it can enhance the aesthetic appeal and create a unique look. The depth and width of the rabbit joint can be varied to achieve different visual effects depending on the desired design outcome.
4. Are there any alternatives to a rabbit joint in carpentry?
Yes, there are alternative joints that can be used instead of a rabbit joint in carpentry. Some common alternatives include butt joints, dado joints, and tongue and groove joints. The choice of joint depends on the specific application and the desired outcome for the project.
While a rabbit joint provides a strong connection between two pieces of wood, a butt joint is a simpler and common joint where the ends of two pieces are simply butted together. Dado joints involve cutting a groove across the grain of one piece and fitting another piece into it. Tongue and groove joints involve creating a protrusion on one piece and a corresponding groove on another, creating a tight fit.
5. Can a beginner carpenter create a rabbit joint?
Yes, a beginner carpenter can learn to create a rabbit joint with practice and proper guidance. It’s important to start with the right tools and materials, and to understand the steps involved in creating a rabbit joint. Following proper safety precautions and taking the time to measure and cut accurately are crucial to achieve a successful joint.
It is recommended for beginners to start with smaller projects and gradually work their way up to more complex ones. Taking a woodworking class or seeking guidance from an experienced carpenter can also be helpful in learning the techniques required for creating a rabbit joint. With patience and practice, a beginner carpenter can master this joint and incorporate it into their woodworking projects.
Summary
So, what is a rabbit in carpentry? Well, it’s not a fluffy bunny. In carpentry, a rabbit is a groove or notch cut into a piece of wood. It helps pieces fit together snugly.
Rabbits have different names based on how they’re used. They can be used to join two pieces of wood or to hold a panel in place. So, next time you see a rabbit in carpentry, remember, it’s not about cute animals, it’s about making things fit together perfectly!