
Are you curious about what a lathe is in 3ds Max? Well, buckle up because I’m about to take you on a creative journey! Now, you might be wondering, “What is a lathe in 3ds Max?” Don’t worry, my young friend, I’ll explain it to you in a language that is simple and easy to understand.
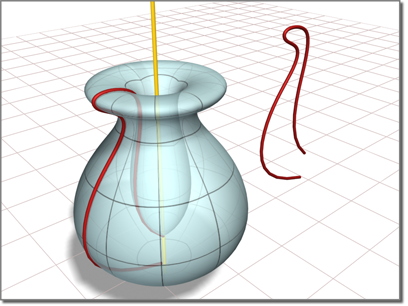
In the world of 3D modeling, a lathe is a powerful tool that allows you to create symmetrical 3D objects by rotating a 2D shape around a center point. Imagine it like a potter’s wheel, where you start with a lump of clay and with each revolution, it transforms into a beautifully sculpted vase. In 3ds Max, the lathe tool works in a similar way, giving you the ability to shape your ideas into stunning 3D masterpieces.
You might be wondering, “Why would I use a lathe in 3ds Max?” Well, my young artist, the lathe tool is perfect for creating objects like cups, bowls, vases, and even characters! By just sketching a 2D profile of your desired shape, you can use the lathe tool to bring it to life in 3D. So, whether you’re designing a fantastical creature or crafting a realistic prop, the lathe tool in 3ds Max is your creative companion. Let’s dive deeper into the world of lathe and uncover the possibilities together!
What is Lathe in 3ds Max?
3ds Max is a powerful 3D modeling and animation software used by professionals in various industries, including architecture, gaming, and entertainment. One of the essential tools in 3ds Max is the Lathe modifier. The Lathe modifier allows users to create complex 3D objects by revolving a 2D shape around an axis, similar to a potter’s wheel. In this article, we will explore the functionality and capabilities of the Lathe tool in 3ds Max, and how it can be used to enhance your 3D projects.
Understanding the Lathe Modifier
The Lathe modifier in 3ds Max is a powerful tool that can take a 2D shape and transform it into a 3D object by rotating it around an axis. This creates a symmetrical result, which can be further modified and customized to fit your design needs.
Creating Basic Shapes with the Lathe Modifier
To create a basic shape using the Lathe modifier, start by creating a 2D shape using one of the many available tools in 3ds Max, such as the Line or Shape tools. Once you have your shape, select it, and apply the Lathe modifier. This will bring up the Lathe parameters, where you can adjust the axis, segments, and other settings to refine the shape. By manipulating these parameters, you can create a wide variety of objects, from simple vases and bowls to more intricate ornamental designs.
The Lathe modifier also provides the ability to control the smoothness and detail of the final 3D object. By increasing the number of segments, you can achieve a higher level of detail, while decreasing the segments can create a more simplistic shape. Additionally, the modifier allows you to adjust the axis of rotation, allowing for asymmetrical designs and unique twists on traditional shapes.
Furthermore, the Lathe modifier offers various options for defining the shape’s profile, including open-ended and closed-ended shapes. This flexibility enables artists and designers to create complex objects with openings, such as lampshades or hollow vessels.
Applying Materials and Textures to Lathe Objects
Once you have created your 3D object using the Lathe modifier, you can take your designs to the next level by applying materials and textures. 3ds Max provides a wide range of built-in materials, as well as the ability to import custom textures and materials. This allows you to add realistic finishes, such as metal, wood, or glass, to your lathe objects.
The application of materials and textures in 3ds Max is straightforward. Simply select the object, navigate to the Material Editor, and choose the desired material or texture. You can then adjust properties such as color, reflectivity, and transparency to achieve the desired look for your lathe object.
Advanced Techniques with the Lathe Modifier
Now that we have explored the basics of the Lathe modifier in 3ds Max, let’s dive into some advanced techniques that can take your 3D modeling to the next level.
Using Custom Profiles and Splines
While 3ds Max provides default shapes like circles and rectangles, you can also create custom profiles using splines. Splines allow you to create more intricate and unique shapes, which can then be used with the Lathe modifier. By combining different splines and profiles, you can create complex objects with intricate details.
Another advanced technique is the ability to use multiple splines in conjunction with the Lathe modifier. This allows you to create more complex and organic forms by merging different shapes together. By adjusting the positioning and parameters of each individual spline, you can create seamless transitions and intricate designs.
Combining Lathe with other Modifiers
3ds Max offers a wide range of modifiers that can be combined with the Lathe modifier to further enhance your designs. For example, you can apply the Bend modifier to add curvature to your lathe objects, or the Twist modifier to create spiraling shapes.
Additionally, you can use the Lathe modifier in combination with the Symmetry modifier to create perfectly mirrored objects. This can be particularly useful when designing symmetrical architectural elements or characters in the gaming industry.
Optimizing Performance and Workflow
As with any complex software, it’s essential to optimize your performance and workflow when working with the Lathe modifier in 3ds Max. One way to improve performance is by adjusting the level of detail based on the final output. If you’re creating an object for a high-resolution render, you may want to increase the number of segments for a more detailed result. However, if the object is intended for real-time applications, such as video games, reducing the number of segments can help improve performance without sacrificing visual quality.
It’s also important to organize your scene and utilize 3ds Max’s tools for managing complex projects. This includes naming conventions, layer management, and proper utilization of groups and hierarchies. By keeping your scene clean and organized, you can improve your workflow and make it easier to navigate and edit your lathe objects.
Conclusion
The Lathe modifier in 3ds Max is a powerful tool that allows you to create complex 3D objects by revolving 2D shapes around an axis. By understanding its functionalities and exploring advanced techniques, you can unlock the full potential of this tool and bring your 3D designs to life. Whether you’re in architecture, gaming, or entertainment, the Lathe modifier in 3ds Max offers a variety of possibilities for creating unique and visually stunning objects.
Key Takeaways: What is Lathe in 3ds Max?
- Lathe is a tool in 3ds Max that allows you to create symmetrical 3D objects by revolving a 2D shape around an axis.
- With the Lathe modifier, you can easily create objects like vases, cups, or even complex forms like human faces.
- By controlling parameters such as the number of segments and the rotation angle, you can achieve different levels of detail and smoothness in your lathe objects.
- The Lathe modifier also offers options to adjust the axis position, scale, and even texture mapping for more customization.
- Using the Lathe tool in 3ds Max opens up endless possibilities for creating unique 3D models with ease and precision.
Frequently Asked Questions
Whether you’re a beginner or an experienced user, understanding what a lathe is in 3ds Max is essential. Here are some commonly asked questions to help you grasp this concept better.
1. How does the lathe tool work in 3ds Max?
The lathe tool in 3ds Max allows you to create a 3D object by revolving a 2D shape around a specified axis. It mimics the process of shaping an object on a real lathe machine. By defining a spline shape, you can extrude it along its axis, resulting in a solid 3D object. You have control over various parameters, such as the number of segments, the angle of revolution, and the smoothness of the object.
With the lathe tool, you can quickly create symmetrical objects such as vases, bottles, or architectural elements with rotational symmetry. It’s a powerful tool to add depth and dimension to your 3D scenes while maintaining accuracy and precision.
2. Can the lathe tool be used with any 2D shape?
Yes! The lathe tool in 3ds Max works with any closed 2D shape, known as a spline. This means you can use a variety of shapes, including circles, ovals, polygons, or complex freeform curves. The only requirement is that the shape must be closed and have no intersecting segments.
Whether you draw the spline shape manually using the available drawing tools or import a 2D vector file from an external software, the lathe tool will work its magic and generate a 3D object based on the specified parameters.
3. Can you animate objects created with the lathe tool?
Absolutely! Once you create a 3D object using the lathe tool, it becomes a regular object in 3ds Max, capable of animation. You can apply various transformations such as scaling, rotating, and translating to animate the object’s position, size, and orientation.
Furthermore, you can also apply materials, textures, and lighting effects to enhance the visual appeal of the object. By animating these properties, you can bring your lathe-generated objects to life, making them a dynamic part of your 3D scenes and animations.
4. Are there any limitations to consider when using the lathe tool?
While the lathe tool is a versatile feature in 3ds Max, there are a few limitations to keep in mind. One limitation is related to the spline shape used as input. If the shape has irregularities or self-intersections, it may result in unexpected or undesirable outcomes when using the lathe tool.
Another consideration is the number of segments used for the lathe. Higher segment counts can lead to more detailed and smoother objects, but it can also increase the complexity of the scene and slow down performance. Finding the right balance between detail and performance is crucial.
5. Can you edit or modify a lathe-generated object after it’s created?
Absolutely! Once you generate a 3D object using the lathe tool, it remains fully editable in 3ds Max. You can access its parameters and adjust the number of segments, the angle of revolution, or even reshape the original spline shape to create variations.
Additionally, you can apply other modifiers to the object, such as bending, twisting, or warping, to further customize its appearance. This flexibility allows you to experiment, iterate, and refine your designs until you achieve the desired result.
3ds Max Lathe Modifier Tutorial
Summary
So, to summarize, a lathe in 3ds Max is a tool that helps you create smooth, curved surfaces. You can use it to shape and refine your 3D models, adding more detail and realism. It’s like using a virtual sculpting tool!
With the lathe, you can easily turn a simple shape into something more complex by rotating it around an axis. This allows you to create objects like vases, bowls, and even characters with rounded features. So, next time you’re working on a 3D project, give the lathe tool a try and take your designs to the next level!