Have you ever wondered what “non through cutting on a table saw” means? Well, let me break it down for you in a simple and easy-to-understand way.
Picture this: you’re in a woodworking shop, and you’re using a table saw to make precise cuts. But sometimes, you don’t want the blade to go all the way through the material. That’s when non through cutting comes into play.
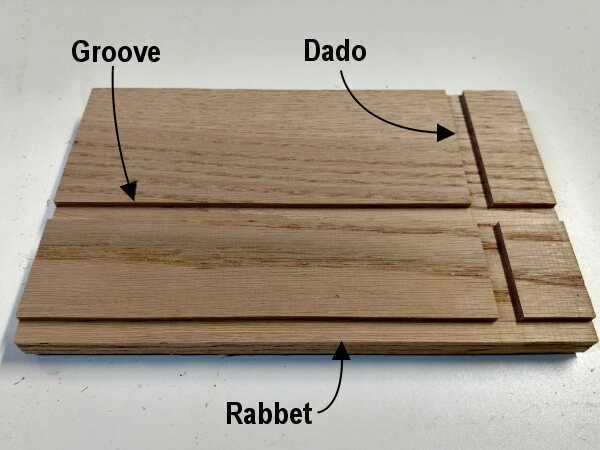
Non through cutting on a table saw is a technique where you make a cut that doesn’t go all the way through the material. Instead, you stop the cut at a certain depth, leaving a small portion uncut. This technique is commonly used for making grooves, rabbets, dados, or even decorative details on your woodworking projects.
Now that you have a basic understanding of what non through cutting on a table saw is all about, let’s dive deeper into how it can be done and the safety precautions you need to keep in mind. So, let’s get started and explore this fascinating technique together!
A non-through cut on a table saw refers to a type of cut where the blade does not completely go through the workpiece. This is often used to create grooves, dados, or rabbets. To achieve a non-through cut, adjust the table saw’s blade height to the desired depth and guide the workpiece along the fence, making multiple passes if necessary. Always remember to prioritize safety by wearing protective gear and following the manufacturer’s instructions.

Understanding Non Through Cutting on a Table Saw: A Comprehensive Guide
Non through cutting, also known as scoring or grooving, is a technique used on a table saw to create precise cuts without cutting through the entire thickness of the material. This method is commonly employed when working with delicate or expensive materials, such as veneers, laminates, or high-quality hardwoods, where preserving the integrity of the material is crucial. In this article, we will delve into the details of non through cutting on a table saw, exploring its benefits, techniques, and important safety considerations.
The Benefits of Non Through Cutting
Non through cutting offers several advantages, especially when working with delicate or expensive materials. By making a shallow cut, you can achieve greater precision and reduce the risk of tear-out or splintering on the face of the material. This technique also minimizes waste, as it allows multiple cuts to be made from a single piece of material, making it both cost-effective and efficient.
Another benefit of non through cutting is that it allows for better control over the cutting process. By making a scoring cut first, you can ensure that the final cut is clean and accurate. This is particularly important when working with materials that tend to chip or crack easily, as the scoring cut helps to prevent these issues and ensures a smooth finish.
Key Benefits of Non Through Cutting:
- Precise and clean cuts
- Minimized risk of tear-out or splintering
- Cost-effective use of materials
- Improved control over the cutting process
- Enhanced safety for delicate or expensive materials
Techniques for Non Through Cutting
To achieve non through cuts on a table saw, you can follow these step-by-step techniques:
1. Set the blade height: Begin by adjusting the height of the table saw blade to the desired depth of the non through cut. It is important to set the blade height accurately to ensure the desired results.
2. Install a scoring blade: In some cases, a scoring blade may be required for non through cutting. A scoring blade is designed with multiple small cutting teeth, which create a shallow groove or score on the material’s surface without cutting through it. Install the scoring blade according to the manufacturer’s instructions.
3. Align the material: Position the material to be cut on the table saw’s surface, ensuring it is flat and securely clamped in place. Align the material so that the desired non through cut line aligns with the blade.
4. Make the scoring cut: Turn on the table saw and slowly feed the material into the blade, applying gentle pressure. This will create a shallow groove or score on the material’s surface. Take care to maintain a steady pace and keep your fingers clear of the blade.
5. Adjust for the final cut: Once the scoring cut is made, adjust the table saw blade to the desired cutting depth. This will depend on the specific project requirements and the thickness of the material being cut.
6. Make the final cut: With the blade adjusted, repeat the cutting process, feeding the material into the blade to achieve the final non through cut. Ensure that the material is aligned properly and that you are using appropriate safety precautions throughout the process.
It is important to note that the specific techniques and steps may vary depending on the type of table saw and the particular manufacturer’s instructions. Always refer to the owner’s manual and follow all safety guidelines when working with power tools.
Safety Considerations for Non Through Cutting
While non through cutting can be a precise and efficient technique, it is essential to prioritize safety throughout the process. Here are some important safety considerations to keep in mind when using a table saw for non through cutting:
1. Eye and ear protection: Wear safety glasses or goggles to protect your eyes from any potential debris or flying particles. Additionally, consider wearing ear protection to reduce the noise levels generated by the table saw.
2. Proper workspace setup: Ensure that your workspace is clean, well-lit, and free of any obstacles that may obstruct your movements or affect the stability of the table saw. Keep the area around the saw clear to prevent tripping hazards.
3. Use a push stick: When making non through cuts, use a push stick or push block to guide the material through the blade, keeping your hands a safe distance away from the cutting area. This helps to prevent accidents and minimize the risk of injury.
4. Mind the kickback: Kickback can occur when the material gets caught by the rotating blade and is forcefully thrown back towards the operator. To minimize the risk of kickback, ensure that the material is flat and securely positioned on the table saw, and never stand in line with the blade rotation.
5. Familiarize yourself with the table saw: Before attempting non through cutting or any other technique on a table saw, take the time to read the owner’s manual and familiarize yourself with the specific features and safety mechanisms of the table saw.
By adhering to these safety considerations and using appropriate safety gear, you can enjoy the benefits of non through cutting while minimizing the risk of accidents or injuries.
Advanced Techniques for Non Through Cutting
Once you have mastered the basics of non through cutting on a table saw, you can explore more advanced techniques to enhance your woodworking skills. Here are three advanced techniques that can take your work to the next level:
1. Dado Cuts
Dado cuts are non through cuts made perpendicular to the grain of the material, resulting in a wide channel or groove. This technique is commonly used when creating joints or fitting panels together. To make dado cuts, a dado blade or a specialized dado set can be used. The dado set consists of two circular blades with multiple small cutting teeth and a set of removable chippers that determine the width of the groove.
To make dado cuts:
1. Set the blade height and width: Adjust the height of the dado blade to the desired depth of the groove. Then, install the appropriate chippers to achieve the desired width of the groove.
2. Align the material: Position the material to be cut on the table saw surface, ensuring it is flat and securely clamped in place. Align the material so that the desired dado cut line aligns with the blade.
3. Make the cut: Slowly feed the material into the blade, applying steady pressure. Move the material across the blade to create the desired dado cut. Take caution and maintain a steady pace throughout the process, using push sticks or push blocks to keep your hands away from the blade.
2. Rabbet Cuts
Rabbet cuts are non through cuts made along the edge of the material to create a recess or step. This technique is often used to join pieces or create channels for drawer bottoms or panels. To make rabbet cuts, a rabbeting bit in a router or a dado blade on a table saw can be used.
To make rabbet cuts on a table saw:
1. Set the blade height and fence position: Adjust the height of the blade to the desired depth of the rabbet cut. Set the fence to the desired width of the rabbet cut.
2. Align the material: Position the material to be cut on the table saw surface, ensuring it is flat and securely clamped in place. Align the material with the blade and the fence, according to the desired rabbet cut measurements.
3. Make the cut: Slowly feed the material into the blade, applying steady pressure. Move the material along the blade, keeping it snug against the fence to create the rabbet cut. Take caution and maintain a steady pace throughout the process, using push sticks or push blocks to keep your hands away from the blade.
3. Decorative V-Grooves
Decorative V-grooves add depth and visual interest to woodworking projects, such as cabinetry, picture frames, or decorative panels. These cuts create a V-shaped groove along the surface of the material, enhancing its aesthetic appeal. To create decorative V-grooves, a V-groove bit on a router or a specialized decorative blade on a table saw can be used.
To make decorative V-grooves on a table saw:
1. Set the blade height and angle: Adjust the height of the blade to the desired depth of the V-groove. Set the blade angle to create the desired V-shape.
2. Align the material: Position the material to be cut on the table saw surface, ensuring it is flat and securely clamped in place. Align the material with the blade according to the desired decorative V-groove pattern.
3. Make the cut: Slowly feed the material into the blade, applying steady pressure. Move the material along the blade to create the decorative V-groove. Take caution and maintain a steady pace throughout the process, using push sticks or push blocks to keep your hands away from the blade.
Remember to always refer to the manufacturer’s instructions and follow safety guidelines when using advanced techniques on a table saw.
In conclusion, non through cutting on a table saw is a valuable technique for achieving precise and clean cuts on delicate or expensive materials. By understanding the benefits, techniques, and safety considerations associated with this method, you can enhance your woodworking skills and create high-quality projects. Whether you’re making dado cuts, rabbet cuts, or decorative V-grooves, always prioritize safety and take the time to practice and refine your technique. Happy woodworking!
Key Takeaways: What is Non Through Cutting on a Table Saw?
- Non through cutting refers to making a cut that does not go all the way through the material on a table saw.
- It is often used to create grooves or dadoes in wood where only a portion of the material needs to be removed.
- This technique helps in creating joints, decorative elements, or accommodating other pieces in woodworking projects.
- Non through cutting requires adjusting the height of the saw blade to control the depth of the cut.
- It is important to practice safety measures and use appropriate blades for achieving accurate and clean non through cuts on a table saw.
Frequently Asked Questions
Welcome to our frequently asked questions section on non-through cutting on a table saw! Here, we’ll address some common queries related to this topic and provide you with informative answers. Read on to learn more!
1. How does non-through cutting on a table saw differ from regular cutting?
Non-through cutting on a table saw is a technique where the blade does not fully pass through the material being cut. Unlike regular cutting, which results in a complete separation of the material, non-through cutting leaves a small portion of the material intact. This technique is often used to create grooves, dadoes, or rabbets on the surface of the workpiece.
By adjusting the height of the saw blade and using a suitable fence or guide, you can control the depth and width of the cut, allowing for precise and accurate results. It is essential to have a good understanding of this technique to ensure safety and achieve the desired outcome.
2. What are some common applications of non-through cutting on a table saw?
Non-through cutting on a table saw is widely used in various woodworking applications. One common application is creating grooves or dadoes, which are often used for joinery or adding decorative details to furniture or cabinetry.
Another popular application is making rabbets, which are recessed cuts typically used to join two pieces of wood together. Rabbets are commonly seen in drawer construction or cabinet-making, providing a strong and clean joint. Overall, non-through cutting on a table saw opens up a range of possibilities for customization and precision in woodworking projects.
3. Are there any safety considerations to keep in mind when performing non-through cutting on a table saw?
Yes, safety is of utmost importance when working with a table saw, including when performing non-through cutting. Here are a few key safety considerations:
Firstly, always wear appropriate personal protective equipment (PPE) such as safety goggles, hearing protection, and a dust mask to protect yourself from potential hazards. Ensure you have a clear and well-lit workspace, free from obstructions that may interfere with your cutting process or cause accidents.
4. What types of table saw blades are typically used for non-through cutting?
When performing non-through cutting on a table saw, it’s essential to use the appropriate type of blade. The most commonly used blades for this technique are stacked dado sets and dado blades. These blades consist of multiple individual cutting blades that can be adjusted to achieve the desired width and depth of the cut. They are designed specifically for creating grooves or dadoes for joinery or other woodworking applications.
It’s crucial to ensure that the blade you choose is compatible with your table saw and that you follow the manufacturer’s instructions for proper installation and usage.
5. Can non-through cutting be done on any type of table saw?
Non-through cutting can generally be performed on most types of table saws, provided they have the necessary features and adjustments. However, it’s important to check your table saw’s specifications and user manual to ensure it supports non-through cutting operations.
Some table saws may have specific accessories or features like a riving knife or a splitter that enhance safety during non-through cutting. Always familiarize yourself with your table saw’s capabilities and instructions before attempting any cutting operations.

Table Saw Basics : Non-Through Cuts
Summary
Non-through cutting on a table saw is a technique where the blade does not go all the way through the material being cut. Instead, it allows for a shallow cut, which can be useful for making grooves, dadoes, or rabbets.
To perform non-through cutting, you can adjust the height of the blade to the desired depth and use a fence to guide the material through the saw. This technique requires careful measurement and control, ensuring that the material is held securely and the cut is precise.
By using non-through cutting, you can create different types of joints and add decorative details to your woodworking projects. Always remember to prioritize safety and follow the manufacturer’s instructions when using a table saw.