
So, you’re curious about the uses of an orbital sander, huh? Well, you’re in the right place! Let’s dive in and discover how this versatile tool can make your woodworking projects a breeze.
Picture this: you’re working on a DIY project, whether it’s refinishing furniture or smoothing out rough wooden surfaces. An orbital sander comes to the rescue! With its unique circular sanding motion, this nifty tool is designed to deliver a smooth and even finish.
But what sets the orbital sander apart from other sanding tools? Firstly, it’s lightweight and easy to handle, making it perfect for beginners and experienced DIY enthusiasts alike. Secondly, it’s excellent for removing paint, varnish, and stains, saving you hours of tedious hand sanding.
Now that you know the basics, let’s explore the various uses of an orbital sander. From sanding large surfaces to reaching tight corners, this tool is a true multitasker when it comes to woodworking. So, let’s roll up our sleeves and uncover the endless possibilities with an orbital sander!
<p>So, you’re curious about the uses of an orbital sander, huh? Well, you’re in the right place! Let’s dive in and discover how this versatile tool can make your woodworking projects a breeze. The orbital sander is a handy tool designed to deliver a smooth and even finish, perfect for tasks like refinishing furniture and smoothing out rough wooden surfaces. It’s lightweight and easy to handle, making it perfect for beginners and experienced DIY enthusiasts alike. Let’s explore the various uses of an orbital sander, from sanding large surfaces to reaching tight corners. Get ready to unleash your woodworking potential!</p>

The Uses of Orbital Sander: A Complete Guide
An orbital sander is a versatile power tool commonly used in woodworking and sanding projects. With its circular sanding pad that moves in an elliptical motion, it provides a smooth and even finish on various surfaces. Whether you’re a professional craftsman or a DIY enthusiast, understanding the uses of an orbital sander can help you achieve professional-looking results. In this comprehensive guide, we’ll explore the various applications and benefits of using an orbital sander, along with tips to get the most out of this essential tool.
Benefits of Using an Orbital Sander
Before we delve into the specific uses of an orbital sander, let’s first understand why it’s a popular choice among woodworkers and DIYers alike. Here are some key benefits of using an orbital sander:
- Efficiency: Orbital sanders are designed to remove material quickly and efficiently, allowing you to complete sanding tasks in less time.
- Smooth Finish: The elliptical motion of the sanding pad ensures a swirl-free, smooth finish on any surface.
- Easy to Use: Orbital sanders are user-friendly and require minimal effort to operate, making them suitable for both professionals and beginners.
- Versatility: These sanders can be used on a range of materials, including wood, metal, and plastic, making them a versatile tool for various projects.
- Less Fatigue: The ergonomic design of an orbital sander reduces hand and arm fatigue, allowing you to work comfortably for extended periods.
1) Smoothing and Preparing Wood Surfaces
One of the primary uses of an orbital sander is to smooth and prepare wood surfaces for finishing, such as staining or painting. The random orbital motion of the sanding pad helps eliminate visible scratch marks and imperfections, resulting in a flawless surface. Whether you’re sanding a wooden table, cabinet, or a piece of furniture, an orbital sander can make the job easier and more efficient.
To achieve optimal results, start with a lower grit sandpaper to remove any roughness or unevenness from the wood, gradually progressing to higher grits for a smoother finish. Remember to sand with the grain of the wood to avoid damaging the surface and always wear appropriate safety gear, including goggles and a dust mask, to protect yourself from flying debris or harmful particles.
By using an orbital sander to prepare wood surfaces, you’ll not only save time but also ensure a professional-looking result that will enhance the appearance of your project.
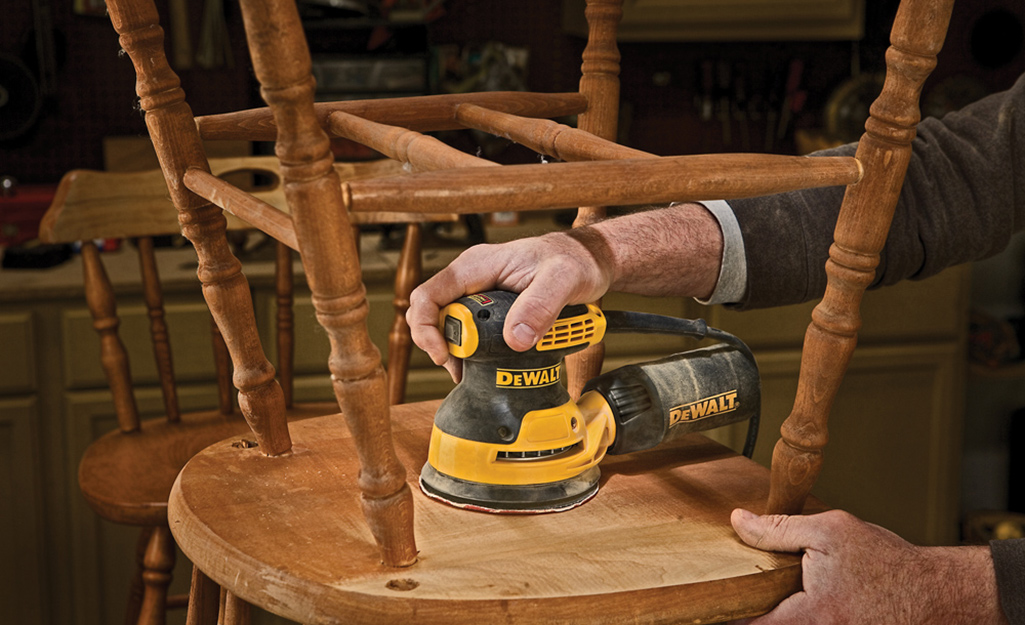
2) Refinishing and Restoring Furniture
If you have a worn-out piece of furniture that needs a new lease of life, an orbital sander can be your best friend. Whether you’re refinishing an old wooden chair or restoring a vintage dresser, an orbital sander can help strip away old varnish, paint, or coatings, revealing the beautiful natural wood underneath.
Start by using a coarse grit sandpaper to remove the existing finish, then gradually switch to finer grits to achieve a smooth surface. Be sure to sand in the direction of the wood’s grain to avoid causing any damage. Once you’ve removed the old finish, you can apply a fresh coat of stain or paint to bring your furniture back to its former glory.
An orbital sander makes the refinishing process quicker and easier compared to traditional manual sanding methods, allowing you to transform your furniture without spending hours laboring over it.
3) Removing Paint and Stripping Surfaces
When it comes to removing paint or stripping surfaces, an orbital sander can be a game-changer. Whether you’re dealing with peeling paint on a wall or an old layer of varnish on wooden stairs, an orbital sander can make the task much more efficient.
Start by selecting an appropriate sandpaper grit based on the surface and the thickness of the coating you need to remove. Begin sanding in a small area to test the effectiveness of the sandpaper and adjust the speed or pressure accordingly. Move the sander in a back-and-forth or circular motion, allowing the sandpaper to do the work. It’s important to wear a dust mask and safety goggles to protect yourself from the dust particles that will be released during the process.
By using an orbital sander to remove paint or strip surfaces, you’ll save time and effort compared to manual scraping or chemical stripping methods. Just be sure to keep the sander moving continuously to avoid creating divots or gouges in the surface.
4) Smoothing Drywall and Removing Spackle
An orbital sander can also be useful for smoothing drywall and removing excess spackle or joint compound. Before painting or applying wallpaper, it’s essential to ensure that the drywall is smooth and free from any imperfections.
Attach a fine-grit sandpaper to your orbital sander and gently run it over the drywall surface, focusing on any rough patches, bumps, or excess spackle. Be careful not to apply too much pressure, as it can damage the drywall or create uneven surfaces. Work in a systematic pattern, such as horizontal or diagonal strokes, to ensure even sanding.
An orbital sander will help you achieve a smooth and level surface, allowing you to create a flawless finish when painting or wallpapering. Just be sure to protect yourself and the surrounding area by using drop cloths and wearing a face mask to prevent inhaling any dust particles.
5) Sanding Finishing Touches and Curves
When it comes to sanding small or intricate areas, like rounded edges or curved surfaces, an orbital sander with a smaller head or a detail sanding attachment can be a valuable tool. These attachments allow you to reach tight corners, intricate details, and molding profiles, giving your project a professional and polished look.
For smaller areas or intricate details, use a sandpaper with a higher grit to ensure a smooth and fine finish. Keep the sander moving in a controlled motion to avoid creating any divots or uneven surfaces. Remember to take breaks and inspect your work regularly to check for any missed spots or unevenness.
An orbital sander is an excellent choice for sanding finishing touches and curves, providing precision and efficiency that would be challenging to achieve with manual sanding alone.
6) Sanding Between Coats of Paint or Varnish
When applying multiple coats of paint or varnish, it’s essential to sand between each layer to achieve a smooth and flawless finish. An orbital sander can save you time and effort by quickly sanding the surface without leaving visible sanding marks.
Use a fine grit sandpaper or a sanding sponge to lightly sand the surface between coats. This will help remove any imperfections, such as dust particles or brush strokes, and provide a better surface for the next layer of paint or varnish to adhere to. Remember to wipe away any dust with a clean cloth or vacuum before applying the next coat.
An orbital sander makes the process of sanding between coats more efficient, allowing you to achieve a professional-looking finish without the need for extensive hand sanding.
7) Smoothing and Preparing Metal Surfaces
Although an orbital sander is primarily used for woodworking, it can also be used to smooth and prepare metal surfaces before painting or refinishing. Whether you’re working on a metal chair, a car body, or a DIY metal project, an orbital sander with a suitable sandpaper grit can help remove rust, paint, or oxidation.
Start by selecting a sandpaper grit suitable for metal surfaces, and use the sander to gradually strip away any unwanted coatings or imperfections from the metal. Be sure to wear appropriate safety gear, such as goggles and gloves, and be mindful of any sparks or heat generated during the sanding process.
An orbital sander can make metal surface preparation more efficient, allowing you to achieve a smooth and clean surface ready for painting, refinishing or further metalworking.
The Benefits of Using an Orbital Sander
As we’ve explored in this guide, there are numerous benefits to using an orbital sander for various projects. From woodworking to metalworking, an orbital sander’s efficiency, versatility, and ability to provide a smooth finish make it an essential tool for professionals and DIYers alike.
Tips for Using an Orbital Sander
While an orbital sander is a valuable tool, it’s essential to use it correctly to ensure optimal results and safety. Here are some tips for using an orbital sander:
- Always wear appropriate safety gear, including safety glasses, a dust mask, and ear protection.
- Start with a lower grit sandpaper and gradually progress to higher grits for a smoother finish.
- Always sand in the direction of the wood’s grain to avoid damaging the surface.
- Keep the sander moving continuously to avoid creating divots or gouges in the surface.
- Work in a well-ventilated area or use a dust collection system to minimize the amount of airborne dust.
- Take breaks regularly and inspect your work to ensure even and smooth sanding.
- Ensure the sandpaper is securely attached to the sander to avoid any accidents or damage.
With its versatility and ability to provide a smooth finish, an orbital sander is an invaluable tool for a wide range of projects. Whether you’re smoothing wood surfaces, refinishing furniture, or preparing various materials for painting or finishing, an orbital sander can save you time and effort while delivering professional-looking results. By following the tips outlined in this guide, you’ll be able to make the most out of your orbital sander and achieve outstanding outcomes in all your sanding endeavors. So, grab your orbital sander, put on your safety gear, and let your creativity shine!”
Key Takeaways: What Are the Uses of an Orbital Sander?
- An orbital sander is a power tool used for sanding and smoothing surfaces like wood, metal, and plastic.
- It is commonly used in woodworking projects to remove paint, varnish, or old finishes.
- The random orbital motion of the sander prevents swirl marks and provides a smooth finish to the surface.
- Orbital sanders are versatile and can be used for both rough sanding and fine finishing tasks.
- They come in different sizes and are equipped with interchangeable sanding pads for various applications.
Frequently Asked Questions
Welcome to our FAQ section on the uses of an orbital sander. Here, we will address some common questions related to this versatile tool and how it can make your woodworking and DIY projects easier and more efficient.
1. How does an orbital sander work?
An orbital sander works by utilizing a circular sanding pad that moves in a random orbital motion. This means that as the sanding pad spins, it also moves in an elliptical pattern. This motion helps to prevent swirl or scratch marks on the surface being sanded. It also reduces the risk of uneven sanding.
The sanding pad of an orbital sander vibrates in small circles, allowing for smooth sanding even in tight corners and crevices. This tool is particularly effective at removing old finishes, smoothing rough surfaces, and preparing wood for painting or staining.
2. What are the main uses of an orbital sander?
An orbital sander is a versatile tool with various applications. Its main uses include sanding wood surfaces, removing old paint or varnish, preparing surfaces for finishing, and smoothing out rough edges or imperfections. Whether you are refinishing a piece of furniture, sanding down a wooden floor, or working on a carpentry project, an orbital sander can save you time and effort.
It’s important to note that an orbital sander is not designed for heavy-duty sanding tasks or aggressive material removal. For those purposes, a belt sander or a different type of sanding tool may be more suitable.
3. Are orbital sanders suitable for all types of wood?
Yes, orbital sanders are generally suitable for working on a wide range of wood types. Whether you are sanding softwoods like pine or hardwoods like oak, an orbital sander can provide effective results. The random orbital motion helps to prevent any sanding marks that could be more noticeable on certain wood grains.
However, it is always recommended to do a test run on a small, inconspicuous area of the wood before sanding the entire surface. This allows you to assess how the wood reacts to the sander and adjust your technique or sandpaper grit accordingly.
4. Can an orbital sander be used for other materials besides wood?
While an orbital sander is primarily designed for woodworking tasks, it can also be used on certain other materials. These can include metal surfaces, drywall, and even some plastics. However, it’s important to note that using an orbital sander on non-wood materials may require specific sandpaper designed for those materials.
Additionally, the power and speed settings of the orbital sander may need to be adjusted depending on the material being sanded. It’s always a good idea to refer to the manufacturer’s guidelines and recommendations for using an orbital sander on different materials.
5. What safety precautions should I take when using an orbital sander?
When using an orbital sander, it’s essential to prioritize safety. Here are some key precautions to keep in mind:
First, always wear protective goggles or safety glasses to shield your eyes from flying debris. Additionally, consider using a dust mask to prevent inhalation of fine particles. It’s also important to work in a well-ventilated area or use a dust collector to minimize dust buildup. Finally, make sure to read the instruction manual that comes with your orbital sander to understand specific safety guidelines and best practices. Always follow these instructions and take breaks if you feel fatigued or strained during use.
**Summary**
An orbital sander is a handy tool that helps you smooth and prepare surfaces for painting or staining. It uses a circular sanding pad that moves in a random motion, making it easier to sand evenly. The orbital sander is great for removing old varnish, smoothing rough edges, and getting rid of paint drips.
Not only is the orbital sander efficient, but it is also user-friendly. With its lightweight design and easy-to-grip handle, even beginners can use it with confidence. Just remember to always wear safety goggles and a face mask to protect yourself from dust particles. So, whether you want to rejuvenate an old piece of furniture or get your walls ready for a fresh coat of paint, the orbital sander is a valuable tool to have in your toolkit.