
When to use an orbital sander? Well, you’ve come to the right place! If you’ve ever wondered how to make your woodworking projects smooth and polished, an orbital sander can be your secret weapon. But when should you bring out this handy tool? Let’s dive in and find out!
Picture this: you’re working on a wooden table or a DIY project that needs a flawless finish. That’s when an orbital sander comes to the rescue. It’s perfect for tackling rough surfaces, removing old paint or varnish, and getting that smooth, even texture you desire. No more sanding by hand for hours on end!
So, when should you reach for an orbital sander? One of the best times is when you’re starting a new woodworking project. Before you apply any finish or paint, the orbital sander can help prepare the surface, making it clean and ready for the next steps. Plus, it saves you time and energy, so you can focus on the creative part of your project.
In a nutshell, an orbital sander is your go-to tool when you want a polished, professional look. Whether you’re a seasoned DIYer, an aspiring woodworker, or just someone who loves a smooth finish, an orbital sander can take your projects to the next level. So, let’s grab that sander and get sanding!
When to Use an Orbital Sander?
Orbital sanders are versatile power tools that are used for smoothing and finishing surfaces. They are commonly used in woodworking, construction, and DIY projects. Knowing when to use an orbital sander can help you achieve professional-looking results with ease. Whether you are a professional craftsman or a DIY enthusiast, understanding the scenarios where an orbital sander excels will enable you to make the most of this tool and save time and effort in achieving a smooth and flawless finish.
The Benefits of Using an Orbital Sander
Before diving into when to use an orbital sander, let’s explore the benefits this tool provides. Orbital sanders are known for their ability to deliver a smooth and even finish without leaving swirl marks or scratches on the surface. They are designed to operate in small and tight spaces, making them ideal for working on intricate projects and detailed pieces. Additionally, orbital sanders are easy to control, reducing the risk of over-sanding or damaging the workpiece. By utilizing an orbital sander in the right scenarios, you can achieve exceptional results and elevate the quality of your woodworking or DIY projects.
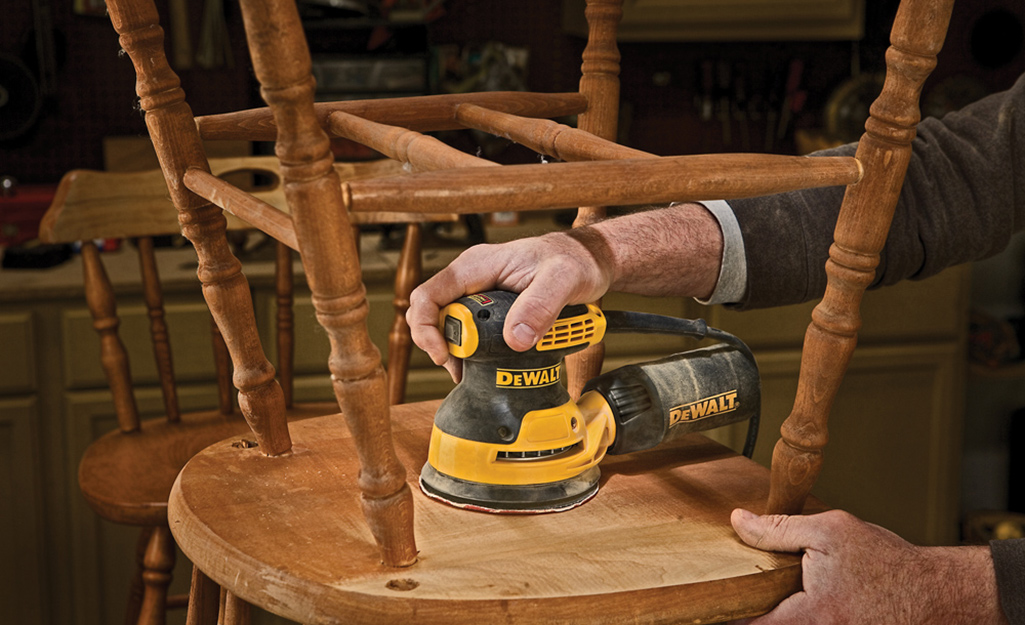
When to Use an Orbital Sander on Wood Furniture
Orbital sanders are commonly used on wood furniture to achieve a smooth and polished finish. They excel at removing roughness, scratches, and imperfections from wooden surfaces. A typical scenario where an orbital sander is beneficial is during the refinishing process. If you have an older piece of furniture that needs a makeover, using an orbital sander can help you strip away the old finish, smooth out the wood, and prepare it for staining or painting. Orbital sanders are also great for rounding off sharp edges and creating a uniform look across the entire piece.
When working with wood furniture, be sure to choose the right grit sandpaper for the task. Coarse grit sandpaper, such as 80 or 100, is suitable for removing the old finish or paint. As you progress to smoothing the wood, you can switch to medium grit sandpaper like 120 or 150. For the final sanding before applying a finish, use a fine grit sandpaper like 220 or 240 for a smooth and flawless result.
One additional tip when using an orbital sander on wood furniture is to always sand with the grain. Sanding against the grain may result in scratches that can be difficult to remove later on.
An Orbital Sander for Drywall Sanding
Drywall sanding is a crucial step in achieving a smooth and seamless finish in any remodeling or construction project. Traditional sanding methods can be time-consuming and labor-intensive. This is where an orbital sander comes in handy. When used with the appropriate sandpaper grit, an orbital sander can quickly and efficiently smooth out joint compound, sand down ridges, and create a smooth surface for painting or wallpapering.
When using an orbital sander for drywall sanding, choose sandpaper with a fine grit, preferably 220 or higher. This will help prevent over-sanding and avoid damaging the drywall. It’s also important to move the sander in smooth and circular motions, applying even pressure to ensure an even finish. Always wear a dust mask and safety goggles when sanding drywall, as the process can create significant amounts of dust.
Using an orbital sander for drywall sanding can save you time and effort. It allows you to achieve professional results without the need for manual sanding, making it an indispensable tool for any remodeling or construction project.
Refinishing a Wooden Floor with an Orbital Sander
Wooden floors often require refinishing to restore their beauty and protect them from wear and tear. An orbital sander is an excellent tool to use when refinishing a wooden floor. It allows you to remove the old finish, smooth out imperfections, and prepare the surface for new stain or paint.
When refinishing a wooden floor, it’s essential to start with a coarse grit sandpaper, such as 36 or 40, to remove the existing finish and level out any uneven surfaces. As you progress to the smoothing stage, switch to medium grit sandpaper like 80 or 100. Finally, use a fine grit sandpaper like 120 or 150 for the last sanding pass to achieve a smooth finish. Make sure to sand the floor in the direction of the wood grain for the best results.
It’s important to note that refinishing a wooden floor can be a time-consuming and messy process. Proper preparation, such as covering furniture and using a dust collection system, is crucial to ensure a successful and clean outcome. While an orbital sander is an effective tool for refinishing wooden floors, it requires patience and attention to detail to achieve the desired results.
Key Takeaways: When to Use an Orbital Sander?
1. When you want to sand large areas quickly and efficiently.
2. When you need to remove old paint or stain from a surface.
3. When you want to smooth rough edges or surfaces.
4. When you’re working on woodworking projects like furniture or cabinets.
5. When you want a tool that is easy to handle and provides a smooth finish.
Frequently Asked Questions
Welcome to our frequently asked questions section about when to use an orbital sander. If you’re unsure about how and when to utilize this handy tool, we’ve got you covered. Read on for answers to common queries about orbital sanders and their optimal application.
1. What types of projects are suitable for using an orbital sander?
An orbital sander is a versatile tool that can be used for various projects, both big and small. It is particularly useful for tasks such as smoothing rough surfaces, removing paint or varnish, and preparing surfaces for painting or staining. Whether you’re refinishing furniture, touching up trim, or giving a wooden deck a fresh look, an orbital sander can be a reliable companion.
However, it’s worth noting that an orbital sander may not be suitable for certain delicate or intricate projects, as its design focuses on efficiency rather than precision. For intricate work or tight spaces, hand sanding or using specialized sanding tools may be more appropriate.
2. When should I choose an orbital sander over other types of sanders?
An orbital sander is an excellent choice when you want to achieve a smooth and evenly sanded surface without the risk of leaving visible sanding marks. Its random orbital motion helps prevent swirls or scratches commonly associated with other types of sanders. So, if you’re aiming for a flawless finish, an orbital sander is your go-to tool.
Other sanders, such as belt sanders or detail sanders, may be more suitable for specific tasks. For instance, a belt sander is great for rapid material removal or leveling uneven surfaces, while a detail sander excels at reaching tight corners and intricate details. Consider the task at hand and the desired result to determine the best sander for your needs.
3. Are there any safety precautions I should take when using an orbital sander?
Yes, safety should always be a priority when working with power tools, and using an orbital sander is no exception. Here are a few key safety precautions to keep in mind:
First, make sure to wear proper personal protective equipment (PPE), including safety goggles, a dust mask, and ear protection, as sanding can create fine particles and generate noise.
Additionally, always ensure that the sander is switched off and unplugged when not in use or when making adjustments. When operating the sander, maintain a firm grip, and avoid putting excessive pressure on the tool, as this can affect its performance and increase the risk of injury.
4. How do I know which sandpaper grit to use with an orbital sander?
The choice of sandpaper grit depends on the task at hand and the desired level of sanding. Generally, the higher the grit number, the finer the sandpaper and the smoother the finish. For initial material removal or when working with rough surfaces, start with a coarser grit (around 80 or 100) and gradually progress to finer grits (such as 120, 180, or even 220) for a smoother result.
Remember to inspect the condition of the sandpaper regularly and replace it when it becomes worn or clogged. Using worn-out sandpaper can compromise the efficiency and effectiveness of the orbital sander, leading to unsatisfactory results.
5. Can I use an orbital sander on surfaces other than wood?
While an orbital sander is commonly used on wood surfaces, it can also be used on other materials such as metal or plastic. When sanding non-wood surfaces, it’s important to select the appropriate sandpaper with a grit suitable for the material. Keep in mind that orbital sanders are designed for light to moderate sanding tasks, so if you’re working with particularly tough or resistant materials, a different sanding tool may be more appropriate.
Always test the orbital sander on a small, inconspicuous area before proceeding with the full sanding to ensure that there are no adverse effects on the material. If in doubt, consult the manufacturer’s instructions or seek professional advice.

Orbital Sander Basics | Beginner Tool
Summary
So, when should you use an orbital sander? Well, first, if you have a big sanding job, like refinishing a table or sanding down a door, it’s a great tool to have. The orbital sander can remove a lot of material quickly, making the job much faster and easier.
Second, if you want a smooth and even finish on your woodwork, an orbital sander is your best friend. It can create a uniform surface by sanding in small circles, minimizing any potential scratches or swirl marks.
Overall, an orbital sander is perfect for larger sanding projects and achieving a polished result. Just make sure to use it carefully and always wear protective gear, like goggles and a mask, to keep yourself safe. Happy sanding!