If you’ve ever wondered, “Where is the drill bit for the Ring Doorbell?” you’re in the right place! Installing a Ring Doorbell can provide an extra layer of security to your home, and knowing where to find the drill bit is essential for a successful installation. In this guide, we’ll explore the location of the drill bit and provide you with the information you need to confidently tackle this DIY project.
When it comes to installing your Ring Doorbell, having the right tools is crucial. The good news is that you don’t have to run to the hardware store for a special drill bit. Ring Doorbell kits usually come with a mounting bracket that includes a drill bit specifically designed for the installation. So, where exactly is this drill bit hiding? Don’t worry, it’s conveniently tucked inside the mounting bracket itself, ready for use!
Now that you know where the drill bit for the Ring Doorbell is located, it’s time to start your installation process. Remember to follow the manufacturer’s instructions carefully and take your time to ensure a proper and secure installation. So grab your toolkit, locate the drill bit in the mounting bracket, and get ready to enhance the security of your home with a Ring Doorbell!
1. Start by locating the screws that came with your Ring Doorbell.
2. Check if the screws have a small drill bit attached to the end.
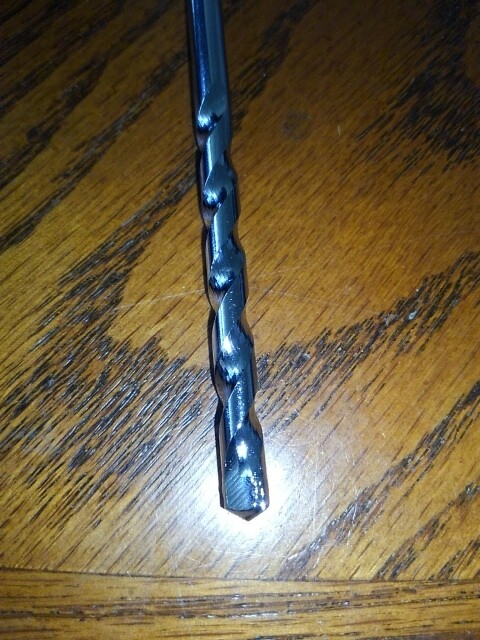
3. If not, you can use a 3/32″ drill bit to make pilot holes for the screws.
4. Securely mount your Ring Doorbell using the screws and drill bit if needed.
Remember, always double-check the instructions provided by Ring for your specific model to ensure proper installation.

Where is the Drill Bit for Ring Doorbell? A Complete Guide
Ring doorbells have become incredibly popular in recent years, providing homeowners with enhanced security and convenience. However, when it comes to installing your Ring doorbell, one essential tool you’ll need is a drill bit. In this comprehensive guide, we’ll explore where you can find the drill bit for your Ring doorbell, its importance in the installation process, and tips on using it effectively. Whether you’re a DIY enthusiast or a first-time homeowner, this guide will ensure that you have all the information you need to get your Ring doorbell up and running smoothly.
Why is the Drill Bit Important for Ring Doorbell Installation?
Before we dive into the specifics of where to find the drill bit for your Ring doorbell, let’s first discuss why it’s such a crucial tool for the installation process. The drill bit is necessary for creating the pilot holes required to mount the Ring doorbell bracket securely onto your wall or door frame. These pilot holes ensure that the screws go in smoothly and hold the doorbell in place securely. Without the drill bit, you may face difficulties mounting the doorbell, and it could potentially become loose or fall off over time.
Where Can You Find the Drill Bit for Ring Doorbell?
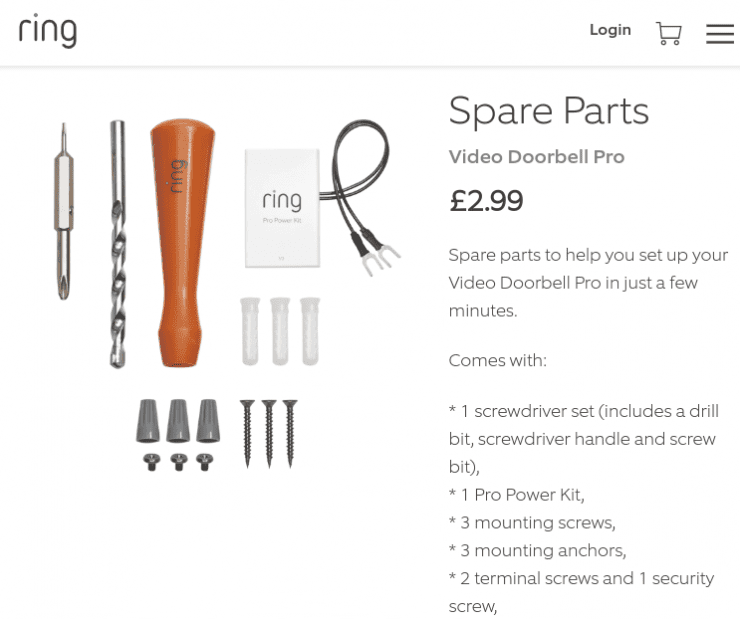
Now that we understand the importance of the drill bit let’s explore where you can find it. When you purchase a Ring doorbell, it typically comes with a drill bit included in the package. The drill bit is usually located in a small compartment within the packaging, alongside other installation accessories like screws and wall anchors. It’s essential to check the packaging thoroughly to ensure that you don’t accidentally throw away or misplace the drill bit. If you are unable to locate the drill bit in the packaging, you can contact Ring’s customer support for assistance. They can provide guidance on acquiring a replacement drill bit.
How to Use the Drill Bit for Ring Doorbell Installation
Using the drill bit for your Ring doorbell installation is a relatively straightforward process, even for those with limited DIY experience. Here’s a step-by-step guide to help you use the drill bit effectively:
Step 1: Choose the appropriate drill bit size. The drill bit size will depend on your specific Ring doorbell model and the type of material you’ll be drilling into. Refer to the installation manual or Ring’s website for the recommended drill bit size.
Step 2: Mark the drill hole locations. Use the provided template or a measuring tape to accurately mark the spots where you’ll be drilling the pilot holes. Double-check the positioning to ensure that it aligns with your desired placement for the doorbell.
Step 3: Securely attach the drill bit to your drill. Make sure the drill bit is securely locked into place, allowing for easy drilling without wobbling or slipping.
Step 4: Drill the pilot holes. Carefully drill the pilot holes at the marked locations. Apply consistent pressure and maintain a steady hand to prevent any damage to your walls or door frame.
Step 5: Install the doorbell bracket. Once the pilot holes are drilled, proceed to install the doorbell bracket using the provided screws and wall anchors. Ensure that the bracket is tightly secured.
Step 6: Attach the Ring doorbell. Finally, attach the Ring doorbell onto the bracket, following the manufacturer’s instructions. Make sure it fits snugly and doesn’t wobble.
Remember, it’s essential to prioritize safety while using the drill bit. Wear protective eyewear and gloves, and ensure that the area you’re drilling is clear of any obstacles before proceeding.
Benefits of Using the Drill Bit for Ring Doorbell Installation
Using the drill bit that comes with your Ring doorbell offers several benefits. Firstly, it ensures a secure and stable installation, preventing your doorbell from becoming loose or detaching over time. Secondly, it allows for precise pilot hole drilling, resulting in a professional-looking installation. Additionally, by using the provided drill bit, you can be confident that it is compatible with your Ring doorbell and will fit perfectly.
Alternative Drill Bit Options for Ring Doorbell Installation
While it’s recommended to use the drill bit that comes with your Ring doorbell, there may be instances where you require an alternative option. For example, if you misplace the original drill bit or prefer using a different brand or type. In such cases, it’s crucial to ensure that the alternative drill bit matches the recommended size and quality standards for the secure installation of your Ring doorbell. Consult with a professional or refer to Ring’s website for guidance on compatible alternatives.
Tips for Using the Drill Bit Effectively
To ensure a smooth and successful installation process, here are some tips for using the drill bit effectively:
1. Familiarize yourself with the user manual and installation instructions provided by Ring before starting the installation process.
2. Take measurements and double-check the positioning before drilling to ensure accurate placement of the pilot holes.
3. Practice drilling on a scrap piece of material similar to your wall or door frame to get a feel for the drill and adjust your technique if needed.
4. Use slow, steady pressure while drilling to prevent any damage to the surface being drilled into.
5. Clean up any debris or dust after drilling the pilot holes to ensure a clean and secure installation.
Now that you have a comprehensive understanding of where to find the drill bit for your Ring doorbell, its importance, and how to use it effectively, you’re ready to embark on your installation journey. Remember to follow the manufacturer’s instructions and prioritize safety throughout the process. Enjoy the added security and convenience that your Ring doorbell brings to your home!
Key Takeaways: Where is the drill bit for Ring Doorbell?
Are you wondering where to find the drill bit required for installing your Ring Doorbell? Here are some key points to keep in mind:
- The drill bit for Ring Doorbell is usually included in the installation kit.
- Check the contents of the package to ensure you have the necessary tools.
- If the drill bit is missing, contact Ring customer support for assistance.
- You can also purchase a compatible drill bit from hardware stores or online retailers.
- Make sure to use the appropriate size and type of drill bit recommended by Ring.
Frequently Asked Questions
Welcome to our FAQ section where we address common questions about the drill bit for Ring Doorbell!
Q: How do I install a Ring Doorbell without a drill bit?
A: If you don’t have a drill bit or prefer not to use one, you can install a Ring Doorbell using adhesive mounting tape. Simply clean the surface, apply the tape to the back of the doorbell, and firmly press it onto the desired location. Make sure the surface is flat and compatible with adhesive tape for the best results. Keep in mind that adhesive tape may not be as secure as using a drill, so it’s essential to periodically check the device’s stability.
Q: Can I use my own drill bit to install a Ring Doorbell?
A: Yes, you can use your own drill bit to install a Ring Doorbell as long as it’s the correct size and compatible with the material you’re drilling into. The recommended drill bit size for a Ring Doorbell is 3/16 inch, suitable for most standard installations.
Before using your own drill bit, make sure it’s in good condition and sharp. Always follow the manufacturer’s instructions and exercise caution when drilling to avoid damage to the doorbell or the mounting surface.
Q: Does the Ring Doorbell come with a drill bit?
A: No, the Ring Doorbell does not come with a drill bit in the package. However, it typically includes all the necessary mounting hardware and tools, such as screws and a screwdriver bit, to help you with the installation process. You will need to provide your own drill bit if you choose to use one during the installation.
If you don’t have a drill bit, don’t worry! There are alternative installation methods available, such as adhesive mounting tape, as mentioned earlier.
Q: Where can I purchase a drill bit for installing a Ring Doorbell?
A: You can find drill bits suitable for installing a Ring Doorbell at various hardware stores, home improvement centers, or online retailers. Look for drill bits that are 3/16 inch in size and are appropriate for drilling into the material of your mounting surface (e.g., wood, metal, brick). Some brands even offer drill bit sets specifically designed for doorbell installations, which can be a convenient option.
Before purchasing, ensure that the drill bit is of good quality to ensure an efficient and safe installation process.
Q: Can a professional installer handle the drilling for my Ring Doorbell?
A: Absolutely! If you’re unsure about drilling or prefer to have a professional take care of the installation, you can hire a certified installer or contact Ring’s professional installation service. They have the expertise and tools required to ensure a secure and accurate installation, saving you time and effort.
Professional installers can handle any necessary drilling and ensure that your Ring Doorbell is properly mounted and functioning correctly, giving you peace of mind.
Summary
The drill bit for the Ring Doorbell is not included in the box when you purchase it. You will need to get a drill bit separately.
To find the right size drill bit, you can check the Ring website or contact their support team. They will provide you with the exact specifications you need.
When drilling a hole for the Ring Doorbell, make sure to follow the instructions carefully and use a drill bit that matches the size recommended. It’s important to create a clean and secure installation for your Ring Doorbell.
Remember, always seek adult supervision and assistance when using any tools or equipment.