
Have you ever wondered which way the bevel goes on a hand plane? Well, you’ve come to the right place! Let’s dive into this fascinating woodworking topic and uncover the answer together.
Now, let’s imagine you’re holding a hand plane in your hands. Do you know which way the bevel should be facing? Don’t worry if you’re not sure; we’ll shed some light on this mystery in just a moment.
Understanding the proper orientation of the bevel is crucial for achieving smooth and precise woodworking results. So, let’s roll up our sleeves and explore the bevel’s correct position on a hand plane. Let’s get started!
A hand plane has a bevel on the cutting edge of its blade. The bevel should be facing downwards when using the hand plane. This orientation allows the bevel to slice through the wood fibers cleanly, resulting in a smoother and more precise cut. When setting up your hand plane, ensure the bevel is properly sharpened and positioned downwards for optimal performance.
Which Way Does the Bevel Go on a Hand Plane?
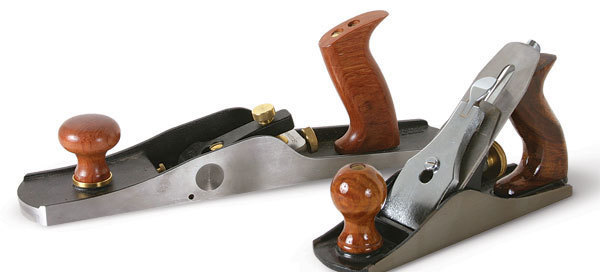
Hand planes are essential tools in woodworking for shaping and smoothing wood surfaces. One crucial aspect of using a hand plane is understanding the direction in which the bevel should be positioned. The bevel refers to the angle at the cutting edge of the plane iron, which determines the way the plane cuts through the wood. In this article, we will delve into the topic of which way the bevel goes on a hand plane, exploring its importance, benefits, and tips for achieving optimal results. Whether you’re a beginner or an experienced woodworker, understanding how to position the bevel correctly will greatly enhance your planing skills and the quality of your finished projects.
The Importance of Bevel Direction
The directional orientation of the bevel on a hand plane significantly affects the tool’s performance and the quality of the wood surface it produces. When using a hand plane, the bevel can be positioned facing either upwards or downwards, relative to the direction of the wood grain. This positioning influences the cutting action of the plane and the type of shavings it produces.
When the bevel is facing upwards (or facing away from you as you push the plane forward), it results in a shearing cut. This means that the plane iron slices through the wood fibers cleanly and smoothly, producing thin, translucent shavings. This orientation is ideal for planing difficult grain or highly figured wood, as it reduces tear-out and leaves a smooth surface behind.
On the other hand, when the bevel is facing downwards (or towards you as you push the plane forward), it creates a scraping action. In this orientation, the plane iron scrapes the wood rather than cutting it, resulting in thicker, more coarse shavings. While this may not provide the same level of refinement as a shearing cut, it can be advantageous when tackling highly irregular or challenging grain patterns.
The Benefits of a Shearing Cut
When the bevel is positioned to achieve a shearing cut, several benefits come into play. Firstly, a shearing cut requires less effort to push the plane through the wood, making it easier to control and reducing user fatigue. Additionally, the shearing action produces smoother surfaces with fewer visible tool marks compared to a scraping cut. This is especially crucial when working with fine woods or when aiming for a polished finish.
Furthermore, a shearing cut minimizes tear-out, which occurs when the wood fibers are lifted or torn from the surface, resulting in a rough and uneven appearance. By slicing through the fibers cleanly, tear-out is significantly reduced, leading to a more pristine finish. This is particularly important when planing against the grain or working with woods that have interlocking or wild grain patterns.
Overall, the shearing cut achieved by positioning the bevel upwards on a hand plane offers greater control, smoother surfaces, and minimizes tear-out, making it the preferred choice for most woodworking applications.
Tips for Achieving a Shearing Cut
To achieve a shearing cut with your hand plane, follow these tips:
- Ensure that the plane iron is sharp and properly honed. A dull blade will not perform well regardless of its bevel orientation.
- Set the bevel angle to the desired degree. This angle will vary based on the wood species, grain direction, and personal preference.
- When starting a planing stroke, engage the bevel by slightly tilting the plane towards the working edge. This will ensure that only the cutting edge of the blade makes contact with the wood.
- Maintain consistent pressure and smooth, fluid motions as you push the plane forward. Avoid applying excessive force, as it can lead to chatter marks on the surface.
- Regularly check the wood surface and adjust the bevel direction if tear-out or roughness occurs. Experiment with slight adjustments until you achieve the desired results.
By following these tips, you’ll be well on your way to mastering the art of achieving a shearing cut with your hand plane and creating beautifully finished wood surfaces.
Common Mistakes to Avoid
Suboptimal Blade Sharpness
One common mistake when using a hand plane is neglecting to keep the blade sharp. A dull blade will struggle to cut cleanly through the wood fibers, resulting in tear-out and an overall poor surface finish. Regularly sharpening and honing the blade will ensure optimal cutting performance, regardless of the bevel direction.
Insufficient Blade Tension
Another mistake that can hinder the performance of a hand plane is insufficient blade tension. When the blade is loose or not securely tightened, it may chatter or vibrate during use, causing uneven cuts and surface irregularities. Make sure to properly secure the blade in place to achieve consistent and precise results.
Incorrect Bevel Angle
Choosing the wrong bevel angle for the wood species and grain direction can lead to less than satisfactory results. Experiment with different angles to find the optimal setting for the specific wood you are working with. Keep in mind that harder woods may require a steeper angle, while softer woods may benefit from a more acute angle.
Finding Your Perfect Bevel Direction
While the shearing cut achieved by positioning the bevel upwards is generally preferred for most woodworking tasks, it’s essential to keep in mind that there may be exceptions. Certain wood species, highly irregular grain patterns, or specific woodworking techniques may call for the use of a scraping cut with the bevel facing downwards. It’s crucial to experiment and adapt the bevel direction to achieve the desired results for each unique woodworking project.
Remember to pay attention to the wood’s grain direction, the desired surface finish, and any potential challenges in order to determine the ideal bevel orientation. By understanding the importance of bevel direction and following the tips outlined in this article, you’ll be able to harness the full potential of your hand plane and create stunning woodworking masterpieces.
So, the next time you pick up a hand plane, remember: the bevel up for a shearing cut, and the possibilities for woodworking excellence are endless!
Key Takeaways: Which Way Does the Bevel Go on a Hand Plane?
- The bevel on a hand plane should always face down.
- When using a hand plane, the bevel helps in slicing through the wood fibers smoothly.
- Placing the bevel down reduces the risk of tear-out or splintering of the wood surface.
- Having the bevel down also allows for more control and stability while planing.
- It is important to ensure the bevel is sharp and properly honed for efficient and effective planing.
Frequently Asked Questions
When it comes to using a hand plane, understanding the direction of the bevel is crucial for achieving the desired result. Here are some commonly asked questions regarding the bevel direction on a hand plane:
———————————————————-
1. How do I determine the direction of the bevel on a hand plane?
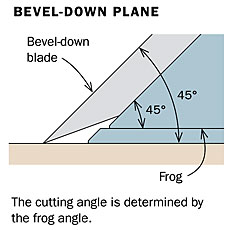
The easiest way to determine the bevel direction on a hand plane is by looking at the blade. On most hand planes, the bevel is located on one side of the blade. To find the direction of the bevel, hold the plane upright with the blade facing you. The bevel will typically be on the bottom side of the blade, sloping downward to the cutting edge. This angled bevel helps to reduce friction and allows the plane to cut smoothly through the wood.
It’s important to note that some specialty hand planes, like those used for certain types of woodworking joinery, may have a bevel on both sides of the blade. In these cases, you will need to determine the specific bevel direction for each side of the blade.
2. Why is it important to know the direction of the bevel on a hand plane?
Understanding the direction of the bevel on a hand plane is crucial because it affects how the plane interacts with the wood. The bevel determines the angle at which the plane’s blade meets the wood’s surface, which in turn affects the quality of the cut and the ease of use. When using a hand plane, the bevel should always be oriented in a way that allows the cutting edge to make contact with the wood first.
If the bevel is facing the wrong way, the plane may not cut properly and can leave rough or uneven surfaces. Additionally, having the bevel facing in the wrong direction can increase the likelihood of the blade digging into the wood or causing tear-out. By knowing the correct bevel direction, you can ensure smooth, controlled cuts and achieve the desired results in your woodworking projects.
3. Can I use a hand plane with the bevel facing upwards?
While it is technically possible to use a hand plane with the bevel facing upwards, it is not the recommended or commonly accepted practice. When the bevel is facing upwards, it creates a steeper angle of attack between the cutting edge and the wood’s surface. This can make the plane more difficult to push and control, leading to less precise and smooth cuts.
Having the bevel facing upwards also increases the risk of the blade digging into the wood or causing tear-out, as the steeper angle of attack can result in more aggressive cutting action. To achieve the best cutting performance and control, it is generally recommended to use a hand plane with the bevel facing downwards, allowing the blade to make contact with the wood at a shallower angle.
4. Is the bevel direction the same for all types of hand planes?
The bevel direction can vary depending on the type of hand plane you are using. While the general rule is to have the bevel facing downwards, there are exceptions. Some specialty hand planes, such as those used for scraping or certain types of joinery, may have the bevel facing upwards or in a different direction.
It is essential to consult the manufacturer’s instructions or references specific to the type of hand plane you are using to determine the correct bevel direction. Following the recommended bevel direction for each type of plane will ensure optimal performance and results.
5. How do I sharpen a hand plane blade with the correct bevel angle?
When sharpening a hand plane blade, it is essential to maintain the correct bevel angle to ensure proper cutting performance. The bevel angle is typically determined by the manufacturer and can vary depending on the type of plane and its intended use.
To sharpen the blade with the correct bevel angle, you can use a sharpening guide or jig specifically designed for hand plane blades. These tools help maintain a consistent angle while sharpening. Alternatively, some woodworkers prefer to sharpen freehand, relying on their skill and experience to maintain the correct bevel angle.
Regardless of the method used, it is important to check the bevel angle periodically during the sharpening process to ensure it remains accurate. Properly sharpening the hand plane blade with the correct bevel angle will result in sharper, longer-lasting cutting edges and improved overall performance.
Summary
Okay, let’s sum it all up! When using a hand plane, the bevel should face downward. This helps the plane cut smoothly and prevents it from digging into the wood. It’s important to pay attention to the bevel and make sure it’s positioned correctly for the best results. Now you’re ready to use a hand plane like a pro!
In conclusion, remember that the bevel goes down on a hand plane. Keep practicing, and soon you’ll be able to create smooth and beautiful surfaces on your woodworking projects. Happy planing!