Why do you stagger plywood? When it comes to installing plywood, there’s a method to the madness. Staggering plywood is an important technique to ensure stability and strength in your construction projects.
By staggering the plywood sheets, you create a stronger and more secure base. This technique involves alternating the seams of the plywood sheets so that they don’t line up in a straight line.
But why is this important? Well, staggering the plywood helps to distribute weight evenly and reduces the risk of weak spots or potential failure. It also helps to minimize the risk of warping and adds structural integrity to your build. So, let’s dive deeper into why you should stagger plywood and how it benefits your projects.

Why Do You Stagger Plywood? Exploring the Importance of Proper Plywood Installation
When it comes to installing plywood, one crucial technique that should never be overlooked is staggering. Staggering refers to the practice of alternating the placement of plywood sheets, creating a strong and stable surface. This method is essential to prevent the formation of weak spots, potential structural damage, and ensure longevity. In this article, we will delve into the reasons why you should stagger plywood, the benefits it offers, and some tips for proper installation.
The Importance of Staggering Plywood
Staggering plywood is not just a recommended practice; it is absolutely necessary for maintaining structural integrity and preventing issues down the line. When sheets of plywood are placed directly on top of each other, the seams align, leaving vulnerable spots where the plywood edges can weaken and potentially fail. By staggering the sheets, the seams are dispersed, spreading the load evenly across the surface and significantly reducing the risk of damage or failure.
Another key reason for staggering plywood is to minimize potential changes in the plane of the floor or the wall. Wood tends to expand and contract with changes in temperature and humidity, and if all the seams of the plywood align, these movements can lead to unsightly gaps or even buckling. Staggering the sheets helps distribute these movements, allowing the plywood to accommodate changes without compromising the stability of the structure.
Additionally, staggering plywood enhances the overall strength and load-bearing capacity of the surface. This is particularly important in applications such as subflooring or wall sheathing, where the plywood acts as a structural element. By distributing the seams, staggering ensures that the weight and pressure exerted on the surface are equally absorbed by the entire area, reducing the risk of localized damage.
The Benefits of Staggering Plywood
Staggering plywood offers a range of benefits that go beyond structural integrity. One of the main advantages is improved aesthetics. When the seams of plywood sheets align, it can create a visually unappealing pattern of lines and gaps. Staggering the sheets helps create a more uniform and visually pleasing surface, particularly important if the plywood will be left exposed or if it will serve as a base for flooring or wall finishes.
Furthermore, opting to stagger plywood can enhance the overall durability of the surface. As mentioned earlier, aligning seams can create weak spots prone to failure or damage. By staggering the sheets, the load is distributed more evenly, reducing the risk of stress concentration and extending the lifespan of the plywood installation. This is especially valuable in high traffic or heavy load areas, where the plywood will be subjected to more significant wear and tear.
Finally, staggering plywood also offers advantages in terms of sound reduction and thermal insulation. By dispersing the seams, the transmission of sound and heat is minimized, creating a more comfortable and energy-efficient space. This can be particularly beneficial in applications such as flooring or interior wall installations, where controlling noise levels and maintaining comfortable temperatures are important considerations.
Tips for Properly Staggering Plywood
To ensure that you stagger plywood effectively, follow these practical tips:
- Start by identifying the orientation of the plywood sheets, usually indicated by the manufacturer’s recommendations or any specific requirements of your project.
- Avoid placing seams directly opposite each other, aiming for an offset of at least half a sheet’s length for maximum stability.
- Use construction adhesive or subfloor adhesive between the plywood sheets to strengthen the bond and reduce the potential for movement.
- Secure the plywood to the underlying structure using appropriate fasteners, taking care not to damage the edges or compromise the integrity of the plywood.
- Always follow the guidelines and specifications provided by the manufacturer for the specific type of plywood you are using, as different materials may have unique requirements.
Common Mistakes to Avoid When Staggering Plywood
In addition to understanding the importance and benefits of staggering plywood, it is equally important to be aware of common mistakes that should be avoided:
1. Not Staggering the Plywood
Perhaps the most significant mistake is neglecting to stagger the plywood altogether. Failing to stagger the sheets can compromise the structural integrity of the installation, leading to weakened spots, potential failure, or the need for costly repairs in the future. It is essential to prioritize proper installation techniques to ensure a reliable and durable finished product.
2. Incorrectly Aligning the Seams
Another common mistake is aligning the seams of the plywood sheets instead of staggering them. Aligning the seams creates vulnerable spots where stress can concentrate, increasing the likelihood of damage or failure. Always take care to offset the seams properly, following the recommended guidelines and ensuring that the edges of the sheets are adequately supported.
3. Neglecting Adhesive and Fastening
Proper use of construction adhesive and secure fastening is crucial for a successful plywood installation. Neglecting to apply adhesive between the sheets or using incorrect fasteners can result in movement, gaps, or even delamination. Be sure to choose the appropriate adhesive and fasteners for your specific project, following the manufacturer’s recommendations and guidelines.
4. Ignoring Manufacturer Specifications
Each type of plywood may have unique characteristics and specific installation requirements. Ignoring these specifications can lead to subpar results and potential issues. Take the time to familiarize yourself with the manufacturer’s guidelines, paying attention to details such as fasteners, adhesives, and specific staggering recommendations. Adhering to these specifications will help ensure a successful installation.
5. Failing to Consider Environmental Factors
Environmental factors such as temperature and humidity can significantly impact the performance of plywood installations. Failing to consider these factors when staggering plywood can lead to issues such as gaps, buckling, or delamination. Ensure that the space where the plywood will be installed is properly conditioned, and follow any recommendations related to acclimation or environmental requirements.
6. Rushing the Installation
Plywood installation is best approached with patience and attention to detail. Rushing the process can lead to mistakes, inadequate staggering, or improper fastening. Take the time to plan the layout, measure accurately, and follow a systematic approach. Investing time and effort in the initial installation will yield better results and ensure a long-lasting and reliable finished product.
The Versatility of Staggering Plywood
While the primary focus of this article has been on the importance of staggering plywood in structural applications such as subflooring and wall sheathing, it is important to note that the benefits and techniques discussed can be applied to a wide range of projects. Staggering plywood applies to various installations, including but not limited to:
- Roof sheathing
- Ceiling installations
- Floor underlayment
- Cabinetry and furniture construction
- Exterior siding and cladding
Regardless of the specific project, the principles and techniques covered in this article remain relevant and crucial for ensuring a successful and long-lasting plywood installation.
Conclusion
Properly staggering plywood is an essential practice that should never be overlooked. By following the recommended techniques and guidelines, you can ensure a strong and stable installation that will withstand the test of time. Staggering plywood is not only critical for structural integrity but also offers a range of benefits such as improved aesthetics, durability, and enhanced thermal and acoustic properties. Remember to avoid common mistakes, prioritize adhesive and secure fastening, and always follow the manufacturer’s specifications. By embracing the technique of staggering plywood, you can achieve a reliable and visually pleasing result in a variety of projects.
Why Do You Stagger Plywood?
- Staggering plywood helps to improve structural integrity.
- It prevents weak spots and potential buckling in the floor or wall.
- Staggering also distributes the weight more evenly and reduces the chance of sagging.
- It enhances the overall durability and lifespan of the plywood installation.
- Staggering plywood is a common practice in construction to ensure a sturdy and long-lasting result.
Frequently Asked Questions
In this section, we’ll discuss some common questions about why it’s important to stagger plywood during installation.
1. How does staggering plywood benefit the installation process?
Staggering plywood during installation is crucial because it helps distribute weight and prevents weak spots from forming. By staggering the plywood, you ensure a more stable and durable foundation. This is especially important for heavy loads, such as furniture or appliances, that may be placed on the plywood.
When plywood is installed without staggering, it can lead to uneven weight distribution, which can cause the boards to warp or buckle over time. Additionally, not staggering the plywood can result in weak spots where multiple edges align, making the installation more prone to damage and reducing its overall strength.
2. Can I simply butt the edges of the plywood together without staggering?
While it may seem tempting to butt the edges of the plywood together without staggering, it is not recommended. Butt joining, or placing the edges directly against each other, can create a weak point in the installation. Over time, the weight and pressure placed on the plywood can cause the edges to separate or shift, leading to potential damage or structural issues.
Staggering the plywood provides better stability and strength. By overlapping the seams, you create a more secure connection that can withstand the demands placed on the installation. It ensures a more even distribution of weight and reduces the risk of gaps or separations between the boards.
3. What is the ideal pattern to stagger plywood?
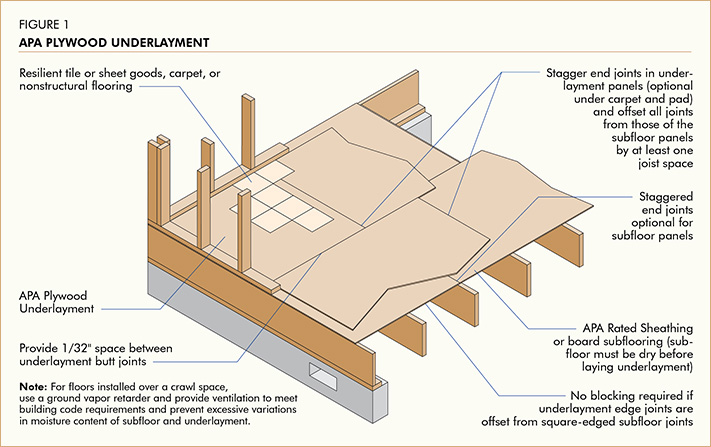
The ideal pattern for staggering plywood is to alternate the seams in a “brick” or “running bond” pattern. This means that each subsequent row of plywood should start with a half or partial sheet, offsetting the seams from the previous row. The goal is to avoid aligning the seams directly above or below each other.
This staggered pattern helps to distribute weight evenly and minimize the chances of weak spots forming in the installation. It creates a stronger and more resilient foundation, providing better support for the materials or structures placed on top of the plywood.
4. Is staggering necessary for all types of plywood installations?
Staggering plywood is generally recommended for most types of installations. Whether you are laying plywood as subflooring, sheathing for walls or roofs, or as a base for tiling or flooring, staggering the boards is beneficial. It adds stability, durability, and helps prevent issues such as warping or buckling.
However, in some specific cases, such as small-scale projects or installations with minimal load-bearing requirements, staggering may not be as critical. It is always best to consult the manufacturer’s guidelines or seek advice from a professional to determine the specific requirements for your project.
5. Are there any specific tips for staggered plywood installation?
When installing plywood in a staggered pattern, there are a few tips to keep in mind. First, ensure that the seams of each row are securely fastened and properly aligned. This will help maintain the strength and stability of the installation. Additionally, use the appropriate nails, screws, or adhesives recommended for the type of plywood and the specific installation.
It is also important to consider the expansion and contraction of the plywood due to changes in temperature and humidity. Leave a small gap between the plywood sheets to allow for natural movement without causing buckling or warping. Finally, always follow the manufacturer’s instructions and best practices for the specific type of plywood and installation you are working on.
Summary:
When you stagger plywood, you can make your project stronger and prevent warping. Staggering involves alternating the seams between sheets of plywood, which distributes weight more evenly. It’s like when you play Jenga and stack the blocks in a way that keeps the tower from falling down. By staggering the plywood, you create a stable and sturdy surface for your project.
Additionally, staggering plywood can help minimize the risk of warping. Plywood is made up of layers, and when those layers are exposed to moisture or changes in temperature, they can expand or contract. Staggering the seams helps to distribute these changes more evenly, reducing the likelihood of warping. So, next time you’re working with plywood, remember to stagger those sheets for added strength and stability. Happy building!