
Have you ever wondered if using an orbital sander can leave those pesky swirl marks? Well, you’ve come to the right place! In this article, we’ll dive into the world of orbital sanders and explore whether or not they leave behind those undesirable patterns on your freshly sanded surfaces. So, let’s get started and find out the truth about orbital sanders and swirl marks!
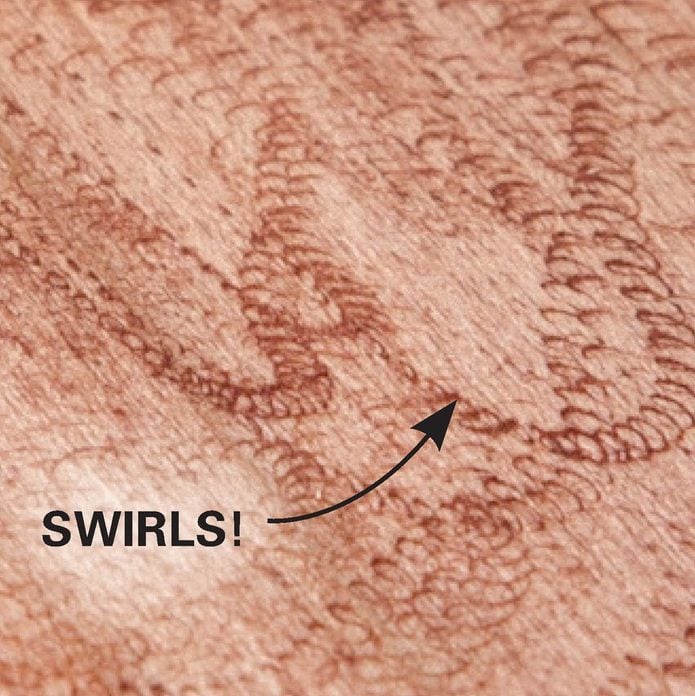
Now, you may be thinking, “What are swirl marks anyway?” Well, swirl marks are those tiny circular scratches that can appear on a surface after sanding. They can be quite frustrating, especially if you’ve put in a lot of effort to achieve a smooth and flawless finish. So, the big question is, do orbital sanders contribute to the creation of these pesky swirl marks?
We’ve heard all sorts of opinions on this topic, and it’s time to separate fact from fiction. In the following paragraphs, we’ll explore the mechanics of an orbital sander and shed light on whether or not it’s guilty of leaving behind those dreaded swirl marks. So, strap in and get ready for some woodworking knowledge!
Does an Orbital Sander Leave Swirl Marks?
Introduction: Orbital sanders are a popular tool for woodworking and removing imperfections from surfaces. However, one concern that many people have is whether using an orbital sander can leave behind swirl marks. In this article, we will delve into this topic and provide you with detailed information about the impact of orbital sanders on surface finish. We will explore the factors that can contribute to swirl marks and discuss techniques to minimize or prevent them.
Understanding Orbital Sanders and Swirl Marks
An orbital sander is a power tool that uses a circular sanding pad that moves in an elliptical or orbital motion. This motion allows for even sanding across a surface while reducing the risk of leaving visible sanding marks. However, it is important to note that despite their design and intended purpose, there is a possibility of orbital sanders leaving swirl marks.
Swirl marks are fine circular scratches that can appear on the surface after sanding. They are most noticeable when a glossy finish is applied to the sanded surface. These marks can be caused by various factors, including the quality of the sanding discs, improper sanding techniques, or using the wrong grit size.
To minimize the risk of swirl marks, it is essential to understand the causes and implement effective sanding techniques. Let’s explore some key factors that can contribute to the formation of swirl marks and how to prevent them.
Factors Contributing to Swirl Marks
1. Grit Selection: Using a sanding disc with a grit that is too coarse can leave deep scratches on the surface, leading to swirl marks when a finish is applied. It is important to choose the appropriate grit size for the material you are working on.
2. Sanding Pattern: Random orbital sanders are designed to move in a random pattern, but it is still important to maintain a consistent sanding pattern. Sanding in a haphazard or circular motion can contribute to the formation of swirl marks.
3. Pressure: Applying excessive pressure while using an orbital sander can result in uneven sanding and the formation of swirl marks. It is crucial to let the weight of the sander do the work and avoid pressing down too hard.
4. Sanding Disc Quality: Low-quality sanding discs may have irregularities or be prone to wear, which can cause swirl marks. Investing in high-quality sanding discs can help minimize this risk.
5. Dust Control: Dust particles can get trapped under the sanding disc and create scratches on the surface, leading to swirl marks. Regular cleaning of the sanding disc and using proper dust extraction methods can help prevent this issue.
Preventing Swirl Marks and Achieving a Smooth Finish
1. Start with the Right Grit: Begin sanding with a coarser grit size and gradually move to finer grits. This gradual progression helps remove imperfections without leaving deep scratches that can be difficult to remove.
2. Maintain a Consistent Sanding Pattern: Sand in straight lines or back-and-forth motions, following the grain of the material. Avoid circular or haphazard patterns that can contribute to swirl marks.
3. Use Proper Technique: Let the weight of the sander do the work and apply even pressure across the surface. Avoid applying excessive pressure or tilting the sander, as this can lead to uneven sanding and swirl marks.
4. Choose High-Quality Sanding Discs: Invest in reputable brands and opt for discs specifically designed for orbital sanders. These discs are often made with high-quality materials and have a uniform grit distribution, reducing the risk of swirl marks.
5. Clean the Sanding Disc: Regularly clean the sanding disc during use to remove accumulated dust particles. This will help prevent scratches and swirl marks caused by debris getting trapped under the disc.
By following these tips and practicing proper sanding techniques, you can minimize the risk of swirl marks and achieve a smooth surface finish with your orbital sander.
The Importance of Surface Preparation
Introduction: To ensure a successful sanding job with minimal swirl marks, proper surface preparation is essential. In this section, we will discuss the importance of surface preparation and how it contributes to the overall finish quality.
Why Surface Preparation Matters
1. Removal of Imperfections: Surface preparation, such as sanding, helps remove imperfections like scratches, stains, or rough patches. By starting with a smooth and even surface, you minimize the chance of swirl marks appearing after sanding.
2. Enhances Adhesion: Properly prepared surfaces provide better adhesion for paints, stains, or finishes. When the surface is smooth and free from imperfections, the finish adheres evenly, resulting in a more professional-looking final product.
3. Improves Finish Quality: Surface preparation allows for a more even application of finishes, resulting in a smoother and more consistent surface. This enhances the overall aesthetic appeal and durability of the final piece.
Effective Surface Preparation Techniques
1. Clean the Surface: Before sanding, ensure the surface is free from dust, dirt, and any other contaminants. Use a soft cloth or a brush to remove loose particles, and follow up with a suitable cleaning agent if necessary.
2. Repair Imperfections: Address any visible imperfections, such as dents, scratches, or cracks, before starting the sanding process. Use suitable fillers or putties to level the surface and allow them to dry completely before sanding.
3. Sand with Care: Use the appropriate grit size for the material and make sure to sand evenly across the entire surface. Pay attention to areas that may require extra sanding, such as edges or corners.
4. Remove Dust: After sanding, use a clean cloth or a tack cloth to remove any residual dust from the surface. This step is crucial to prevent dust particles from causing scratches or swirl marks when applying finishes.
5. Inspect and Touch Up: Once the surface is clean and dust-free, inspect it for any remaining imperfections. If necessary, lightly sand specific trouble spots and touch up with suitable fillers before proceeding to the finishing stage.
Common Mistakes to Avoid when Using an Orbital Sander
Introduction: While orbital sanders are versatile and effective tools, there are some common mistakes that can lead to swirl marks and other surface imperfections. In this section, we will highlight these mistakes and provide guidance on how to avoid them.
Mistake #1: Using the Wrong Grit Size
Using an improper grit size is a common mistake that can result in visible swirl marks. Using a grit that is too coarse can leave deep scratches, while using a grit that is too fine may not effectively remove imperfections. It is crucial to choose the appropriate grit size for the material and the level of sanding required.
Solution: Familiarize yourself with the grit scale and select the grit size that aligns with your project’s needs. Start with a medium grit and gradually progress to finer grits for a smooth finish.
Mistake #2: Not Cleaning the Sanding Disc
Accumulated debris and dust particles on the sanding disc can cause scratches and swirl marks on the surface. Failing to clean the sanding disc during use increases the risk of these imperfections.
Solution: Regularly clean the sanding disc during sanding sessions to remove dust and debris. Use a brush or compressed air to ensure the disc remains clean and effective throughout the sanding process.
Mistake #3: Applying Excessive Pressure
Applying excessive pressure while using an orbital sander can lead to uneven sanding and swirl marks. Letting the weight of the sander do the work is crucial for achieving an even and smooth finish.
Solution: Use a light touch and guide the orbital sander smoothly over the surface. Avoid pressing down too hard or applying uneven pressure by using a grip that allows for comfortable and controlled sanding.
Mistake #4: Neglecting Dust Extraction
Dust particles can become trapped under the sanding disc and cause scratches or swirl marks. Failing to implement proper dust extraction methods can diminish the overall quality of the finish.
Solution: Use a dust extraction system or attach a vacuum to your orbital sander to minimize dust accumulation. This will help keep the surface clean and free from particles that can cause imperfections.
Mistake #5: Rushing the Sanding Process
Rushing through the sanding process can lead to uneven sanding and a higher risk of swirl marks. Taking the time to properly sand the surface ensures a more even and polished finish.
Solution: Be patient and take your time while sanding. Use consistent and controlled movements, and check the surface regularly to ensure all imperfections have been properly addressed.
Comparing Orbital Sanders: Which One is Right for You?
Introduction: Orbital sanders come in various types and models, each with its own unique features and capabilities. In this section, we will compare different types of orbital sanders and help you determine which one is the best fit for your specific needs.
Random Orbital Sanders vs. Orbital Sheet Sanders
Random orbital sanders and orbital sheet sanders are two popular types of orbital sanders with distinct characteristics. Understanding the key differences between these two types will help you make an informed decision when selecting the right sander for your woodworking projects.
Random Orbital Sanders
Random orbital sanders, also known as dual-action or orbital finishing sanders, are versatile and commonly used for woodworking tasks. They utilize a circular sanding pad that oscillates in a random elliptical pattern. This random motion helps prevent visible sanding marks and swirls.
Benefits:
- Produces a consistent finish with minimal swirl marks.
- Efficiently removes material and smooths surfaces.
- Works well on flat and contoured surfaces.
Best for:
- General woodworking projects.
- Preparing surfaces for staining, painting, or finishing.
- Removing imperfections and achieving smooth finishes.
Orbital Sheet Sanders
Orbital sheet sanders, also known as quarter sheet sanders, are more straightforward in design compared to random orbital sanders. They use a rectangular sanding pad that moves in an orbital pattern. While they can effectively sand larger areas, they have a higher chance of leaving visible swirl marks.
Benefits:
- Allows for efficient sanding of larger surfaces.
- Cost-effective option for occasional users.
- Offers more control over the sanding process.
Best for:
- Sanding large, flat surfaces.
- Removing material quickly and efficiently.
- Working on tight corners and edges.
Choosing the Right Orbital Sander for Your Needs
When deciding which orbital sander is right for you, consider the following factors:
- Size of the project: If you primarily work on larger surfaces, an orbital sheet sander may be a suitable choice. For smaller projects or tasks that require more finesse, a random orbital sander is a better option.
- Frequency of use: If you plan on using the sander frequently or for extended periods, investing in a higher-end random orbital sander may provide better durability and performance. If you only need a sander for occasional use, an orbital sheet sander can be a cost-effective solution.
- Surface finish requirements: If achieving a flawlessly smooth finish is crucial, a random orbital sander is the recommended choice. It will minimize the risk of swirl marks and produce cleaner results. However, if a few swirl marks are acceptable or can be easily sanded out, an orbital sheet sander can still deliver satisfactory results.
By assessing your specific needs and understanding the differences between random orbital sanders and orbital sheet sanders, you can make an informed decision and select the right orbital sander for your woodworking projects.
Tips for Maintaining Your Orbital Sander
Introduction: Proper maintenance of your orbital sander is essential for optimal performance and longevity. In this section, we will provide you with valuable tips on how to maintain your sander to ensure its effectiveness and extend its lifespan.
Regular Cleaning
After each use, clean the sanding pad and dust collection system to prevent debris buildup. Use a soft brush or compressed air to remove any dust or particles that may have accumulated. Regular cleaning not only enhances the sander’s efficiency but also reduces the risk of swirl marks caused by debris trapped under the sanding pad.
Inspect and Replace Sanding Discs
Inspect the sanding discs before each use to ensure they are in good condition. Discard any worn-out or damaged discs, as they can affect the quality of the sanding and potentially introduce swirl marks. Replace the discs when necessary to maintain optimal sanding performance.
Proper Storage
Store your orbital sander in a clean and dry environment to prevent dust or moisture from affecting its performance. Use the manufacturer’s recommended storage method, such as a case or protective sleeve, to keep the sander safe from potential damage.
Check and Tighten Connections
Regularly inspect the connections and attachments of your orbital sander. Ensure that the sanding discs are securely attached and that the power cord is in good condition. Loose connections can affect the sander’s performance and potentially lead to accidents.
Align and Balance Sanding Pad
If you notice any wobbling or imbalance in the sanding pad, it may require realignment. Follow the manufacturer’s instructions to properly align and balance the sanding pad, as an unbalanced pad can cause uneven sanding and swirl marks.
Maintain Dust Extraction System
If your orbital sander has a built-in dust extraction system, regularly clean and maintain it according to the manufacturer’s instructions. This will ensure effective dust collection during sanding, keeping the surface clean and reducing the risk of swirl marks caused by trapped dust particles.
By following these maintenance tips, you can prolong the lifespan of your orbital sander, ensure its optimal performance, and minimize the risk of swirl marks during your woodworking projects.
To Swirl or Not to Swirl: Your Guide to Orbital Sanders
Introduction: Orbital sanders are versatile tools that can help you achieve smooth and polished surfaces in your woodworking projects. By understanding how to prevent swirl marks and selecting the right sander for your needs, you can confidently use these tools to achieve professional results.
In this comprehensive guide, we have explored the impact of orbital sanders on surface finish and answered the question: “Does an orbital sander leave swirl marks?” We have discussed the various factors that can contribute to the formation of swirl marks and provided valuable tips on how to prevent them. Additionally, we have compared different types of orbital sanders, outlined common mistakes to avoid, and offered maintenance tips to keep your sander in top shape.
Remember, achieving a smooth and flawless finish is not only about using the right tools but also implementing proper sanding techniques and surface preparation. By following the guidelines provided in this guide, you can confidently use your orbital sander to transform your woodworking projects and achieve professional-level results.
Key Takeaways: Does an Orbital Sander Leave Swirl Marks?
- An orbital sander can leave swirl marks if not used properly.
- Using the right sandpaper grit and technique helps minimize swirl marks.
- Start with a lower grit sandpaper and gradually move to higher grits for smoother finish.
- Apply even pressure and avoid excessive sanding in one area to prevent swirl marks.
- Regularly inspect the sandpaper for clogging to ensure effective sanding and reduce swirl marks.
Frequently Asked Questions
Welcome to our FAQ section on orbital sanders and swirl marks! Here, we’ll address common inquiries about whether orbital sanders leave swirl marks behind. Read on to find the answers you’re looking for.
1. How Can I Prevent Swirl Marks When Using an Orbital Sander?
To prevent swirl marks while using an orbital sander, there are a few precautions you can take. Firstly, make sure you’re using high-quality sandpaper with a fine grit. Coarser grits can leave more noticeable marks on the surface. Additionally, it’s important to maintain a consistent and even pressure while sanding. Applying too much pressure can lead to unwanted marks.
Furthermore, always keep the sander moving in a back-and-forth or circular motion. Avoid staying in one spot for too long, as this can cause uneven sanding and create swirl marks. Lastly, before you start sanding, ensure that the surface is clean and free from any debris that could potentially scratch the surface and create swirl marks.
2. Can the Type of Wood Influence the Likelihood of Swirl Marks with an Orbital Sander?
The type of wood you’re sanding can indeed impact the likelihood of swirl marks appearing when using an orbital sander. Softer woods, like pine or cedar, tend to be more prone to swirl marks compared to harder woods such as oak or walnut. This is because the softer wood fibers can be easily agitated and leave marks on the surface.
If you’re working with softer woods, it’s important to use a fine grit sandpaper and exercise caution while sanding. Take your time and apply even pressure to minimize the risk of creating swirl marks. Additionally, using a sanding sequence that gradually reduces the grit size can help achieve a smoother finish and reduce the visibility of any potential swirl marks.
3. Are There Any Techniques to Remove Swirl Marks Left by an Orbital Sander?
If you notice swirl marks left behind by an orbital sander, don’t worry – there are techniques to remove them. One method is to sand the surface again using a higher grit sandpaper. This can help smooth out the marks and blend them with the surrounding area.
Alternatively, you can use a wood filler or putty to fill in the swirl marks and then sand the surface to achieve a smooth finish. Just make sure to match the color of the filler to the wood for a seamless result. Remember to clean the surface before applying any finish to ensure a pristine final outcome.
4. What Factors Can Contribute to the Appearance of Swirl Marks with an Orbital Sander?
Several factors can contribute to the appearance of swirl marks when using an orbital sander. One common factor is using a low-quality or worn-out sanding pad. A worn pad may not distribute the sanding motion evenly, leading to uneven sanding and swirl marks.
Additionally, using a high speed setting on the sander can increase the risk of creating swirl marks. It’s important to adjust the speed according to the type of wood and the desired level of sanding. Lastly, using improper sanding techniques, such as sanding against the grain, can also contribute to swirl marks.
5. Are There Alternative Sanding Methods That Are Less Likely to Leave Swirl Marks?
Yes, there are alternative sanding methods that are less likely to leave swirl marks. One option is hand sanding. With hand sanding, you have more control over the pressure and motion, allowing you to minimize the risk of creating swirl marks. However, keep in mind that hand sanding can be more time-consuming compared to using an orbital sander.
Another alternative is using a random orbital sander instead of a traditional orbital sander. Random orbital sanders move in a more random pattern, reducing the chances of creating visible swirl marks. These sanders combine both orbital and rotational motions to provide a smoother sanding experience and a better chance of achieving a swirl mark-free finish.
Summary
Orbital sanders can leave swirl marks on the surface if not used properly.
To avoid swirl marks, use the right grit sandpaper, apply even pressure, and follow the grain.
Regularly check the sandpaper for wear and change it when needed.
Remember to move the sander in a smooth, continuous motion to get the best results.
In conclusion, by using the correct technique and taking proper care, you can prevent swirl marks when using an orbital sander.