Do you ever wonder how cherry wood gets its beautiful and rich stain? Well, you’ve come to the right place! In this article, we’ll unravel the mystery behind how cherry wood achieves its stunning color through the staining process.
Cherry wood is known for its warm reddish-brown hue that develops over time and with exposure to light. But how does this transformation occur? It all begins with the wood’s natural pigments and their reaction to certain elements.
When cherry wood is exposed to light, it undergoes a process called oxidation, where the wood’s pigments react and darken. The longer the exposure, the deeper and more intense the color becomes. So, if you’re curious about how cherry wood achieves its signature stain, keep reading to uncover the fascinating details!
Ready to delve into the world of stunning cherry wood stains? Let’s explore how these incredible colors come to life!

How Does Cherry Wood Stain? – Unveiling the Intricacies of Achieving Beautiful Stained Cherry Wood
Cherry wood, with its rich color and beautiful grain pattern, is a popular choice for furniture, cabinets, and flooring. To enhance its natural beauty and protect it from wear and tear, many people choose to stain cherry wood. But how does cherry wood stain actually work? In this article, we will dive into the intricacies of staining cherry wood, exploring the process, techniques, and tips to achieve stunning results.
The Science Behind Cherry Wood Staining
Cherry wood has a unique composition that makes it both beautiful and challenging to stain. The primary color of cherry wood is light, with slight reddish undertones. However, over time, cherry wood naturally darkens and develops a deeper, redder color. Staining cherry wood aims to accelerate this natural aging process, mimicking the desirable aged appearance.
When you apply a stain to cherry wood, the pigments in the stain penetrate the wood’s porous surface, creating a layer of color. The stain interacts with the wood’s natural components, such as tannins and lignin, to create the desired shade. The key to achieving the perfect stain on cherry wood lies in understanding its unique characteristics and applying the right techniques.
To prepare the wood for staining, it’s crucial to sand it down to remove any existing finishes, dirt, or imperfections. This provides a clean and smooth surface for the stain to adhere to. Once the wood is prepared, you can begin the staining process using various techniques, such as wiping, brushing, or spraying the stain onto the wood’s surface. The choice of technique depends on the desired result and personal preference.
The Importance of Choosing the Right Stain
When it comes to staining cherry wood, selecting the right stain color is essential to achieve the desired look. Different stain colors will interact with cherry wood in unique ways, resulting in varying shades and intensities. It’s recommended to test the stain on a small, inconspicuous area of the wood or a sample piece to see how it develops and adjusts to the cherry wood’s natural characteristics.
A common mistake when staining cherry wood is choosing a stain that is too dark. Cherry wood naturally darkens over time, so a stain that is too dark can overpower the wood’s natural beauty and make it appear artificially aged. Opting for lighter or medium tone stains allows the natural reddish tones of cherry wood to shine through, creating a warm and inviting aesthetic.
Furthermore, choosing a high-quality stain product is essential to achieving consistent and long-lasting results. Look for stains specifically formulated for use with cherry wood and ensure they are designed to penetrate the wood’s surface rather than forming a film on top. This allows the wood’s natural beauty to remain intact while providing protection.
Techniques for Achieving the Perfect Stain
When staining cherry wood, there are several techniques you can use to achieve the perfect result. One popular method is to apply a thin coat of stain and allow it to soak into the wood for a few minutes before wiping off the excess with a clean cloth. This technique allows the natural variations in the wood’s grain to absorb the stain differently, creating depth and enhancing the wood’s character.
Another technique is to layer multiple coats of stain, allowing each coat to dry thoroughly before applying the next. This builds up the color depth and saturation, giving the cherry wood a richer and more vibrant appearance. Be mindful not to over-apply the stain, as this can result in an uneven or blotchy finish.
Additionally, it’s essential to follow the manufacturer’s instructions regarding drying times, curing processes, and the need for sanding or additional coats of finish. Proper preparation and application techniques play a significant role in achieving a flawless stained cherry wood surface.
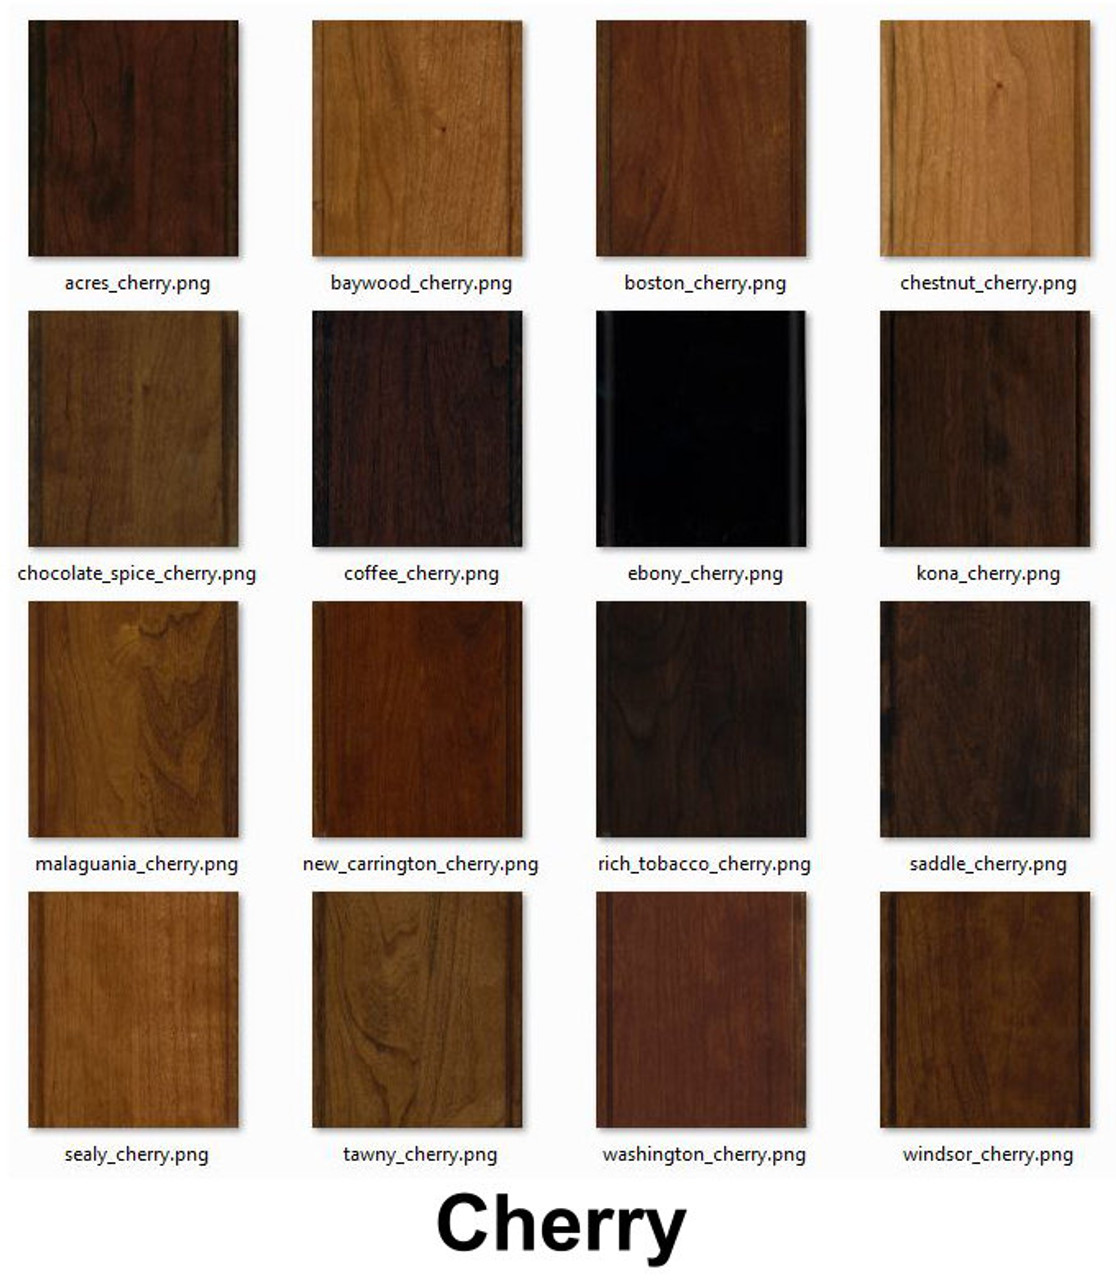
The Best Cherry Wood Stains for Optimal Results
With a myriad of stain options available, it can be overwhelming to choose the best one for cherry wood. Here are three highly recommended cherry wood stains:
1. Minwax Wood Finish – Cherry
This stain is specifically formulated to enhance the natural beauty of cherry wood, creating a rich and warm finish. It penetrates deeply into the wood, bringing out the grain patterns and adding depth to the color.
Pros:
- Produces a beautiful, traditional cherry finish
- Easy to apply and provides consistent results
- Enhances the natural characteristics of cherry wood
Cons:
- May require multiple coats for desired intensity
- Can darken over time, so monitor the stain’s development
Rating: 4.5/5
2. General Finishes Water-Based Wood Stain – Georgian Cherry
This water-based stain is an excellent option for those looking for an eco-friendly and low odor staining solution. It provides vibrant and long-lasting color, enhancing the cherry wood’s natural richness.
Pros:
- Water-based formula for easy cleanup and low odor
- Offers excellent color intensity and depth
- Dries quickly, allowing for faster project completion
Cons:
- Requires careful application to achieve an even finish
- May need additional coats for a deeper color
Rating: 4/5
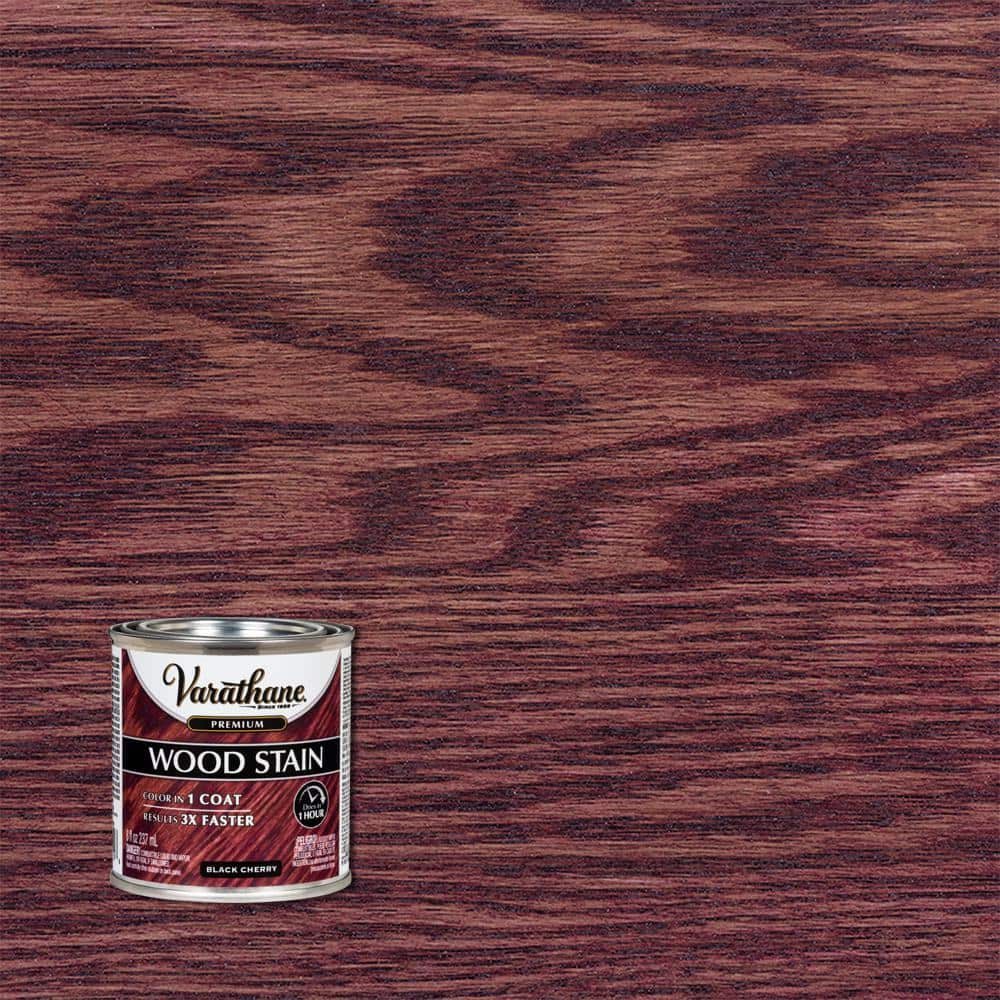
3. Varathane Premium Fast Dry Wood Stain – Traditional Cherry
This fast-drying stain is perfect for those who prefer a quicker staining process. It creates a rich and even color while showcasing the natural beauty of cherry wood.
Pros:
- Fast-drying formula reduces waiting time between coats
- Delivers a smooth and even finish
- Provides excellent color clarity and depth
Cons:
- May require additional coats for deeper color saturation
- Strong odor during application, so ensure proper ventilation
Rating: 4/5
Tips for a Successful Cherry Wood Staining Project
1. Prepare the Wood Properly
Take the time to thoroughly sand and clean the wood before staining to ensure the best adhesion and finish results.
2. Test the Stain on a Sample Piece
Testing the stain on a small, inconspicuous area or a sample piece allows you to see how it interacts with the wood’s unique characteristics.
3. Apply Stain in Even Coats
Avoid applying too much stain at once, as it can result in an uneven or blotchy finish. Apply thin and even coats for the best results.
4. Allow Sufficient Drying Time
Follow the manufacturer’s instructions for drying and curing times to ensure the stain fully sets and achieves its desired color.
5. Protect and Maintain the Stained Surface
Once the stain is dry and cured, apply a protective finish like polyurethane to keep the wood looking beautiful and maintain its longevity.
In conclusion, staining cherry wood is a process that requires patience, attention to detail, and the right techniques. By understanding the science behind cherry wood staining, choosing the appropriate stain, and employing the best practices, you can achieve stunning results that enhance the natural beauty of cherry wood. Whether it’s a piece of furniture, cabinetry, or flooring, stained cherry wood adds warmth, depth, and character to any space.
Key Takeaways: How Does Cherry Wood Stain?
- Cherry wood has a natural reddish-brown color that develops a rich patina over time.
- Before staining cherry wood, it’s important to sand it smooth and remove any existing finishes.
- Using a pre-stain conditioner can help prevent blotching and ensure an even application of stain.
- Choosing the right stain color for cherry wood depends on personal preference and desired outcome.
- Applying multiple coats of stain and allowing for proper drying time results in a deeper, more saturated color.
Frequently Asked Questions
Here are some common questions about how cherry wood stains:
1. What factors can affect how cherry wood stains?
Various factors can impact how cherry wood stains. One significant factor is the age of the wood. As cherry wood ages, it naturally darkens and develops a richer color. Additionally, the grain pattern of cherry wood can affect how it absorbs stain. The more porous areas of the grain tend to absorb more stain, resulting in a darker appearance. Lastly, the type and color of stain used will also influence the final result.
2. Can I control the color of the stain on cherry wood?
Yes, you have some control over the color of the stain on cherry wood. Different stain colors and application techniques can produce varying results. Lighter stains will retain more of the natural light color of the wood, while darker stains will create a deeper, more saturated look. To achieve a specific color, it’s advisable to test the stain on a small, inconspicuous area of the cherry wood before applying it to the entire surface.
3. Should I use a pre-stain wood conditioner before applying stain to cherry wood?
Using a pre-stain wood conditioner is recommended when staining cherry wood. Cherry wood is known to have a tendency to blotch when stained, meaning some areas may absorb more stain than others, resulting in an uneven appearance. Applying a wood conditioner helps to seal the wood and create a more even surface for the stain. It minimizes blotching and allows for a more uniform color distribution.
4. How long does it take for cherry wood stain to dry?
The drying time for cherry wood stain can vary depending on several factors, such as the type of stain used, environmental conditions, and the thickness of the stain application. Generally, it takes anywhere from 4 to 24 hours for the stain to dry. It’s crucial to follow the manufacturer’s instructions regarding drying time and allow the stain to dry completely before applying any top coat or sealant.
5. Should I apply a top coat or sealant after staining cherry wood?
Yes, applying a top coat or sealant is recommended after staining cherry wood. A top coat not only enhances the appearance of the stain but also provides protection against moisture, UV rays, and general wear and tear. It helps to seal in the stain, preventing it from fading or rubbing off over time. There are various options for top coats, including polyurethane, lacquer, or oil-based finishes. Selecting the right type of top coat depends on your desired level of durability and sheen.
Summary
So, how does cherry wood stain? In short, cherry wood is a popular choice for staining because it absorbs stains well and develops a rich color over time. When applying a stain to cherry wood, it’s important to prepare the surface by sanding it smooth and applying a pre-stain conditioner. This helps the wood absorb the stain evenly and prevents blotching. After applying the stain, it’s essential to wipe off any excess and allow the wood to dry completely. With proper care and maintenance, your cherry wood can stay beautifully stained for years to come.