If you’ve ever worked with plywood, you might have asked yourself, “How many nails per sheet of plywood?” Well, my curious friend, fret no more! I’m here to unravel this mystery for you. Whether you’re a newbie DIYer or an experienced carpenter, this is a question that often comes up. So, let’s dive in and discover the secret behind nailing your plywood like a pro!
When it comes to nailing plywood, the number of nails you’ll need depends on a few factors. The thickness of the plywood, the size of the sheet, and the intended use all play a role in determining the appropriate number of nails. So, grab your toolbox and get ready to learn the art of nailing plywood efficiently and effectively.
Now, before we jump into the specifics, it’s crucial to understand why nailing plywood correctly is essential. Properly securing the plywood ensures stability, durability, and safety in your projects. Plus, it prevents annoying squeaks and creaks that can drive anyone crazy! So, let’s explore the world of nails and plywood and discover the magic number of nails per sheet. Are you ready? Let’s nail it together!

How Many Nails Per Sheet of Plywood?
The Importance of Nailing Plywood Correctly
When working with plywood, it’s crucial to ensure that it is properly nailed down. Nails are used to secure the plywood sheets to the surface, providing stability and preventing movement. Using the right number of nails is essential for the integrity of the overall structure. If too few nails are used, the plywood may not be secure enough and could start to loosen or detach. On the other hand, using an excessive number of nails can lead to splitting or damaging the plywood. So, how many nails per sheet of plywood should you be using?
Determining the Suitable Number of Nails
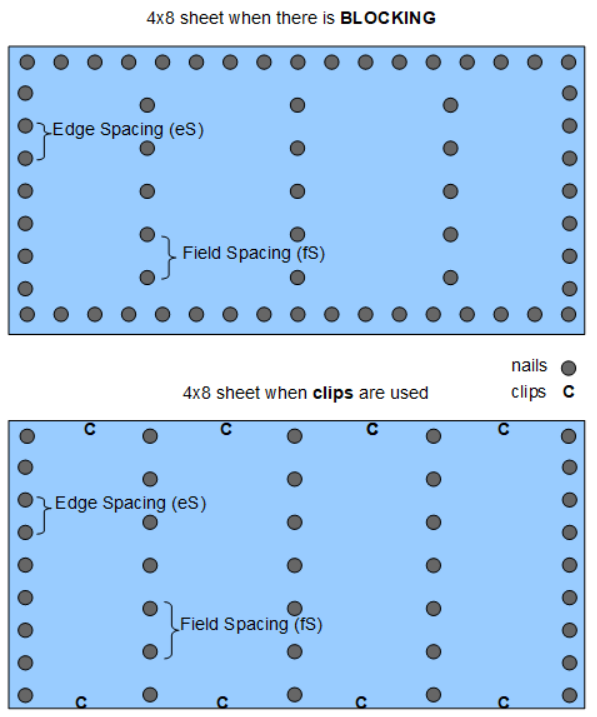
The ideal number of nails per sheet of plywood depends on various factors, including the thickness of the plywood, its dimensions, and the purpose of the project. As a general rule of thumb, it is recommended to use at least four nails per corner of the plywood sheet. This ensures that each corner is properly secured and minimizes the risk of the plywood warping or becoming loose over time.
In addition to the corner nails, it is advisable to place nails every 6 to 8 inches along the edges of the plywood and in the field area. This creates a grid-like pattern that provides adequate support and prevents any potential buckling or sagging. The spacing between the nails can be adjusted based on the size and thickness of the plywood, but it should always be evenly distributed to maintain structural integrity.
Factors to Consider When Nailing Plywood
While the general guidelines mentioned above provide a good starting point, it’s crucial to consider specific factors to determine the exact number of nails needed for a particular project. Here are a few additional factors to consider:
1. Plywood thickness: Thicker plywood generally requires more nails for proper stability and securement. Thinner plywood may require fewer nails but should still be adequately secured.
2. Plywood edges: If the edges of the plywood will be covered or protected by trim or other materials, fewer nails may be necessary. However, if the edges will be exposed, additional nails may be needed to ensure a clean appearance and prevent any potential gaps.
3. Plywood application: The intended use of the plywood should also be taken into account. If the plywood will be used for flooring or heavy loads, more nails may be necessary to provide enhanced strength and support.
By considering these factors and following the general guidelines, you can determine the appropriate number of nails per sheet of plywood for your specific project, ensuring its stability and longevity.
The Benefits of Properly Nailing Plywood
Enhanced Stability and Durability
When plywood is correctly nailed, it provides enhanced stability and durability to any structure it is a part of. Properly nailing plywood ensures that it remains securely in place, preventing any potential movement or shifting. This is especially important for load-bearing structures or high-traffic areas where stability is crucial. By using the right number of nails, you can maximize the strength of the plywood and prolong its lifespan.
Prevention of Warping and Buckling
Incorrect nailing techniques, such as using too few nails or unevenly spacing them, can cause plywood to warp or buckle over time. Warping occurs when the plywood bends or curves, while buckling refers to the plywood forming waves or ripples. These issues not only compromise the structural integrity but also create an uneven surface that can be unsafe and unsightly. Properly nailing plywood distributes the load evenly and minimizes the risk of warping or buckling, ensuring a level and secure surface.
Promotion of Aesthetic Appeal
Nailing plywood with care and precision contributes to the overall aesthetic appeal of the finished project. When nails are placed evenly and properly, they create a clean and professional look. Conversely, using too many nails or placing them haphazardly can result in an unappealing and messy appearance. By paying attention to the number and placement of nails, you can achieve a visually pleasing result that enhances the overall design.
Additional Tips for Nailing Plywood Securely
Quality Nails and Tools
Investing in high-quality nails and using the appropriate tools will ensure that the nails are securely fastened. Using nails specifically designed for plywood and choosing the correct length and gauge can make a significant difference. Additionally, using a hammer or nail gun that is suitable for the job will help drive the nails in effectively and prevent any damage to the plywood’s surface.
Preventing Splintering
To prevent splintering, it is vital to choose nails with a smooth shank or a spiral shank. These types of nails create smaller entry holes and reduce the risk of the plywood splitting. Additionally, pre-drilling pilot holes slightly smaller than the nail diameter can help prevent splitting and ensure a cleaner finish.
Following Manufacturer Guidelines
Always refer to the manufacturer’s guidelines or recommendations when nailing plywood. Some plywood may have specific requirements or recommendations for nail placement, which should be followed for optimal results. Manufacturers provide these guidelines based on extensive testing and expertise, ensuring the best performance and longevity of the plywood.
In summary, properly nailing plywood is essential for its stability, durability, and aesthetic appeal. By considering the thickness, edges, and application of the plywood, you can determine the appropriate number of nails needed. Additionally, using quality nails and tools, preventing splintering, and following manufacturer guidelines will further ensure secure and professional results. So, the next time you find yourself working with plywood, remember to nail it down with precision and care.
Key Takeaways: How Many Nails Per Sheet of Plywood?
- There is no set number of nails per sheet of plywood as it depends on the size and thickness of the plywood, the application, and personal preference.
- As a general guideline, using 8d or 10d nails placed every 6 to 8 inches along the edges and every 12 inches in the field should provide sufficient fastening for most projects.
- Avoid over-nailing, as it can weaken the plywood and increase the risk of splitting or warping.
- If using screws instead of nails, follow the manufacturer’s recommendations for spacing and length to ensure a secure attachment.
- Remember to always wear protective gear when working with tools and materials to ensure safety.
Frequently Asked Questions
When it comes to nailing plywood sheets, it’s important to know how many nails are required for a secure installation. Here are some commonly asked questions about the number of nails per sheet of plywood.
1. How many nails do I need for a sheet of plywood?
For standard 4×8 feet plywood sheets, it is recommended to use around 16 nails for proper fastening. This means placing a nail every 6 inches along the edges and in a grid pattern throughout the sheet. This distribution ensures stability and prevents warping or buckling of the plywood.
However, it’s important to note that the specific number of nails may vary depending on the thickness and composition of the plywood, as well as the intended use. Thicker sheets or specialty plywood may require additional nails to provide adequate support.
2. Can I use fewer nails for plywood installation?
While it is possible to use fewer nails than the recommended amount, it is not advisable. The number of nails recommended ensures proper distribution of weight and minimizes the risk of sagging or failure over time. Fewer nails may result in weaker support and potential damage to the plywood. It’s best to follow the guidelines for optimal performance.
If you feel that using fewer nails is necessary for a specific project, consult with a professional or a knowledgeable associate at your local hardware store to ensure your installation remains secure.
3. Is there a maximum number of nails I can use per sheet of plywood?
While there is no set maximum limit on the number of nails you can use per sheet of plywood, it’s important to exercise caution. Over-nailing can weaken the material, causing it to split or crack. Additionally, using an excessive number of nails can lead to a less aesthetically pleasing finished product.
A good rule of thumb is to follow the recommended guidelines for the number of nails per sheet and make sure they are evenly distributed. If you have concerns or specific requirements for additional fastening, consult with a professional to determine the best approach for your project.
4. Are there different nail sizes for plywood installation?
Yes, there are different nail sizes suitable for plywood installation. The most common nails used for plywood range from 6d to 10d in size. These sizes correspond to different lengths and diameters, with 6d being shorter and thinner than 10d. The specific size to use will depend on the thickness of the plywood and the specific requirements of your project.
When purchasing nails, it is always a good idea to consult with a professional or refer to manufacturer recommendations to ensure you are using the right size for your plywood installation.
5. Are there any alternatives to nails for plywood installation?
Yes, there are alternatives to nails for plywood installation. One popular option is using screws, which can provide a strong and secure hold. Screws are often preferred for applications where disassembly may be required, as they can be easily removed without causing damage to the plywood.
Another alternative is adhesive, such as construction adhesive or wood glue. Adhesive can provide a strong bond between the plywood and the surface it is being installed on, eliminating the need for nails or screws. However, it’s important to note that adhesive alone may not provide sufficient support for certain applications, so it’s crucial to evaluate the specific requirements of your project before opting for an alternative to nails.
Summary
So, to summarize, the number of nails needed per sheet of plywood depends on a few factors. First, the type of project and the size of the plywood sheet are important. If it’s a smaller project, you can use fewer nails, but for larger ones, more nails might be necessary. Additionally, the thickness of the plywood and the spacing of the nails are also vital. It’s essential to follow the recommended guidelines to ensure a secure and sturdy construction. By considering these factors, you can determine how many nails you need for your plywood project.
In conclusion, the number of nails per sheet of plywood varies based on the project’s size, the thickness of the plywood, and the recommended nail spacing. So whether you’re working on a small craft or a big construction, make sure to consider these factors to ensure your project is built safely and securely.