
Are you wondering what you need to sharpen chisels? Well, you’ve come to the right place! Whether you’re a beginner or a seasoned woodworker, keeping your chisels sharp is crucial for clean and precise cuts. But fret not, because in this article, we’ll walk you through everything you need to know and the essential tools you’ll need to get the job done.
Sharpening chisels may seem daunting at first, but with the right tools and a little practice, you’ll be able to achieve razor-sharp edges in no time. So, let’s dive in and explore the must-have items for chisel sharpening!
Now, before we delve into the specifics, it’s important to understand that chisel sharpening typically requires a few key tools. Don’t worry, we’ll cover each one in detail, but here’s a sneak peek: you’ll need a sharpening stone or honing guide, some lubricating oil or water, and a strop to finish off the sharpening process. Excited? Let’s get started!

What Do I Need for Sharpening Chisels?
Sharpening chisels is an essential skill for any woodworker or carpenter. A sharp chisel ensures clean and precise cuts, making your work easier and more efficient. To achieve a sharp edge on your chisels, you’ll need a few tools and materials. In this article, we’ll explore the must-have items for sharpening chisels, providing you with the knowledge to keep your chisels in optimal condition.
Essential Tools for Sharpening Chisels
When it comes to sharpening chisels, there are several tools you’ll need to ensure a professional result. Let’s take a look at the essential tools:
1. Bench Grinder
A bench grinder is a powerful tool that is used to remove material quickly and efficiently from the chisel’s blade. It consists of a motor that spins abrasive wheels at high speeds, allowing you to shape and sharpen the chisel. When using a bench grinder, it’s important to follow safety precautions and maintain a steady hand to avoid overheating the chisel or damaging its temper.
2. Honing Guide
A honing guide is a handy tool that holds the chisel at the correct angle while sharpening. It ensures consistent and accurate bevels, resulting in a uniform edge across the blade. Honing guides come in various designs, but most feature clamps or jaws to hold the chisel securely and an adjustable mechanism to set the desired sharpening angle.
3. Sharpening Stones
Sharpening stones are essential for achieving a fine edge on your chisels. They come in different grits, ranging from coarse to fine, and are made from various materials such as diamond, aluminum oxide, or water stones. Coarse stones are used for initial grinding, while finer stones are used for honing and polishing the edge. It’s important to choose high-quality stones and ensure they are properly flattened and lubricated before use.
4. Strop
A strop is a leather strip used for polishing and refining the edge of a chisel after sharpening. It helps remove any burrs or imperfections, resulting in a razor-sharp edge. To use a strop, you simply apply a small amount of honing compound to the leather and stroke the chisel’s bevel across it, alternating sides until the desired sharpness is achieved.
5. Safety Equipment
When sharpening chisels, it’s important to prioritize safety. Always wear safety goggles to protect your eyes from flying debris and gloves to protect your hands. Additionally, consider using a dust mask or respirator to prevent inhaling harmful particles generated during the sharpening process.
6. Workbench or Sharpening Station
A sturdy workbench or a dedicated sharpening station is crucial to provide a stable and comfortable surface for sharpening chisels. It should have sufficient clamping areas and support for your chosen sharpening tools. Keeping your work area clean and well-organized will contribute to a safer and more efficient sharpening process.
7. Proper Sharpening Techniques
Alongside the necessary tools, it’s important to learn and understand the proper techniques for sharpening chisels. This includes learning how to establish and maintain the correct bevel angle, how to use the tools effectively, and how to recognize when your chisel is properly sharpened. Practicing these techniques will ensure that you consistently achieve excellent results.
Sharpening Chisels: Tips and Tricks
Now that you know what tools are needed for sharpening chisels, let’s explore some tips and tricks to help you achieve optimal results:
1. Use the Right Angle
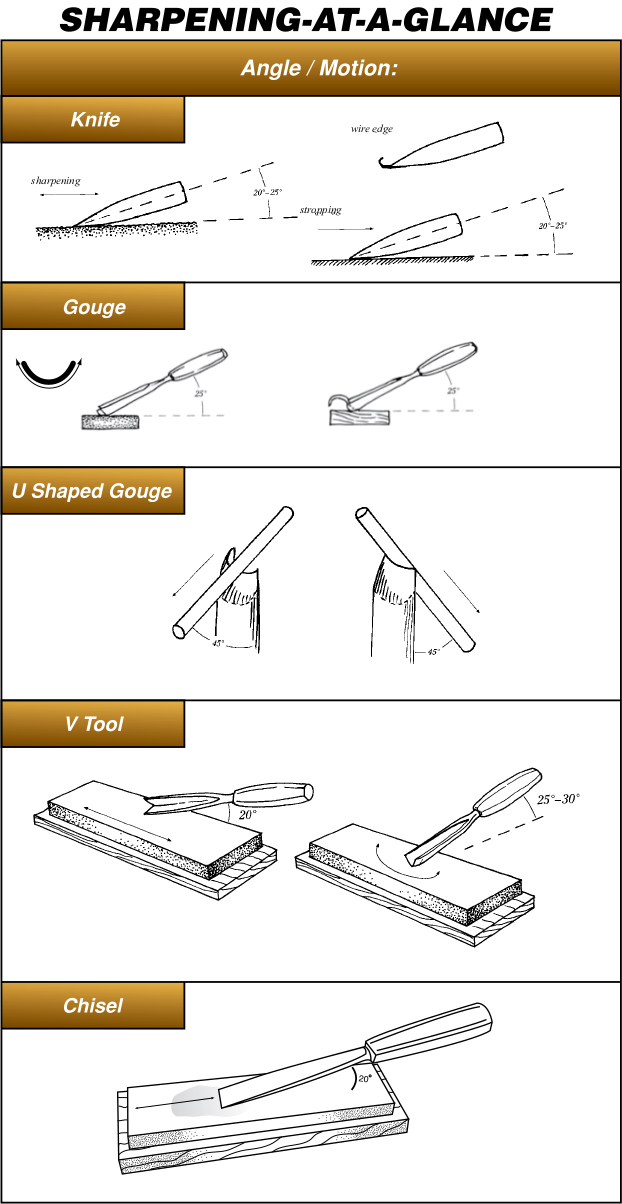
The angle at which you hold the chisel against the sharpening stone is crucial. A general rule of thumb is to maintain a 25 to 30-degree bevel angle for bench chisels and a slightly steeper angle of 30 to 35 degrees for paring chisels. Using a honing guide can help you achieve and maintain the correct angle throughout the sharpening process.
2. Start with a Coarse Grit
If your chisel is significantly dull or damaged, begin by using a coarse grit stone to remove any nicks or deformations. This initial grinding will establish a new bevel and remove material quickly. Once the edge is straight and even, progress to finer grits for honing and refining the edge.
3. Maintain Consistency
Consistency is key when sharpening chisels. Whether it’s maintaining a steady hand, maintaining an even pressure on the sharpening stone, or consistently checking for a burr along the bevel, maintaining consistency will ensure uniform results and a sharp edge.
4. Test the Edge
After sharpening your chisel, it’s important to test the edge to ensure it’s truly sharp. You can do this by gently dragging your thumb along the chisel’s bevel. If you feel a slight catch or resistance, it indicates a sharp edge. Be cautious not to apply too much pressure to avoid injury.
5. Regular Maintenance
Keeping your chisels sharp requires regular maintenance. Make it a practice to touch up the edge periodically, even if you haven’t noticed a decline in performance. This will help extend the life of your chisels and ensure they are always ready for use.
6. Clean After Sharpening
Once you’ve finished sharpening your chisels, clean them thoroughly to remove any metal particles or residue. Use a wire brush or a cloth to wipe away any debris, and apply a light coat of oil or wax to prevent rusting. Proper cleaning and storage will keep your tools in excellent condition.
7. Practice Makes Perfect
Sharpening chisels is a skill that improves with practice. Don’t be discouraged if your first attempts aren’t perfect. Keep practicing, refining your technique, and seeking guidance from experienced woodworkers. With time and dedication, you’ll become adept at sharpening chisels and achieve exceptional results.
Choosing the Right Sharpening System
A variety of sharpening systems are available to cater to different preferences and skill levels. Let’s explore a few options:
1. Water Stones
Water stones are a popular choice among woodworkers due to their versatility and effectiveness. They are available in different grits and require soaking in water before use. Water stones provide excellent sharpening results and are relatively easy to maintain.
2. Oil Stones
Oil stones are another common option for sharpening chisels. They are made from an abrasive material such as silicon carbide or aluminum oxide combined with a lubricating oil. Oil stones are durable and offer consistent results, making them a reliable choice for many woodworkers.
3. Diamond Stones
Diamond stones are a popular choice among professionals due to their durability and efficiency. They consist of a metal plate coated with diamond particles, providing a fast cutting action. Diamond stones are available in various grits and are ideal for quickly restoring and sharpening chisels.
Conclusion
Sharpening chisels is a fundamental skill for woodworkers, and having the right tools is essential for achieving optimal results. Invest in a bench grinder, honing guide, sharpening stones, strop, and safety equipment to create a well-rounded sharpening kit. Remember to learn and practice proper sharpening techniques, and don’t forget to periodically touch up your chisels to maintain their sharpness. By following these tips and choosing the right sharpening system for your needs, you’ll be able to keep your chisels in top condition and elevate your woodworking projects to the next level.
Key Takeaways: What Do I Need for Sharpening Chisels?
– Whetstone oil or water for lubricating the sharpening stone.
– Safety goggles to protect your eyes from flying debris.
– A honing guide to assist with maintaining the correct angle while sharpening.
– A strop or leather for polishing and honing the chisel blade.
Frequently Asked Questions:
Welcome to our Frequently Asked Questions segment on sharpening chisels. Here are five common questions and their answers to help you get started on this woodworking task!
Q: How do I sharpen a chisel?
To sharpen a chisel, you’ll need a few essential tools. First, you’ll require a sharpening stone or whetstone. This will help you remove any dull edges and create a sharp edge on your chisel blade. You’ll also need lubricating oil to keep the stone moist and prevent the blade from overheating during the sharpening process. Additionally, a honing guide can be helpful in maintaining a consistent angle while sharpening. Finally, don’t forget to use a marker to highlight the bevel before sharpening, as it helps you see your progress.
Start by wetting the stone with oil and placing it on a stable surface. Hold the chisel securely and place it in the honing guide, adjusting the guide to your desired angle. With a smooth and consistent motion, slide the chisel across the stone, making sure to cover the full length of the blade. Repeat this process on both sides of the chisel until you achieve a sharp edge. Once you’ve sharpened the chisel, remove any burrs by rubbing the back of the chisel on the stone. Finally, give it a quick polish on a fine-grit stone to refine the edge.
Q: What grit should I use for sharpening chisels?
Choosing the right grit for sharpening your chisels depends on the condition of the blade. If your chisel is very dull or damaged, start with a coarse grit stone, typically around 250 to 400 grit. This will help you remove more material from the blade quickly. Once you’ve shaped the edge, transition to a medium grit stone, usually around 800 to 1000 grit, to refine and hone the edge further.
After the medium grit stone, you can move on to a fine grit stone, typically around 3000 to 8000 grit. This will provide a polished edge and enhance the chisel’s cutting performance. Remember that each chisel is unique, so you may need to experiment with different grits to find the one that works best for you. Regularly sharpening your chisels will ensure that they stay sharp and ready for any woodworking project.
Q: Do I need a honing guide to sharpen chisels?
While a honing guide is not necessary for sharpening chisels, it can be a helpful tool, especially for beginners. A honing guide helps you maintain a consistent angle while sharpening, ensuring that you achieve an even and symmetrical edge. It can be particularly useful if you’re new to sharpening or if you want precise control over the angle of your chisel’s bevel.
However, if you have experience and prefer sharpening freehand, you can achieve excellent results without a honing guide. It’s a matter of personal preference and comfort. Regardless of your method, the key is to practice and develop a technique that works best for you and produces sharp, reliable chisels.
Q: Can I sharpen chisels with sandpaper?
Yes, you can sharpen chisels using sandpaper, also known as the “scary sharp” method. This method involves adhering sandpaper to a flat surface, such as a piece of glass or granite, and using it to sharpen your chisels. To get started, you’ll need sandpaper in various grits, typically ranging from 220 to 2000. It’s recommended to use a progression of grits for optimal results.
Begin by attaching the coarsest grit sandpaper to your flat surface. Wet the sandpaper with water to create a slurry and start sharpening your chisel by moving it back and forth across the sandpaper. As you progress through the different grits, you’ll remove scratches left by the previous grit and refine the chisel’s edge. Remember to maintain a consistent angle and check your progress regularly. Once you’ve reached your desired level of sharpness, remove any burrs and give the chisel a final polishing with a strop or fine-grit sandpaper.
Q: How often should I sharpen my chisels?
The frequency of sharpening your chisels depends on how often you use them and the nature of your projects. As a general guideline, it’s recommended to check and touch up the edge of your chisels regularly. If you notice your chisels becoming dull or struggling to make clean cuts, it’s a sign that they need sharpening.
For heavy use, such as professional woodworking, you may need to sharpen your chisels more frequently, perhaps every few days or weeks. However, for occasional hobbyists or less demanding tasks, sharpening your chisels every few months may suffice. The key is to develop a habit of inspecting your chisels and keeping them sharp to ensure enjoyable and precise woodworking experiences.
Summary
So, to summarize, when it comes to sharpening chisels, you’ll need a few key things. First, you’ll need a sharpening stone or diamond plate to sharpen the blade. Second, a honing guide will help you maintain the correct angle while sharpening. Third, a strop with honing compound will give your chisel a final polish. And finally, don’t forget safety goggles and a firm grip to keep yourself safe and in control. With these tools, you’ll be able to sharpen your chisels like a pro!
In conclusion, a sharpening stone, honing guide, strop, safety goggles, and proper grip are all essential for sharpening chisels effectively and safely. Remember, practice and patience are key to mastering this skill. So, get your tools ready, and start sharpening those chisels for your next woodworking project!