
When it comes to DIY projects and woodworking, one handy tool you might use is an orbital sander. But have you ever wondered when it’s time to change the sandpaper on your trusty orbital sander? Well, you’re in luck! In this article, we’ll give you the lowdown on when and how often you should change the sandpaper on your orbital sander to keep your projects smooth and your tool in top-notch condition!
Using the right sandpaper is crucial for achieving a flawless finish on your woodworking projects. So, let’s dive in and find out the answer to the question: when should you change the sandpaper on your orbital sander?
Changing the sandpaper on your orbital sander at the right time is key to maintaining its performance and ensuring quality results. In this article, we’ll explore the signs that indicate it’s time for a sandpaper swap and provide you with helpful tips to maximize your sanding efficiency. So let’s get started on this sandpaper adventure!
– When the edges of the sandpaper start to wear down.
– When the sandpaper becomes clogged with dust and debris.
– When the sandpaper no longer provides a smooth and consistent finish.
By regularly checking for these signs, you can ensure that you always have the right sandpaper for optimal sanding performance.
When to Change Sandpaper on Orbital Sander: A Comprehensive Guide
Orbital sanders are powerful tools that are commonly used in woodworking and other DIY projects. However, to ensure optimum performance and achieve the desired results, it is essential to know when to change the sandpaper on your orbital sander. In this article, we will provide you with a detailed guide on when and how to change the sandpaper, as well as important tips and considerations to keep in mind. So, let’s dive in!
Understanding the Lifespan of Sandpaper
Sandpaper is a crucial component of an orbital sander, as it is responsible for the actual sanding action. Over time, the sandpaper on your sander will become worn down and lose its effectiveness. The lifespan of sandpaper can vary depending on several factors, including the type of wood being sanded, the grit of the sandpaper, and the intensity of use. As a general rule of thumb, you should change the sandpaper on your orbital sander when it becomes dull or starts to lose its cutting power.
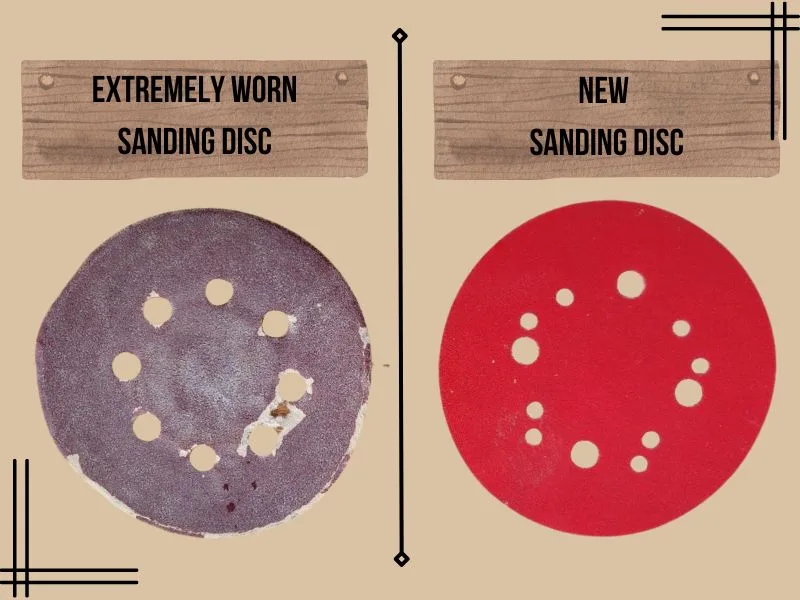
One way to determine if it’s time to change the sandpaper is by inspecting its surface. If you notice that the sandpaper is heavily worn, with visible signs of fraying or clogging, it is a clear indicator that it needs to be replaced. Additionally, if you find that the sander is not removing the desired amount of material or is leaving behind an uneven surface, these are also signs that the sandpaper needs to be changed.
It is important to note that even if the sandpaper appears to be in good condition, you should still periodically change it for optimal performance. Regularly replacing the sandpaper will ensure that you are achieving the best results and prolong the life of your orbital sander.
Factors that Influence Sandpaper Longevity
While the general rule is to change the sandpaper when it becomes dull or loses its cutting power, there are certain factors that can influence the lifespan of the sandpaper. Understanding these factors will help you determine when to change the sandpaper on your orbital sander more effectively:
- Type of Wood: Different types of wood have varying levels of hardness. Harder woods, such as oak or maple, can wear down sandpaper more quickly compared to softer woods like pine or cedar.
- Grit Size: The grit size of the sandpaper refers to the coarseness or fineness of the particles attached to the backing. Higher grit numbers indicate finer particles, which tend to wear down more slowly compared to lower grit numbers.
- Amount of Material to be Removed: If you are working on a project that requires heavy material removal, such as refinishing a significantly damaged surface, the sandpaper may wear down more quickly than when working on lighter projects.
- Pressure Applied: Excessive pressure applied to the sander can cause the sandpaper to wear down faster. It is important to apply even pressure and allow the sander to do the work without forcing it.
Considering these factors will give you a better understanding of the lifespan of the sandpaper and help you determine when it is necessary to change it.
Proper Maintenance and Care for Sandpaper
In addition to knowing when to change the sandpaper, proper maintenance and care play a crucial role in prolonging its lifespan. By following these tips, you can make your sandpaper last longer and maintain optimal performance:
- Keep it Clean: Cleaning the sandpaper during use can help prevent it from clogging, which can reduce its cutting power. You can use a cleaning stick, wire brush, or rubber sanding block to remove debris from the sandpaper surface.
- Rotate the Sandpaper: To ensure even wear, periodically rotate the sandpaper on your orbital sander. This will prevent excessive wear in one area and prolong the life of the sandpaper.
- Store Properly: When not in use, store your orbital sander and sandpaper in a clean and dry area. Exposure to moisture or dust can damage the sandpaper and reduce its effectiveness.
- Replace Damaged Sandpaper: If you notice any tears, rips, or significant damage to the sandpaper, it is best to replace it immediately. Damaged sandpaper can affect the smoothness of the sanding process and can potentially cause harm.
By following these maintenance tips, you can ensure that your sandpaper remains in good condition, allowing you to achieve optimal sanding results and extending its lifespan.
When to Change Sandpaper on Orbital Sander: Additional Considerations
Benefits of Regularly Changing Sandpaper
Regularly changing the sandpaper on your orbital sander offers several benefits, including:
- Improved Sanding Performance: Fresh sandpaper provides better cutting power, allowing you to achieve smoother and more consistent results.
- Reduced Sanding Time: Worn-out sandpaper will take more passes to remove the desired amount of material, increasing the time and effort required for the project.
- Prevents Damage to the Surface: Dull sandpaper or sandpaper that is clogged can cause uneven sanding, scratches, or damage to the surface you are working on.
- Cost Efficiency: By regularly changing the sandpaper, you can maximize its lifespan and avoid unnecessary expenses and additional trips to the hardware store.
Tips for Extending Sandpaper Lifespan
Here are a few additional tips to help you extend the lifespan of the sandpaper on your orbital sander:
- Start with a coarser grit: If your project requires multiple sanding stages, it is best to start with a coarser grit to remove the bulk of the material. This will reduce the strain on the finer grits and help them last longer.
- Use proper sanding technique: Applying excessive pressure or sanding in a random, haphazard manner can cause the sandpaper to wear down more quickly. Use smooth, even strokes and let the sander do the work.
- Invest in quality sandpaper: Choosing high-quality sandpaper can make a significant difference in its longevity. Opt for reputable brands that offer durability and consistent performance.
Frequently Asked Questions about Changing Sandpaper on Orbital Sanders
1. How often should I change the sandpaper on my orbital sander?
The frequency of changing the sandpaper can vary depending on usage, type of wood, and other factors. However, as a general guideline, it is recommended to change the sandpaper when it becomes dull, clogged, or shows signs of wear and tear.
2. Can I reuse sandpaper?
While it is possible to reuse sandpaper in certain cases, such as for lighter sanding tasks or if there is minimal wear, it is generally advisable to replace the sandpaper. Reusing worn-out sandpaper can result in uneven sanding and compromise the quality of your work.
3. Can I use different grits of sandpaper in the same sanding session?
Yes, using different grits of sandpaper in the same sanding session is common practice. Starting with a coarser grit to remove material and then progressing to finer grits for a smoother finish is often recommended.
4. What are signs that indicate the sandpaper needs to be changed?
Signs that indicate you need to change the sandpaper include loss of cutting power, clogging, fraying at the edges, visible wear, and an uneven or unsatisfactory sanding surface.
5. Can using dull sandpaper damage the material I am working on?
Yes, using dull sandpaper can potentially damage the material you are working on. Dull sandpaper can cause uneven sanding, scratches, or even gouges, compromising the quality of your project.
Remember, knowing when to change the sandpaper on your orbital sander will help you achieve optimal results and prolong the life of your sander. By following proper maintenance and care practices, you can ensure that your sandpaper remains in good condition and performs at its best. Happy sanding!
When to Change Sandpaper on Orbital Sander
Here are the key takeaways about when to change sandpaper on an orbital sander:
- Inspect the condition of the sandpaper regularly. If it’s worn out, torn, or no longer abrasive, it’s time to replace it.
- Pay attention to the sanding results. If the sander isn’t removing material efficiently or leaving a smooth finish, it may be due to worn-out sandpaper.
- Change the sandpaper if it gets clogged with debris or paint residue, as it will no longer be effective in sanding.
- An increase in vibration or unusual noise from the sander can indicate that the sandpaper is worn and needs to be replaced.
- Consider the project size and complexity. For larger or more demanding projects, it’s advisable to change the sandpaper more frequently to maintain optimal sanding performance.
Frequently Asked Questions
Are you wondering when it’s time to change the sandpaper on your orbital sander? Look no further! We’ve compiled the most common questions about this topic and provided detailed answers to guide you through the process. Read on to find out everything you need to know about changing sandpaper on an orbital sander.
1. How often should I change the sandpaper on my orbital sander?
The frequency of changing sandpaper on your orbital sander depends on several factors such as the type of project, the type of wood being sanded, and the condition of the sandpaper. As a general guideline, it is recommended to change the sandpaper every 3-4 hours of continuous use or when you notice a significant decrease in performance.
Keep an eye on the sandpaper for signs of wear and tear, such as clogging, loss of abrasive surface, or fraying edges. If you notice any of these signs or if the sandpaper becomes less effective in smoothing the wood, it’s time for a change. Regularly inspecting the sandpaper during your sanding sessions will help you determine when it needs to be replaced.
2. How can I tell if the sandpaper is worn out?
There are a few indicators that can help you determine if the sandpaper on your orbital sander is worn out. One important sign is the loss of abrasive surface. Over time, the sandpaper will become smoother and less coarse due to the friction against the wood surface. This will result in reduced effectiveness and slower sanding speeds.
Another indication is clogging. If the sandpaper becomes clogged with dust, debris, or wood particles, it will no longer be able to efficiently sand the surface. You may notice a decrease in performance, uneven sanding, or the sander struggling to remove material. Lastly, inspect the edges of the sandpaper. If they appear frayed or torn, it’s a clear sign that it’s time to change the sandpaper.
3. Can I reuse sandpaper on my orbital sander?
While it may be tempting to reuse sandpaper to save money, it is generally not recommended. Sandpaper gets worn down and loses its abrasive properties over time, which affects its sanding efficiency and overall performance. Reusing worn-out sandpaper can result in uneven sanding, lower quality finish, and potential damage to the surface being sanded.
If you’re working on a project that requires multiple grit levels, it’s best to have fresh sandpaper for each level to ensure the best results. By using new sandpaper, you’ll achieve a cleaner and more consistent sanding surface, leading to a smoother and more professional finish.
4. Are there any maintenance tips to extend the lifespan of sandpaper?
While sandpaper will eventually wear out and need to be replaced, there are a few maintenance tips that can help extend its lifespan. First, regularly clean the sandpaper during use by using a sanding pad cleaner or a stiff brush. This will remove excess dust and debris, preventing clogging and improving sanding efficiency.
Additionally, periodically rotate the sandpaper on the orbital sander to distribute the wear evenly. This can help prolong its usefulness and prevent premature wearing in one specific spot. Lastly, store your sandpaper in a dry and cool place to prevent it from moisture damage or warping, which can affect its performance.
5. What are the different types of sandpaper for orbital sanders?
There are various types of sandpaper available for orbital sanders, each designed for different purposes and materials. The most common types include aluminum oxide, silicon carbide, and zirconia alumina. Aluminum oxide is a versatile option suitable for general sanding purposes, while silicon carbide works well for sanding harder materials like metals and stone.
Zirconia alumina is a durable and long-lasting option, ideal for heavy-duty sanding tasks. Additionally, sandpaper comes in different grit sizes, ranging from coarse to fine. Coarser grits (lower numbers) are used for heavy material removal, while finer grits (higher numbers) are used for achieving a smooth finish. Select the appropriate sandpaper type and grit size based on the specific requirements of your project.

Summary
So, now you know when to change the sandpaper on your orbital sander. Here are the key points:
1. Pay attention to the condition of the sandpaper. If it’s worn, torn, or no longer cuts effectively, it’s time to replace it.
2. Keep an eye out for clogged sandpaper. If it’s not removing material efficiently, clean or replace it.
3. Check for signs of burning or scorching. If the sandpaper is leaving burn marks on your workpiece, change it immediately.
4. Remember to choose the right grit for your project. Use lower grits for rough sanding and higher grits for fine finishing.
By following these guidelines, you can ensure that your sandpaper is always in top shape and get the best results from your orbital sander. Happy sanding!